- Divide the class into teams of two or three students each. Hand out the materials.
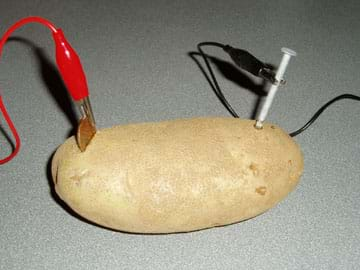
- Direct groups to carefully place the zinc nails and copper pennies into the potato. Make sure the two different metals do not touch each other in the potato (see Figure 1).
- Connect one alligator clip to the end of the penny sticking out of the potato and another alligator clip to the end of the nail sticking out of the potato (see Figure 1).

- (If you have a multimeter) Tell students that a multimeter is an instrument that measures current, voltage and resistance of a circuit, and is a tool (created by and) often used by engineers. Set the multimeter on a low "DC volts" scale for voltage and "DC milliamps" for current, so students can see the charge that one potato can produce. Expect the potato to produce just less than 1 volt. Encourage students to convert the decimal readout from the multimeter to a fraction (for example, 0.82 volts = 82/100 volts).
- Have the students figure out how many potatoes they need to light their LED clock (or clock). For example, if their potato produces a voltage of 0.8 volts, then they may need two potatoes to power a 1.5 voltage LED.
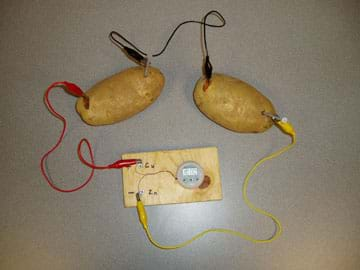
- Have students experiment to figure out how to connect two potatoes together. To connect two potatoes in series, place a penny and nail into a second potato, and connect the wire from the zinc nail in the first potato to the copper penny in the second. Then, add a third wire to the zinc nail in the second potato. Always remember to connect the copper (positive) end of the potato (battery) to the zinc (negative) end of the next potato (see Figure 2).

- Expect two potatoes in series to be able to light an LED; however, you might need three. Show students how to connect the LEDs to the potato in the correct manner, that is, the positive end of the LED to the negative end of the potato battery (zinc nail) and the negative end of the LED to the positive end of the potato battery (copper penny).
- Have students discuss how the potatoes provide the electrolyte (solution) for the chemical battery to work. Ask for suggestions of other foods we could try (for example, lemons, berries, apples).
- Ask students to complete the worksheet either individually or in pairs. After they finish, have them compare answers with a peer or another pair, giving all students time to finish.
Troubleshooting Tips
If
the LED clock, light or small light bulbs do not work, check the setup
of the potato battery. Perhaps the ends are not all connected from
negative to positive, or perhaps there is not enough potato voltage.
Check the voltage of the potato using a multimeter or voltmeter. Another
possibility is having enough voltage, but not enough current to light
the bulb, which is why it is recommended to use only very low-volt LED
clocks or bulbs.
Lemons and oranges also work well for this
activity. They work best if you first roll them on a table top, which
breaks down the cells inside so more juice flows through the fruit
(current).
Some people have more conduction success using copper strips instead of copper pennies.
Soaking the potatoes in Gatorade overnight can make them more conductive.
No comments:
Post a Comment