Electric vehicle design is a complex concept. Here's a look at the heart of every EV: the battery.
from All About Circuits Technical Articles https://ift.tt/2Kfvqzt
Wednesday, 31 July 2019
The Demand of Electric Vehicles Presents New Challenges for Engineers
EVs are hitting the road more and more—what does that mean for engineers being asked to work in automotive applications?
from All About Circuits News https://ift.tt/2GESqqL
from All About Circuits News https://ift.tt/2GESqqL
How to change entry point Transponder of Tatasky
Tatasky change his home transponder frequency
Due to this reason some Tatasky user unable to get signal in his set top box
Here I show you how to change the home transponder frequency and run it as well as.
Step 1Due to this reason some Tatasky user unable to get signal in his set top box
Here I show you how to change the home transponder frequency and run it as well as.
- First time installation settings
- Choose language then select ok

Step 2
- Lnb settings
- Lnb type - Universal

- Choose a transponder to configure
- Change transponder downward which from this have permission for edit entry point select this
Press ok to Next Screen
Step 4
 |
- Signal setting
- Enter frequency 11050
- Select Polarization Horizontal
- Enter Symbol Rate 32720
- Select fec 2/3
- Ok to Next Screen

Step 5
- Now signal locked
- Press Ok to Next screen

Step 6

- If you cant able to get this first step
- on your Tatasky Remote goto Organiser
- Select System settings Ok
- Press 0 and 1
- Then Ok
- Now goto Sattelite Settings
- Then Ok
You can see this complete video for any doubt
Tech Helping In Improving Health And Saving Lives
 Lab-on-a-chip detects cancer faster, cheaper and less invasively A new ultrasensitive diagnostic device invented by the researchers at University of Kansas, University of Kansas Cancer Center and KU Medical Center could allow doctors to detect cancer quickly from a droplet of blood or plasma, leading to timelier interventions and better outcomes for patients. The lab-on-a-chip […]
The post Tech Helping In Improving Health And Saving Lives appeared first on Electronics For You.
from Electronics For You https://ift.tt/2SSvY2l
Basics Of Inductor
 In this video, the presenter will be sharing you a brief introduction on Inductors. The basics of how inductors work, a demo showing an inductor filtering out high-frequency signals, a quick low pass LC filter, and a demo showing the magnetic field created around inductors. Courtesy: Afrotechmods
The post Basics Of Inductor appeared first on Electronics For You.
from Electronics For You https://ift.tt/2GFq3IS
Tuesday, 30 July 2019
pH Monitoring and Control Systems
What are pH monitoring systems and how are they applied in control systems?
from All About Circuits Technical Articles https://ift.tt/2YC1qHe
from All About Circuits Technical Articles https://ift.tt/2YC1qHe
Maxim Integrated’s Newest Clinical-Grade Sensors Claim High Accuracy and Low Power for Wearables
Maxim claims their newest temperature sensor and heart-rate monitor are "lowest-power" with clinical-grade accuracy.
from All About Circuits News https://ift.tt/2KdLMZF
from All About Circuits News https://ift.tt/2KdLMZF
In a $1 Billion Deal, Apple and Intel Divide the 5G World
Apple has offered $1 billion to Intel for a majority share of its modem chip business.
from All About Circuits News https://ift.tt/2MqmsCk
from All About Circuits News https://ift.tt/2MqmsCk
Distance Counter
 Presented here is a simple pedometer (Distance Counter) circuit. It measures the distance covered by you while walking. It may not work very well for running! Circuit and working Fig. 1 shows a circuit diagram of the distance counter. The circuit is built around quad 2-input Schmitt trigger CD4093 (IC1), CMOS ripple carry binary counter/divider […]
The post Distance Counter appeared first on Electronics For You.
from Electronics For You https://ift.tt/2LReBya
Monday, 29 July 2019
3D Printing Electronic Components? Nano Dimension Releases DragonFly LDM Manufacturing Platform
DragonFly LDM extends the scope of 3D printing to the unattended, low-volume manufacturing of electronic circuitry.
from All About Circuits News https://ift.tt/2ZjM9Ip
from All About Circuits News https://ift.tt/2ZjM9Ip
Alibaba’s Semiconductor Subsidiary Will Utilize Open-Source RISC-V Core
Alibaba is set to produce the next generation of Chinese processors with the RISC-V instead of Arm architecture.
from All About Circuits News https://ift.tt/2KcGb5E
from All About Circuits News https://ift.tt/2KcGb5E
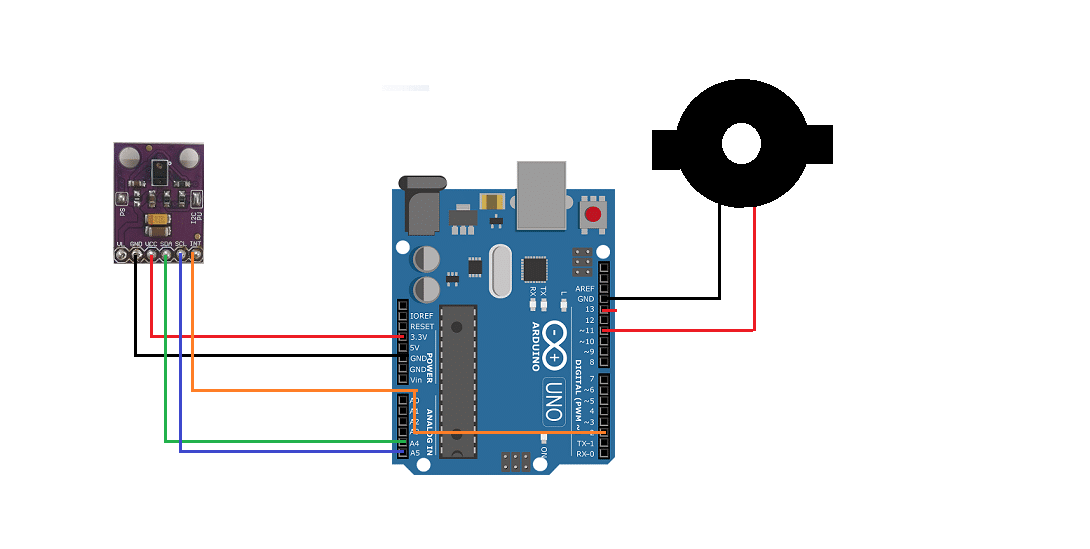
Build Non-Contact Type Digital Tachometer
 A tachometer measures the rotation speed of motors and other machinery. There are various types of tachometers. Described here is a digital non-contact type tachometer using a proximity sensor. Circuit and working The circuit diagram of the Arduino-based tachometer is shown in Fig. 1. It is built around Arduino Uno board (Board1), inductive pnp-type normally-open […]
The post Build Non-Contact Type Digital Tachometer appeared first on Electronics For You.
from Electronics For You https://ift.tt/312qFjy
Sunday, 28 July 2019
Mouser IOT Roadshow 2019 Concludes With a Housefull Bangalore Event
 Engineers thronged the event resulting in a hall bursting at the seams with electronics engineers passionate about IoT in general, and Smart Cities, Factories & Energy in particular. Bangalore, 26 July 2019 — Mouser Electronics, Inc, today concluded its 6-city roadshow with a grand event at Taj, MG Road, Bangalore. The Mouser IoT Technical Roadshow […]
The post Mouser IOT Roadshow 2019 Concludes With a Housefull Bangalore Event appeared first on Electronics For You.
from Electronics For You https://ift.tt/32WjN9k
Saturday, 27 July 2019
Power Integrations Releases 95%-Efficient, GaN-Based InnoSwitch3 Range of ICs
This week, Power Integrations has released their latest family of flyback switcher ICs that integrate GaN technology for more efficient power applications.
from All About Circuits News https://ift.tt/2JZA2Ls
from All About Circuits News https://ift.tt/2JZA2Ls
Real-Time Face Detection and Recognition for Security Purposes
 This article demonstrates real-time training, detection and recognition of a human face with OpenCV using the Eigenface algorithm. There are various biometric security methodologies including iris detection, voice, gesture and face recognition, and others. Among these, face recognition plays a vital role and is one of the emerging technologies for security applications. To begin with, […]
The post Real-Time Face Detection and Recognition for Security Purposes appeared first on Electronics For You.
from Electronics For You https://ift.tt/2GtyeYD
Friday, 26 July 2019
Vesper Releases New MEMS VM3000 Microphone
Vesper has announced their first piezoelectric digital MEMS microphone for audio applications in voice recognition.
from All About Circuits News https://ift.tt/2OgkK8X
from All About Circuits News https://ift.tt/2OgkK8X
14 Helpful eBooks On MATLAB!
 These 15 ebooks cater to everyone from students, freshman and engineers. Happy reading!! 1. Numerical Computing with Matlab Author: by Cleve B. Moler Publisher: SIAM, 2004 This textbook provides an introductory course in numerical methods, MATLAB, and technical computing. It emphasis on explaining the use of mathematical software. The book has used computer graphics, including […]
The post 14 Helpful eBooks On MATLAB! appeared first on Electronics For You.
from Electronics For You https://ift.tt/2OkwGqu
PC-based Oscilloscope Using Arduino
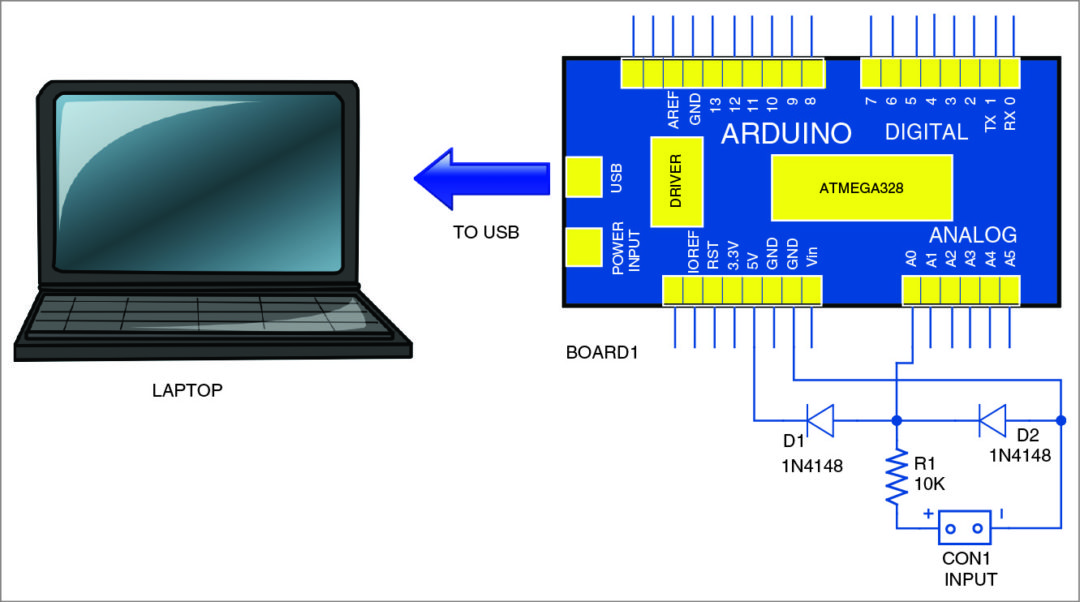 Oscilloscopes are an essential tool for electronics hobbyists and professionals to verify that their designs would work as expected. PC based Oscilloscope score over standalone oscilloscopes due to their compact size, low cost and ability to do offline analysis. Here we describe how you can make your own oscilloscope at a very low cost using […]
The post PC-based Oscilloscope Using Arduino appeared first on Electronics For You.
from Electronics For You https://ift.tt/2Mi2lpM
Thursday, 25 July 2019
In Storage Industry, Highest Capacity Of Yesterday Is Already Today’s Lowest Capacity
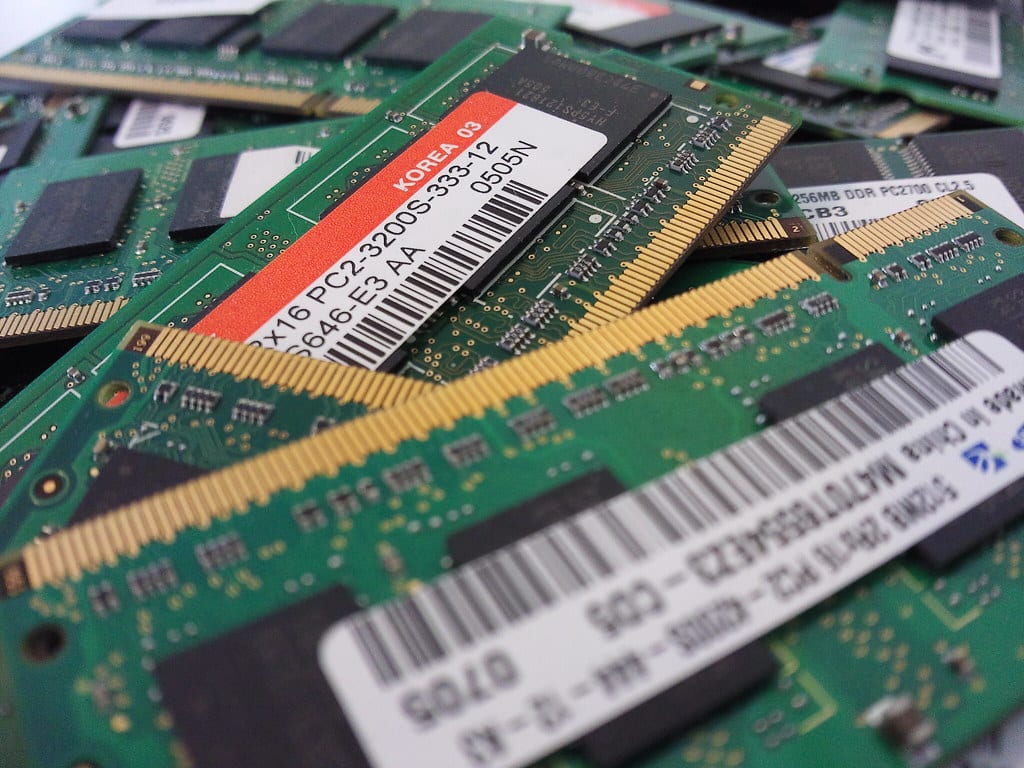 We live in a world which is run on memory and storage, a day without it would be a nightmare. Kingston has been one such company that has been providing its memory products for the past 30 years. Kingston Solutions Inc (KSI), a subsidiary of Kingston Technology Corporation is an established global provider of embedded […]
The post In Storage Industry, Highest Capacity Of Yesterday Is Already Today’s Lowest Capacity appeared first on Electronics For You.
from Electronics For You https://ift.tt/30VK45D
SiTime Introduces Rugged Endura MEMS Oscillators for Military and Aerospace Applications
Learn about SiTime's newest MEMS oscillators.
from All About Circuits News https://ift.tt/2JQOvsK
from All About Circuits News https://ift.tt/2JQOvsK
InnoPhase Wants to Move RF Circuitry Away from Analog
InnoPhase wants to change digital radio architecture. Here's a look at the why and how.
from All About Circuits News https://ift.tt/2MaUIkS
from All About Circuits News https://ift.tt/2MaUIkS
Raspberry Pi Based Vehicle Starter on Face Detection
Download Project Document/Synopsis A vehicle key is the only way to start the car or to provide ignition to the engine. The face recognition-based car starter system literally replaces the car ignition by replacing the key with specific user face. This smart vehicle system is powered by raspberry pi circuit. Here, the face detection system […]
The post Raspberry Pi Based Vehicle Starter on Face Detection appeared first on Nevon Projects.
from Nevon Projects https://ift.tt/30Zr8Tx
How To Calculate The Maximum Power Output From A Solar Panel?
 This video demonstrates calculating the maximum power output from a solar panel and discusses determining the optimum resistive load for a solar panel. Courtesy: ScienceOnline
The post How To Calculate The Maximum Power Output From A Solar Panel? appeared first on Electronics For You.
from Electronics For You https://ift.tt/2LGlPF3
Wednesday, 24 July 2019
What Does It Mean for an SoC to Be Secure? A Closer Look at the Wireless Gecko Series 2
What makes a secure SoC actually... secure? Check out this overview of hardware-based security features in a real-world example IC.
from All About Circuits News https://ift.tt/2y9Lddy
from All About Circuits News https://ift.tt/2y9Lddy
RFID-Based Automatic Desktop/Mobile Phone Login Device
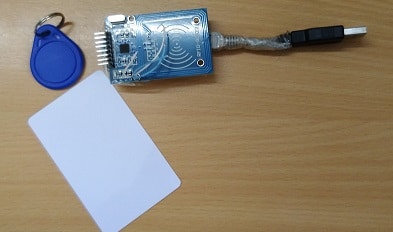 We have so many login passwords to remember in order to access our laptops, emails or online banking. And forgetting password is something that we often face, and when we are in an urgent situation, it is quite annoying. With cameras all around today, it is also not safe to type our password in public […]
The post RFID-Based Automatic Desktop/Mobile Phone Login Device appeared first on Electronics For You.
from Electronics For You https://ift.tt/2Madlpm
Tuesday, 23 July 2019
Secure Microcontrollers Address IoT Security
Security is increasingly something EEs need to be cognizant of in their component choices. Here's an overview of three secure microcontrollers.
from All About Circuits News https://ift.tt/2M5mYp6
from All About Circuits News https://ift.tt/2M5mYp6
Speed Control Of DC Motor Using Pulse-Width Modulation
 Pulse-width modulation (PWM) or duty-cycle variation methods are commonly used in speed control of DC motors. The duty cycle is defined as the percentage of digital ‘high’ to digital ‘low’ plus digital ‘high’ pulse-width during a PWM period. Fig. 1 shows the 5V pulses with 0% through 50% duty cycle. The average DC voltage value […]
The post Speed Control Of DC Motor Using Pulse-Width Modulation appeared first on Electronics For You.
from Electronics For You https://ift.tt/2y4MN0w
Communication And Internet Technology: How It All Began (Part 1 of 6)
 According to Wikipedia, the Internet (or, interconnected network) is the global system of interconnected computer networks that use the Internet protocol suite (TCP/IP) to link devices worldwide. It is a network of networks that consists of private, public, academic, business and government networks of local to global scope, linked by a broad array of electronic, […]
The post Communication And Internet Technology: How It All Began (Part 1 of 6) appeared first on Electronics For You.
from Electronics For You https://ift.tt/2YcS9RU
Waste and Garbage Recycling Vending Machine Project
Download Project Document/Synopsis Nowadays with the increasing quantity of waste generated and restricted lowland house for waste disposal, utilization is one in all the necessary approaches to manage the waste effectively. Concern over the atmosphere is being seen as a massive increase in recycling globally that has full-grown to be a vital a part of […]
The post Waste and Garbage Recycling Vending Machine Project appeared first on Nevon Projects.
from Nevon Projects https://ift.tt/2LCItOQ
Air Powered Mini Wall Climbing Robot Project
Download Project Document/Synopsis The climbing robot comprises of two limbs. Each limb has 4 suction cups. The suction cups are used to stick on to the surfaces. The air removal from suction cups is completed using a vacuum pump, controlled by solenoid valves. A microcontroller is used to control the relays that in turn switch […]
The post Air Powered Mini Wall Climbing Robot Project appeared first on Nevon Projects.
from Nevon Projects https://ift.tt/32KSPS4
Monday, 22 July 2019
Understanding Schematics
If you're looking to get a better handle on how to read schematics, this helpful guide will give you a head start.
from All About Circuits Technical Articles https://ift.tt/32MQOVx
from All About Circuits Technical Articles https://ift.tt/32MQOVx
Health Monitoring System using 7-Segment Display & Atmega Microcontroller
Download Project Document/Synopsis This health monitoring system is a very useful system, which can be used to monitor the health parameters of the patient. This system continuously monitors the heart rate and the temperature reading of the patient. In this health monitoring system project, we use two 7 segment modules to display the parameters, as […]
The post Health Monitoring System using 7-Segment Display & Atmega Microcontroller appeared first on Nevon Projects.
from Nevon Projects https://ift.tt/2JRQcVO
New App Tool for Augmented Reality PCB Design Enters Beta
Ever wish you could see your design file layers overtop your spun board? Augmented reality may make that possible in real time.
from All About Circuits News https://ift.tt/2LAuHMG
from All About Circuits News https://ift.tt/2LAuHMG
Advancing AIoT, Innovating The Tech Future
 TAITRONICS and AIoT Taiwan, the “must-visit” professional trade shows for unlimited opportunities in Electronics! The global electronics industry is moving from simple mass production, technology-oriented development mode to multi-integrations of innovative applications and customized manufacturing and services. According to the latest forecast by Gartner, worldwide IT spending is projected to total $3.8 trillion in 2019, […]
The post Advancing AIoT, Innovating The Tech Future appeared first on Electronics For You.
from Electronics For You https://ift.tt/2StW8bv
Make This Simple Graphical LCD Scope
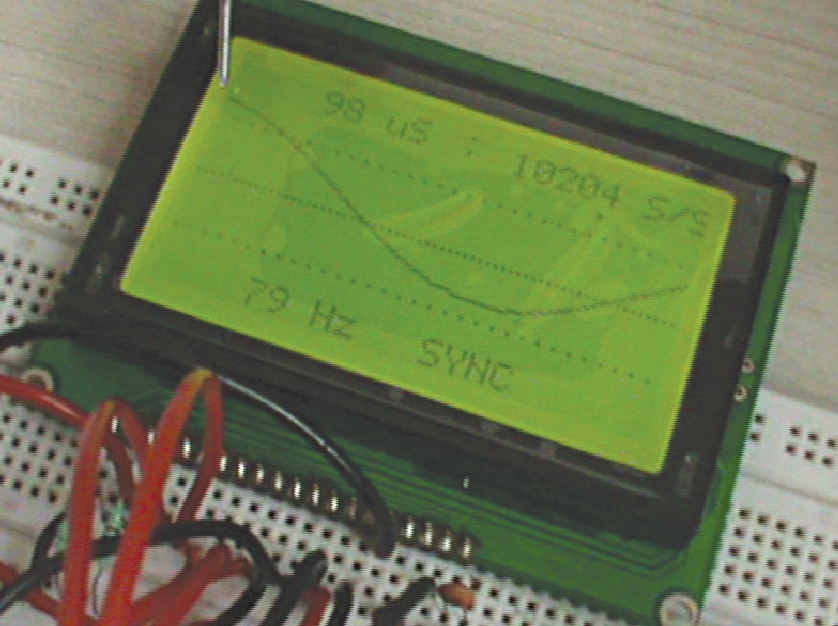 This scope reads input signal and displays the output waveform on a graphical liquid crystal display (GLCD) having 128×64-pixel resolution. The signal is fed to ADC pin of ATmega16 microcontroller (MCU) through an operational amplifier (LM358). The ADC continuously reads the input voltage with preset delay and displays the same on GLCD scope. This circuit […]
The post Make This Simple Graphical LCD Scope appeared first on Electronics For You.
from Electronics For You https://ift.tt/2XYMZ0r
Friday, 19 July 2019
Why Raspberry Pi Isn’t a Good Choice for Commercial Products
RPi has done some amazing good in the world, especially for aspiring young engineers, but here's the breakdown on why it's probably not what you need for a professional project.
from All About Circuits Technical Articles https://ift.tt/2O6HTuB
from All About Circuits Technical Articles https://ift.tt/2O6HTuB
Bio-Inspired Wearable Fabric Sensor Takes Notes from Octopus Suckers
Researchers from a Korean university have studied octopus to learn how to make better stick-on wearable sensors.
from All About Circuits News https://ift.tt/32FBwl5
from All About Circuits News https://ift.tt/32FBwl5
Force-Operated Toy Organ
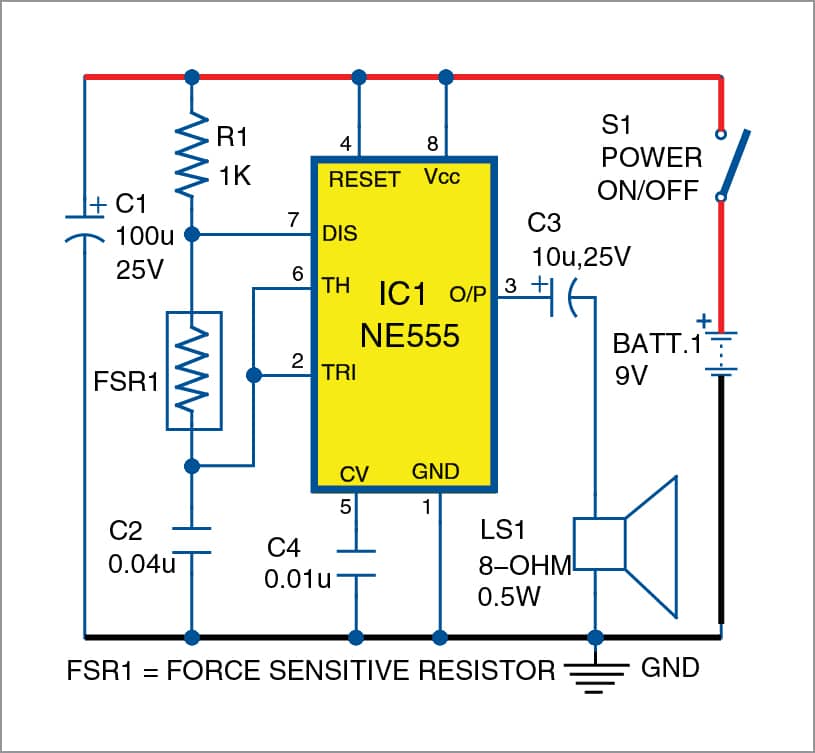 This toy organ for children uses a readily-available force-sensitive resistor (FSR) and an NE555 timer IC. Resistance of the FSR varies with the amount of force or pressure being applied on its surface to play the toy organ. Circuit and working The circuit diagram of the force-operated toy organ is shown in Fig. 1. It […]
The post Force-Operated Toy Organ appeared first on Electronics For You.
from Electronics For You https://ift.tt/2GlqQi5
Marvels Of The Emerging Healthcare Technologies
 From small innovations like fitness bands to larger, more complex technologies like artificial organs and robotic prosthetic limbs, technology is laying the path for accurate health treatments. Technology helps doctors make sure the right patient receives the right treatment at the right time. Technologies like augmented reality (AR), virtual reality (VR), artificial intelligence (AI), blockchain, […]
The post Marvels Of The Emerging Healthcare Technologies appeared first on Electronics For You.
from Electronics For You https://ift.tt/2xTeE3l
Thursday, 18 July 2019
AI Hardware Roundup: Neuromorphic Chips and Neural Network SoCs
AI algorithms take a lot of resources to function. What hardware can handle running them on the edge?
from All About Circuits News https://ift.tt/2JFy7eS
from All About Circuits News https://ift.tt/2JFy7eS
Wednesday, 17 July 2019
Analyzing the Moog Filter
Learn about one of the only audio filter topologies out there, the Moog filter!
from All About Circuits Technical Articles https://ift.tt/2Yh6G3b
from All About Circuits Technical Articles https://ift.tt/2Yh6G3b
The University of Michigan has Developed a Computer Based on the Memristor
AI on a smartphone? U of M researchers open the door to localized AI processing, even on portable devices.
from All About Circuits News https://ift.tt/2xOZtbz
from All About Circuits News https://ift.tt/2xOZtbz
Wireless LCD Display Via Bluetooth
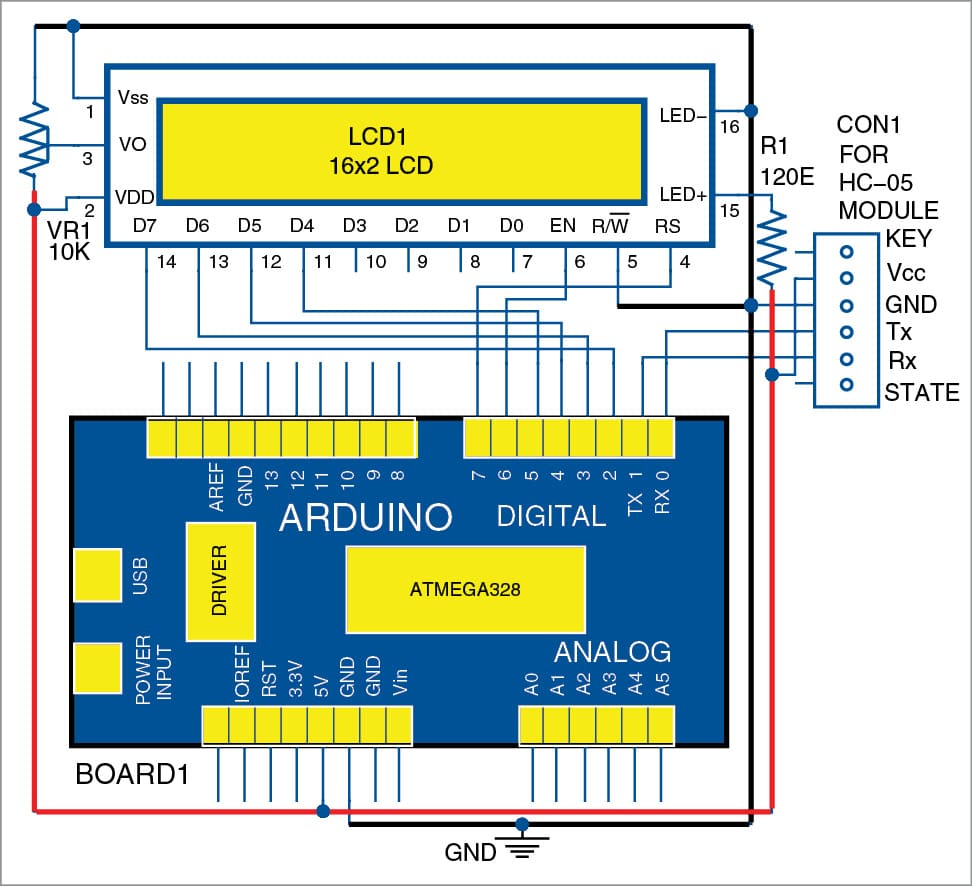 This wireless LCD display shows information sent from a smartphone. The user can send text messages with up to 32 alphanumeric characters to the LCD within Bluetooth range of about 10 metres. This project can be extended and implemented in many ways for: 1. Educational organisations (schools and colleges). To inform any changes in the […]
The post Wireless LCD Display Via Bluetooth appeared first on Electronics For You.
from Electronics For You https://ift.tt/2rBFXf6
Mobile Apps For Fitness And Other Uses
 Scan the QR codes to download the apps based on the operating system of your device. Samsung Health Updated: March 2019 Platforms: Android and iOS Download: Full version (free) Samsung Health is a fitness app that can record and analyse daily activities, diet and habits to help maintain a healthy lifestyle. The app can track […]
The post Mobile Apps For Fitness And Other Uses appeared first on Electronics For You.
from Electronics For You https://ift.tt/2Lplcja
Software For Healthcare And Design Applications
 FieldTrip Visit: Website Full version: Free In medical electronics, FieldTrip can be used for advanced brain analysis methods like electro-encephalography (EEG) or magneto-encephalography (MEG). It is a MATLAB software toolbox developed by the reasearch team at Donders Institute for Brain, Cognition and Behaviour in the Netherlands. The toolbox can monitor invasive electrophysiological data like time-frequency analysis, […]
The post Software For Healthcare And Design Applications appeared first on Electronics For You.
from Electronics For You https://ift.tt/30Kv76H
Tuesday, 16 July 2019
Microchip Announces Smart Embedded Vision Initiative for Machine Vision System Design
Using Microsemi PolarFire FPGAs, the new program aims to enable compact, high-bandwidth, low-power system design.
from All About Circuits News https://ift.tt/2kd4O9q
from All About Circuits News https://ift.tt/2kd4O9q
Monday, 15 July 2019
Design and Fabrication of Pedal Powered Washing Machine
Download Project Document/Synopsis Garments and clothes are washed by hands or by using powered laundry washing machines. Washing machines are one of the most useful devices in households as well as some commercial industries and hospitals. Over the years, this has been either a very strenuous and time-consuming or an expensive method. A washing machine […]
The post Design and Fabrication of Pedal Powered Washing Machine appeared first on Nevon Projects.
from Nevon Projects https://ift.tt/2jZBOSE
Mini Hydraulic Hand Operated JIB Crane
Download Project Document/Synopsis Jib Crane is a small lifting, and material handling equipment used in engineering workshops as well as in Godowns & Warehouses. Jib Cranes is used for lifting various style of materials within the segments wherever frequent lifting & handling of material activity is needed. This material handling Jib Cranes is manually operated. […]
The post Mini Hydraulic Hand Operated JIB Crane appeared first on Nevon Projects.
from Nevon Projects https://ift.tt/2lsvd3b
The Benefits and Potential Drawbacks of the Switch to 5G Antennas
5G is the latest wireless technology for mobile devices and promises considerably higher data rates, lower latency, and increased number of instantaneous connections. But how will current infrastructure cope with the change and what will this mean to current 4G hardware?
from All About Circuits News https://ift.tt/2NZqsfs
from All About Circuits News https://ift.tt/2NZqsfs
Intel Introduces Pohoiki Beach, a New 64-Chip Neuromorphic System
Based on the Loihi research chip, Intel's new system is capable of simulating 8-million neurons.
from All About Circuits News https://ift.tt/30zdUwE
from All About Circuits News https://ift.tt/30zdUwE
ESP32 LoRa Gateway
 In a boiler safety project, we completed, in which we are collecting 32 thermocouple readings from the deep of a 500 MW boiler 2nd pass area where the ambient temperature on a normal day runs 65 to 70 Degree Centigrade due to hot are leakages in the vicinity of the spot. However, the thermocouples need […]
The post ESP32 LoRa Gateway appeared first on Electronics For You.
from Electronics For You https://ift.tt/30Cv9Nx
ESP32 (Non-Standard) GPS receiver
 Introduction GNSS – GG-1802 ($5 a piece) Sometimes things do not fall in place and we curse ourselves for taking the wrong turn or making the wrong choices. But in P B Shelly’s word the real perspective later for those situations could be like this… We look before and after / And pine for what […]
The post ESP32 (Non-Standard) GPS receiver appeared first on Electronics For You.
from Electronics For You https://ift.tt/2SiSzod
Digital Frequency Meter Using Arduino
 This article describes the implementation of a digital frequency meter using Arduino Uno to determine the sinusoidal frequency signal in the range of 20Hz to 5kHz. The logic involves counting the total number of pulses per second that appear at a digital pin of Arduino. The authors’ prototype is shown in Fig. 1. Block diagram […]
The post Digital Frequency Meter Using Arduino appeared first on Electronics For You.
from Electronics For You https://ift.tt/2NYcIBE
Sunday, 14 July 2019
Statistical Noise Analysis: An Introduction
This article is an intuitive introduction to the statistical nature of noise and the basic calculations required to combine noise sources in a circuit.
from All About Circuits Technical Articles https://ift.tt/2JwWtak
from All About Circuits Technical Articles https://ift.tt/2JwWtak
Saturday, 13 July 2019
Dr. Neal Koblitz: Independent Co-creator of Elliptic Curve Cryptography
Neal Koblitz and Victor Miller independently co-discovered elliptic-curve cryptography. In this interview with Dr. Koblitz, we learn about his life and passion for mathematics.
from All About Circuits News https://ift.tt/2LQhZIT
from All About Circuits News https://ift.tt/2LQhZIT
Electronic Pill, The Holy Grail Of Healthcare Technology
 Innovative digital devices making smart use of personalised data will bring about a revolution in healthcare technology. While there are many difficulties and barriers to their adoption, these excuses can no longer stop us from embracing technologies that could have a positive impact on our lives. With the ever-growing susceptibility of masses to diseases in […]
The post Electronic Pill, The Holy Grail Of Healthcare Technology appeared first on Electronics For You.
from Electronics For You https://ift.tt/2jI2wPw
Friday, 12 July 2019
Hardware Security Vulnerabilities that Engineers Should Know
Why should engineers care about hardware security? Because they can help prevent vulnerabilities through design!
from All About Circuits Technical Articles https://ift.tt/2JvjdHK
from All About Circuits Technical Articles https://ift.tt/2JvjdHK
New Low-Power e-Paper Displays from Pervasive Displays Feature Yellow e-Ink
The new large-format, tri-color devices display images and text in yellow, as well as in black and white.
from All About Circuits News https://ift.tt/2Gb5e7T
from All About Circuits News https://ift.tt/2Gb5e7T
Chennai Edition of Sold-out Mouser IOT Roadshow 2019 Concludes Today
 Amazing sessions around Smart Factories & Smarter Buildings enthralled visitors featuring some of the best electronics and embedded engineers in Chennai. Chennai, 12 July 2019 — Mouser Electronics, Inc, today concluded the Chennai edition of its 6-city roadshow on IoT. Mouser IoT Technical Roadshow has been a popular annual event that travels through top cities […]
The post Chennai Edition of Sold-out Mouser IOT Roadshow 2019 Concludes Today appeared first on Electronics For You.
from Electronics For You https://ift.tt/32mVEs9
Thursday, 11 July 2019
Principles of Cache Design
This article will examine principles of CPU cache design including locality, logical organization, and management heuristics.
from All About Circuits Technical Articles https://ift.tt/2Lgozcc
from All About Circuits Technical Articles https://ift.tt/2Lgozcc
ROHM’s Smart City Sensor Module Detects Earthquakes—But the Real Star Is the Algorithm
Built with inexpensive hardware components, ROHM's algorithm-based module has built-in false detection function.
from All About Circuits News https://ift.tt/2YXypTe
from All About Circuits News https://ift.tt/2YXypTe
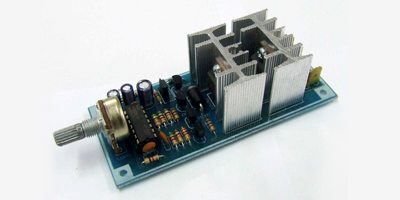
10-Watt Audio Amplifier Using LM1875
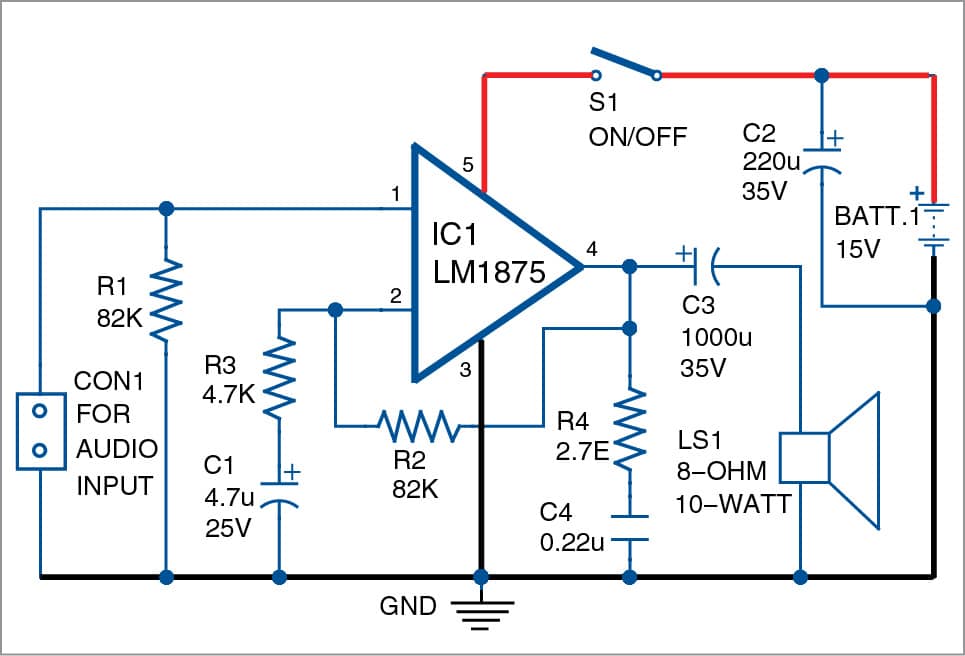 Here is a simple 10-watt audio amplifier using IC LM1875. The IC has five pins and can deliver a maximum of 18-watt output power depending upon the supply voltage and load. The author’s prototype is shown in Fig. 1. Circuit and working The circuit diagram of the audio amplifier is shown in Fig. 2. It […]
The post 10-Watt Audio Amplifier Using LM1875 appeared first on Electronics For You.
from Electronics For You https://ift.tt/2w0NQNv
Dual Audio Level Shifter and Buffer for ADCs, MCU Kits and Arduino
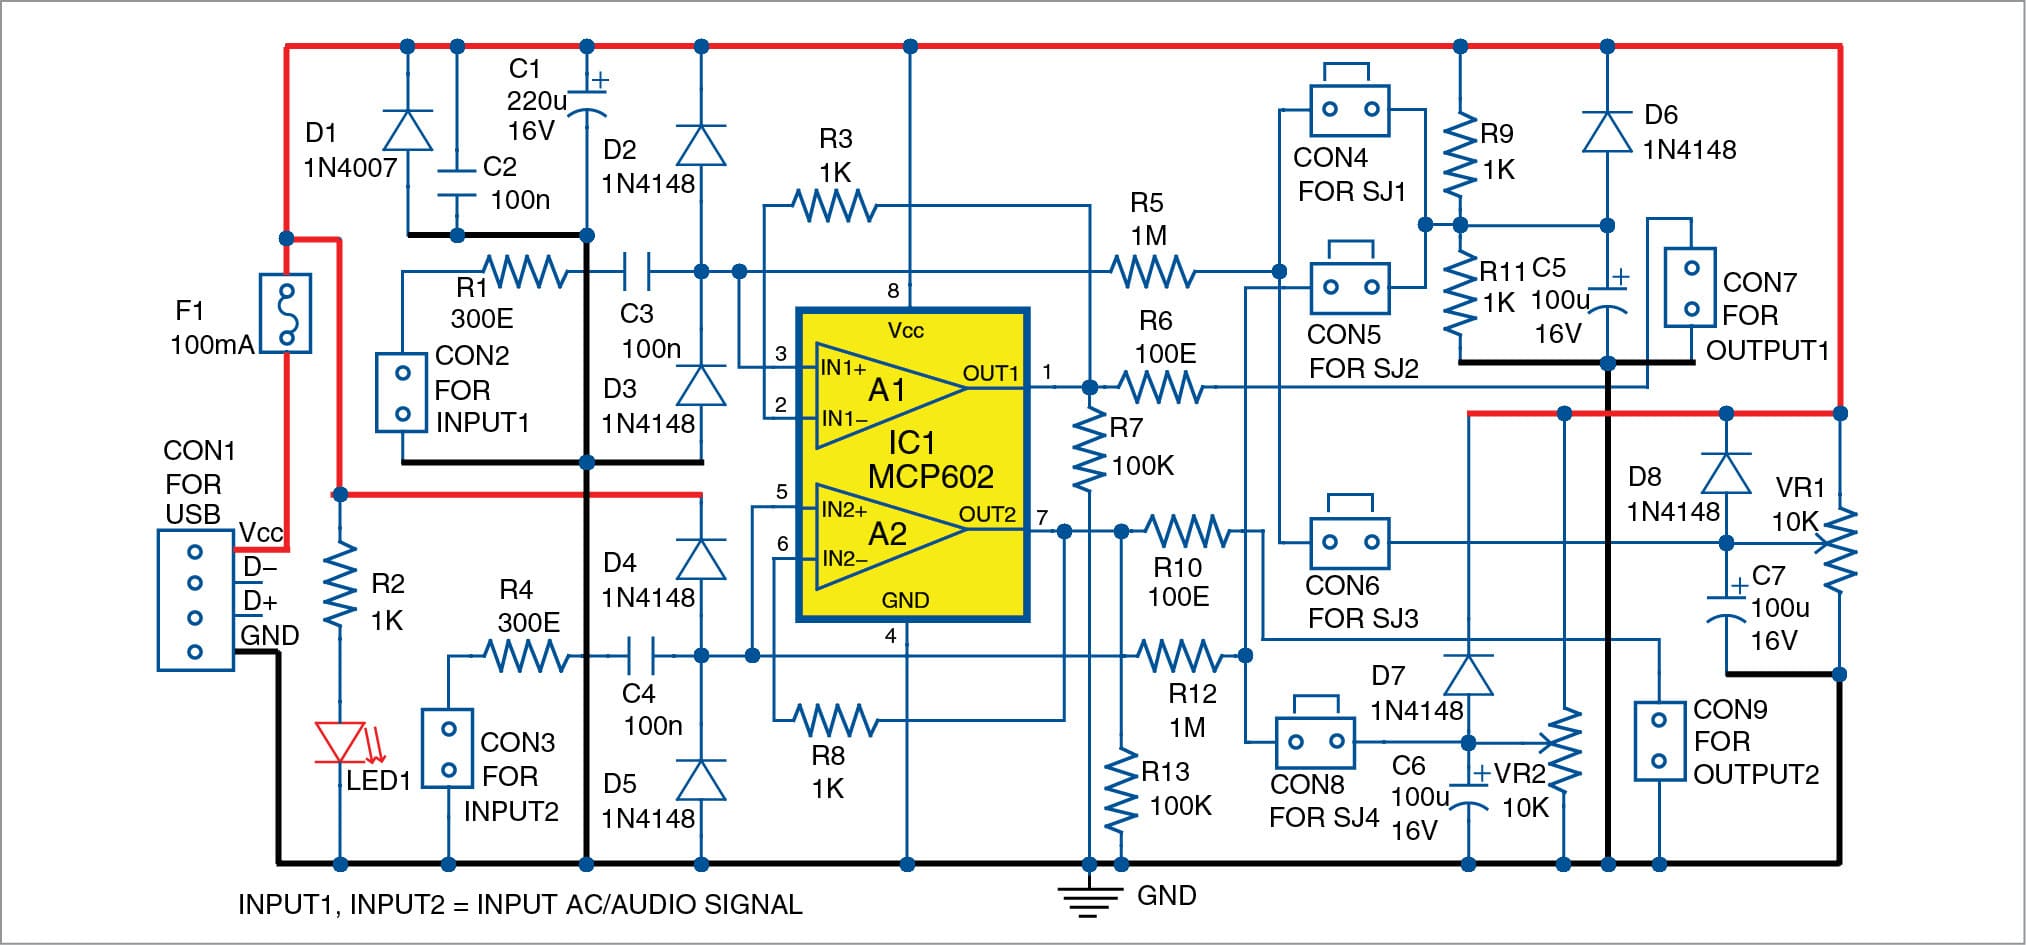 Many single-ended analogue signals do not have DC components or appropriate DC offsets. Due to that, these require very high input resistance for analogue-to-digital converter (ADC) inputs. This simple universal dual level shifter and buffer for AC and audio signals can be used for ADCs, MCU kits and Arduino. It does not need any special […]
The post Dual Audio Level Shifter and Buffer for ADCs, MCU Kits and Arduino appeared first on Electronics For You.
from Electronics For You https://ift.tt/2pzwB32
Control With Authentication For Up To Four Devices
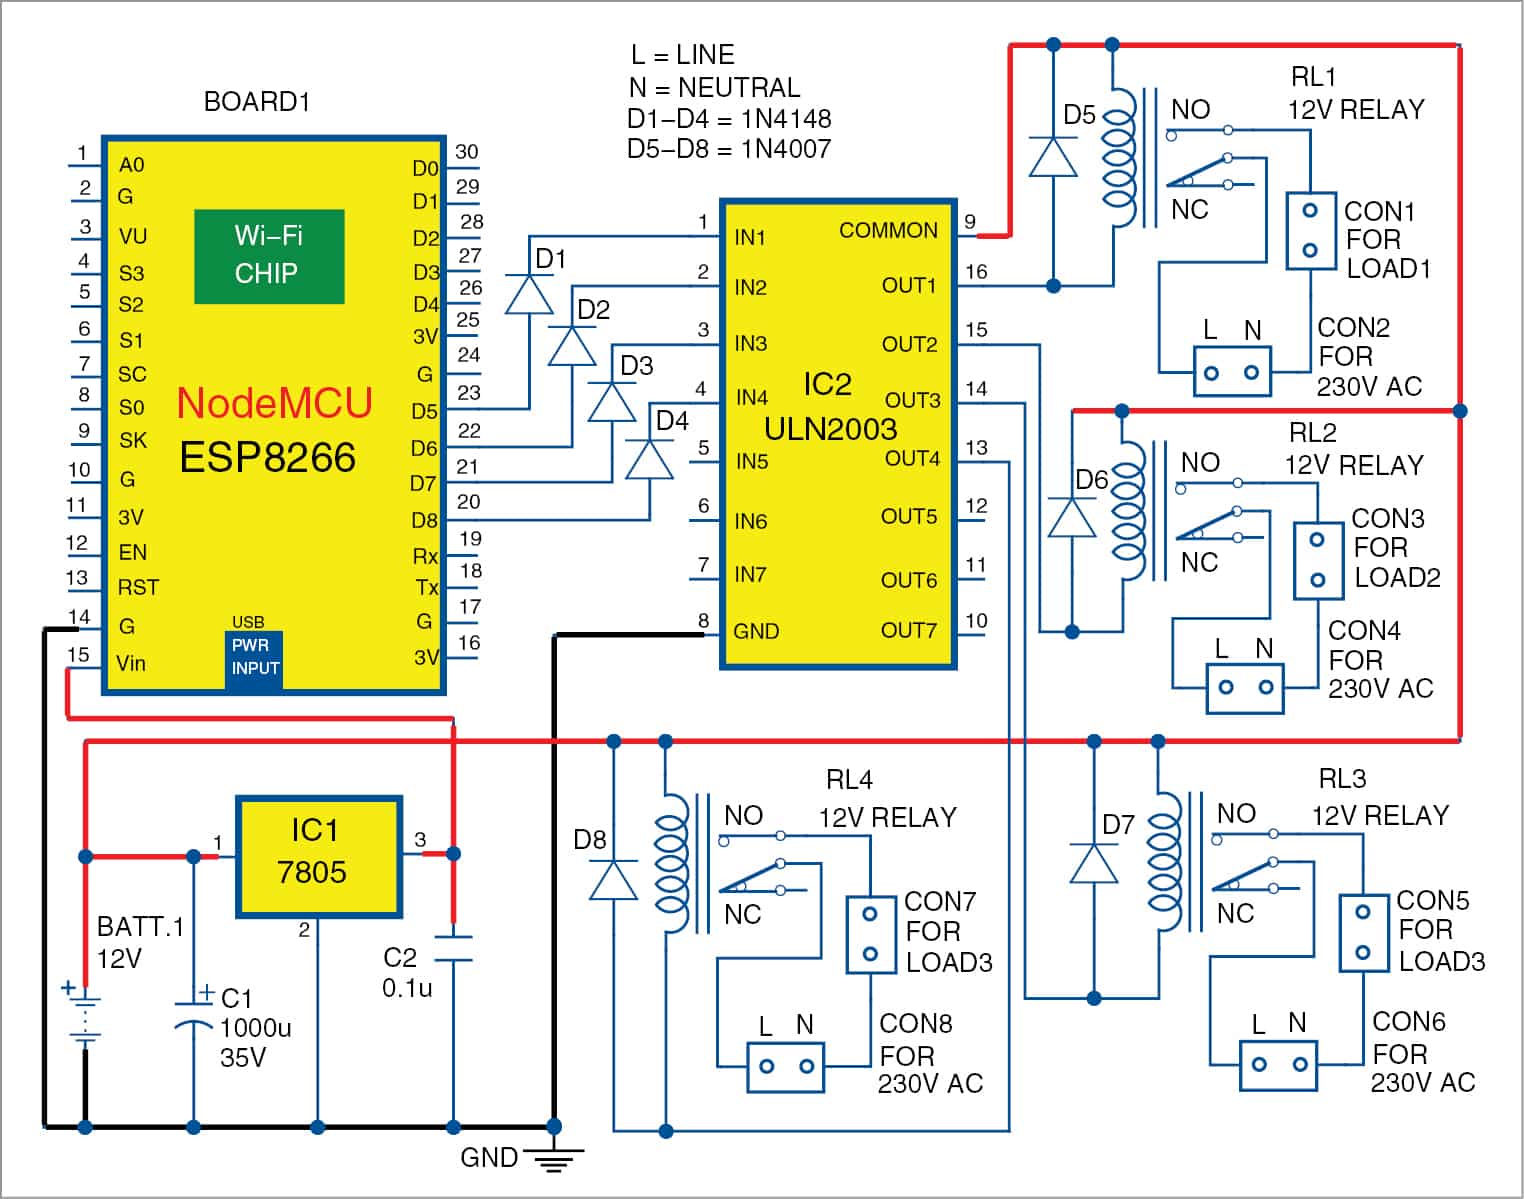 This circuit can be used to control up to four electrical devices through a cellphone or computer. The main advantage is that you can login from anywhere to control the device(s). If you try to login using invalid credentials 10 times, the system gets locked for the next three minutes. Both NodeMCU v0.9 and NodeMCU […]
The post Control With Authentication For Up To Four Devices appeared first on Electronics For You.
from Electronics For You https://ift.tt/2XJghLr
Wednesday, 10 July 2019
LTspice for Nyquist Plot Analysis
This article explains how to generate and refine a Nyquist plot in LTspice and how to incorporate this plot into your AC analysis.
from All About Circuits Technical Articles https://ift.tt/2S8ayOd
from All About Circuits Technical Articles https://ift.tt/2S8ayOd
How Ultrasonic Flow Meters and IoT Connectivity Combine for Smart Metering Systems
Smart cities are exploiting the power of the Internet of Things to prevent wasting water.
from All About Circuits News https://ift.tt/2YMbUAC
from All About Circuits News https://ift.tt/2YMbUAC
Make Your Own Arduino based RFID Door Lock
 In this tutorial, the presenter will be giving you a tutorial on radio-frequency identification (RFID), how it works and how to make an Arduino based RFID door lock. It’s a non-contact technology that’s broadly used in many industries for tasks such as personnel tracking, access control, supply chain management, books tracking in libraries, tollgate systems […]
The post Make Your Own Arduino based RFID Door Lock appeared first on Electronics For You.
from Electronics For You https://ift.tt/2G6t8Sd
Tuesday, 9 July 2019
Researchers Combine Wearable Biosensors and Machine Learning to Combat the Opioid Crisis
Researchers have combined wearable biosensors with machine learning to aid in treatment for substance abuse.
from All About Circuits News https://ift.tt/30rFdZE
from All About Circuits News https://ift.tt/30rFdZE
Monday, 8 July 2019
Meet Two of MIT’s Engineers Observing Black Holes with the Event Horizon Telescope
The first image of a black hole made global headlines. Here are two engineers that helped make it happen.
from All About Circuits News https://ift.tt/2JnBCGI
from All About Circuits News https://ift.tt/2JnBCGI
Linux, But Hardware: CHIPS Alliance Brings Powerful Players into Open Source Hardware Collaboration
Will open source hardware become as ubiquitous as open-source software, such as Linux and Android?
from All About Circuits News https://ift.tt/2S0yH9k
from All About Circuits News https://ift.tt/2S0yH9k
Design & Thermal Analysis of Multi Layer High-Pressure Vessel using FEA
The composite material like aluminium and fiber matrix to sustain different criteria. In the present work, the structure of the composite pressure vessel and different orientations of symmetric shells designed. For pressure were investigated and 3- D finite element analyses using APDL Programming. FEA software is used for failure analysis on the composite shell of […]
The post Design & Thermal Analysis of Multi Layer High-Pressure Vessel using FEA appeared first on NevonProjects.
from NevonProjects https://ift.tt/2YHsDVK
Finite Element Analysis of Centrifugal Pump Impeller
A centrifugal pump is a rot dynamic pump that uses a rotating impeller to increase the pressure of a fluid. Centrifugal pumps are ordinarily used to move liquids through a piping system. The fluid enters the pump impeller on or almost the rotating axis and is accelerated by the impeller, flowing radially outward into a […]
The post Finite Element Analysis of Centrifugal Pump Impeller appeared first on NevonProjects.
from NevonProjects https://ift.tt/2XykDtD
Design and Analysis of Compressor Fins Thermal Distribution
Most of the air compressors are either reciprocating piston type or rotary vane screw. Centrifugal Compressors are common in very large applications such as supply a high-pressure clean air to fill gas cylinders, supply a large amount of moderate pressure air to power pneumatic tool. In air compressor heat can be generated by two ways, […]
The post Design and Analysis of Compressor Fins Thermal Distribution appeared first on NevonProjects.
from NevonProjects https://ift.tt/2Jvb7hk
Thermal Analysis of Heat Pipes in Ansys
The heat pipe is a novel heat transfer device to transfer a large amount of heat through a small cross-sectional area with very small temperature differences and it also possesses high thermal conductance and low thermal impedance. In this paper, the heat pipe working parameters are analyzed using the Taguchi methodology. The Taguchi methodology is […]
The post Thermal Analysis of Heat Pipes in Ansys appeared first on NevonProjects.
from NevonProjects https://ift.tt/2xA2Lzl
Design and Analysis to Analyse the Heat Transfer of Space Heater for Boat
As fossil fuels are depleting gradually with the course of time there is a need in developing innovative products that can extract maximum potential that the system can deliver. One of the key areas that still make use of diesel fuels for experiencing thermal comfort is the boat heating system. Due to its user-friendly characteristics […]
The post Design and Analysis to Analyse the Heat Transfer of Space Heater for Boat appeared first on NevonProjects.
from NevonProjects https://ift.tt/2YGutGy
Structural and Thermal analysis of Steam Turbine in Ansys
The rotor blade of the Steam turbine has been analyzed for the static and thermal stresses resulting from the tangential, axial and centrifugal forces. The Steam forces namely tangential, axial was determined by constructing velocity triangles at the inlet and exit of rotor blades. The rotary-wing was then analyzed for the temperature distribution. For obtaining […]
The post Structural and Thermal analysis of Steam Turbine in Ansys appeared first on NevonProjects.
from NevonProjects https://ift.tt/2S2BX4j
6 Awesome Free eBooks On Arduino
 This interesting collection of Arduino ebooks which help everyone from newbies to pros. These free ebooks will not only help you get started but will also help you learn to program, make microcontroller DIYs, your own wearables and unbelievable Arduino projects. Enjoy! 1. Getting Started with Arduino A Beginners Guide Author: Brad Kendall Publisher: Make […]
The post 6 Awesome Free eBooks On Arduino appeared first on Electronics For You.
from Electronics For You https://ift.tt/2YOWBHm
Latest Technologies To Enhance The Performance Of Memories
 Several initiatives have been taken to improve the performance of memories. The aim is to achieve decreased memory power, terabyte per second memory speed, and hybrid DRAM, flash and CPU module architectures to speed up in-memory operations significantly. We often come across problems with the hardware of our phones, tablets and laptops. These problems could […]
The post Latest Technologies To Enhance The Performance Of Memories appeared first on Electronics For You.
from Electronics For You https://ift.tt/2L5Kbb3
Push Door Visitor Counter Alarm Using Arduino And Apds9960
 We have heard of events/parties going out of control due to gate crashing by uninvited guests. Now, as a solution, imagine your door counting the number of invitees and raising an alarm when the number exceeds the guest list. It could have sounded like a magic door some years back, but it is a reality […]
The post Push Door Visitor Counter Alarm Using Arduino And Apds9960 appeared first on Electronics For You.
from Electronics For You https://ift.tt/2JwJHr4
Sunday, 7 July 2019
Introduction to Bandgap Voltage References
This article presents some basic information about bandgap circuits, which are widely used to generate temperature independent reference voltages.
from All About Circuits Technical Articles https://ift.tt/30pkeXL
from All About Circuits Technical Articles https://ift.tt/30pkeXL
Saturday, 6 July 2019
HDI PCB Technology Enhancing the Performance of Equipment
 High-density interconnection (HDI) PCB takes advantage of recent technologies to amplify the functionality of circuit boards, motivated by the tininess of parts and semiconductor packages that provide superior characteristics in innovative new products, including touchscreen phones The first printed circuit board (PCB) can be traced all the way back to the early 1940s. Back then, […]
The post HDI PCB Technology Enhancing the Performance of Equipment appeared first on Electronics For You.
from Electronics For You https://ift.tt/32g35l5
Friday, 5 July 2019
Microchip Adds Three New Members to Its TD Family of Touchscreen Controllers
New capacitive touchscreen controllers from Microchip continue the supply of components for automotive interface applications.
from All About Circuits News https://ift.tt/2Jhq4ol
from All About Circuits News https://ift.tt/2Jhq4ol
How to Use Nyquist Plots for Stability Analysis
In this article, we’ll see that a Nyquist plot provides a straightforward means of determining if an amplifier will oscillate.
from All About Circuits Technical Articles https://ift.tt/2RVRoLr
from All About Circuits Technical Articles https://ift.tt/2RVRoLr
Arduino-Controlled 12V Battery Charger
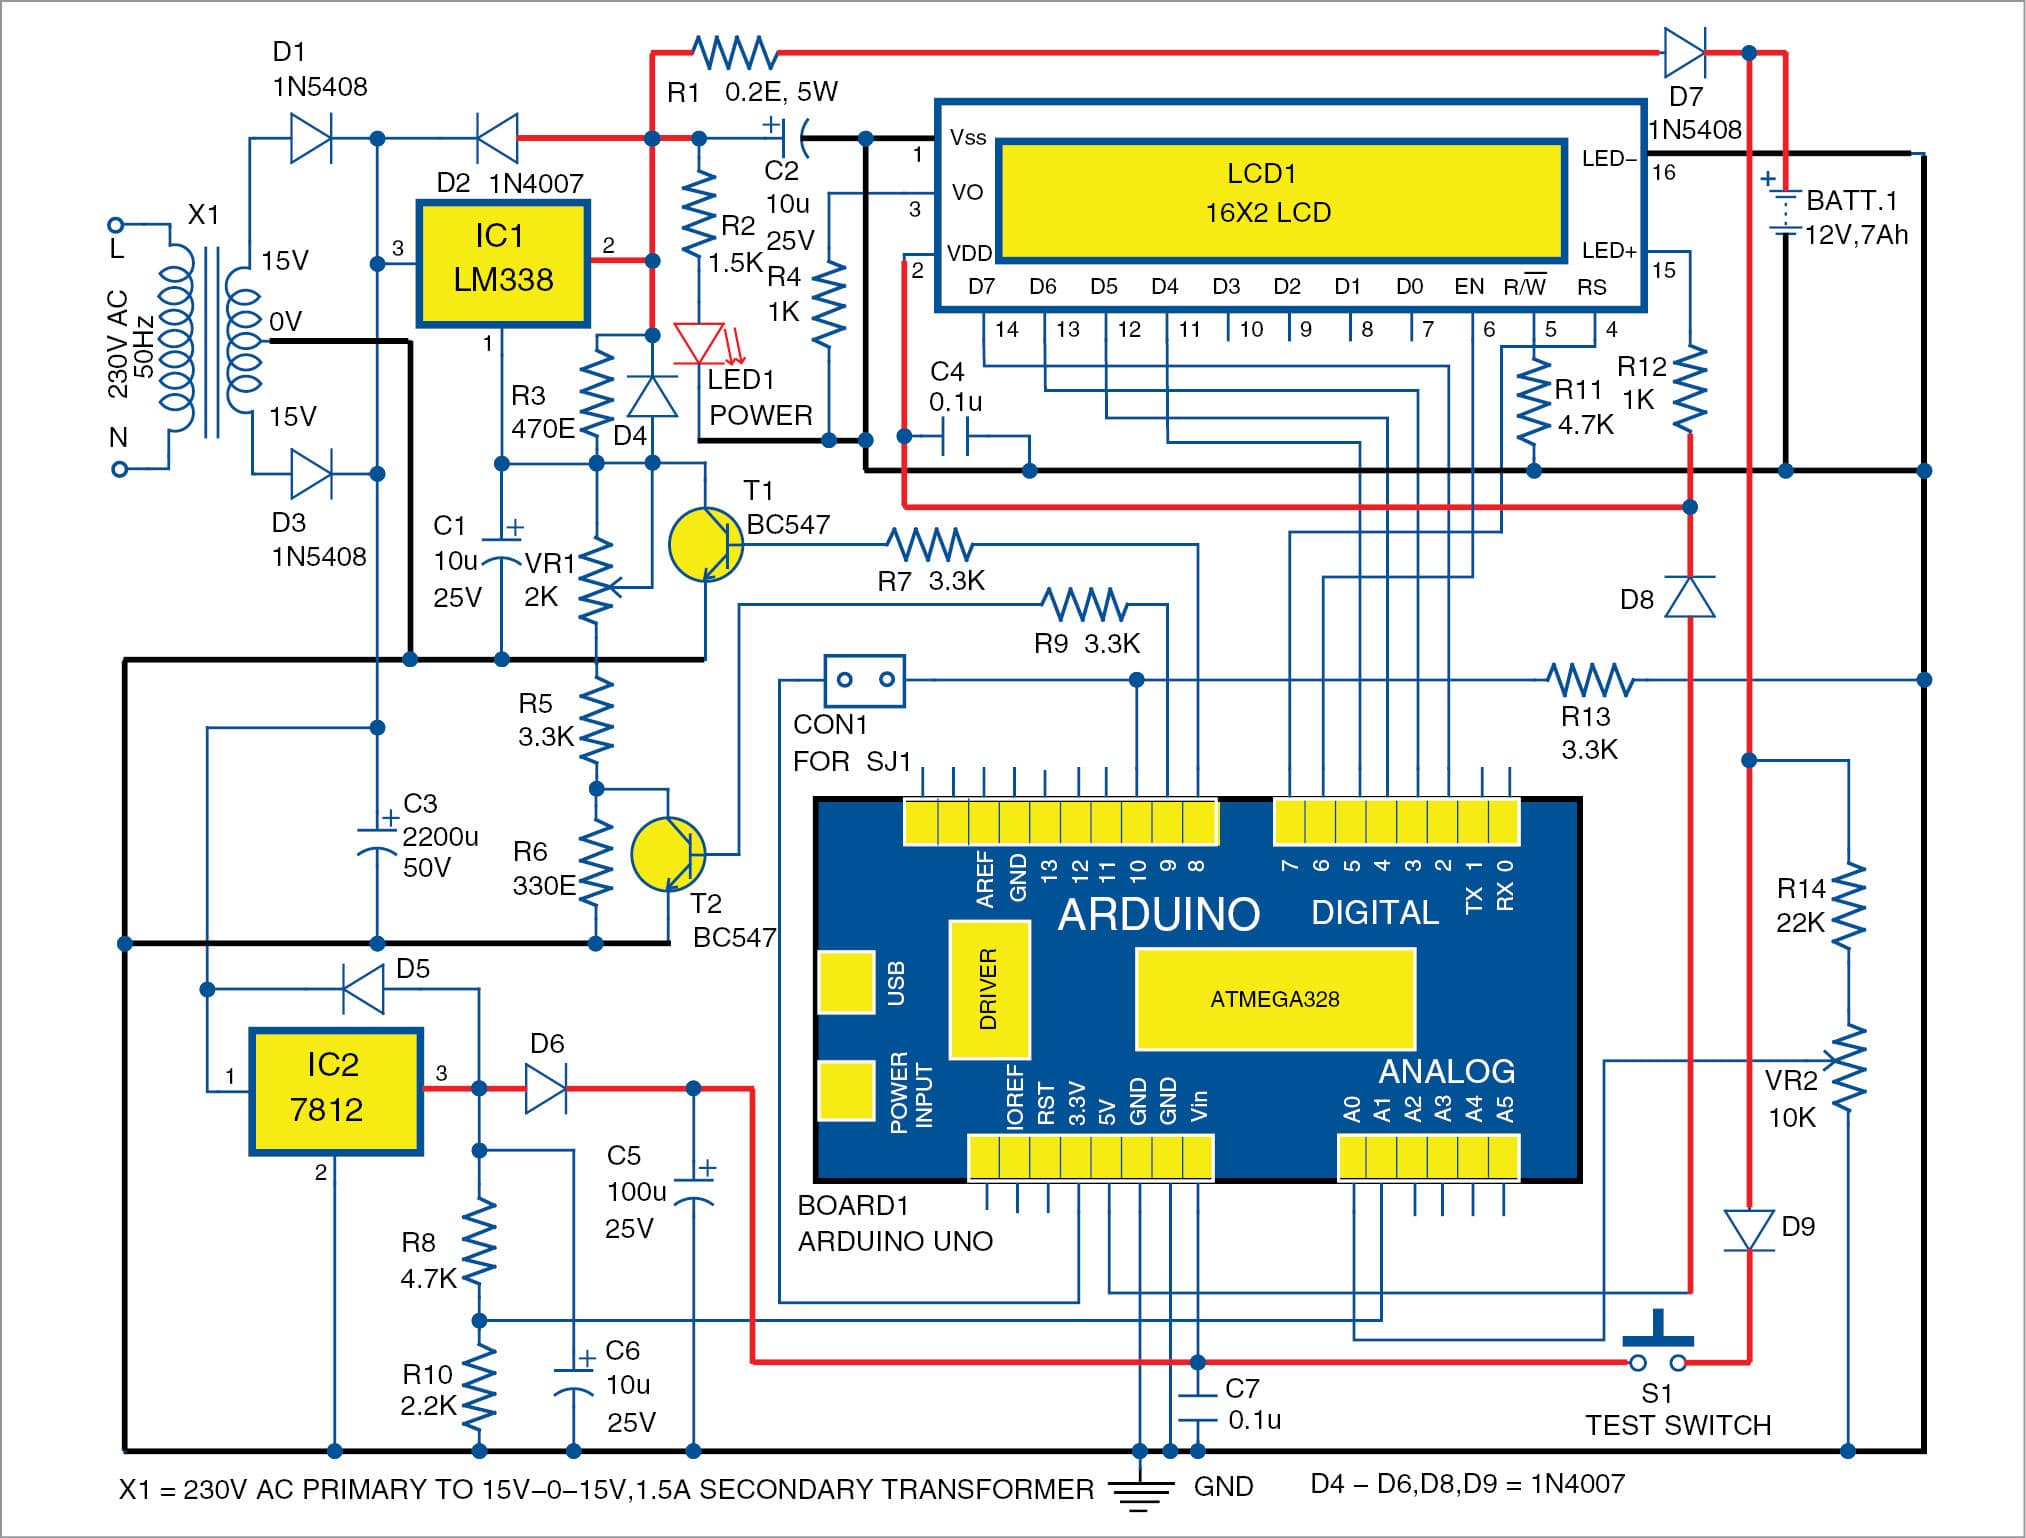 The Automatic Battery Charger circuit presented here can automatically charge a 12V, 7Ah battery, or above. Special features of the charger are as follows. It automatically controls the charging current as per the status of the battery. Battery voltage level as well as charging status are indicated on the LCD display. The charger maintains float […]
The post Arduino-Controlled 12V Battery Charger appeared first on Electronics For You.
from Electronics For You https://ift.tt/2Noeifm
Structural analysis of Angle Plate in Ansys
Angle plates are used for supporting long shafts so as to reduce the bending stresses made within the shafts due to its own weight. Structural analysis of Angle plate by FEA software package ANSYS is given during this report. Loads on the angle plate are because of the load of the portion of the shaft. […]
The post Structural analysis of Angle Plate in Ansys appeared first on NevonProjects.
from NevonProjects https://ift.tt/2RVD3i6
FEA Analysis of Composite Leaf Spring for Automotive Vehicle
Reducing weight while increasing or maintaining the strength of products is getting to be highly important. The Automobile Industry has a great interest for replacement of steel leaf spring with that of composite leaf spring, the objective is to compare the stresses and a weight saving of composite leaf spring with that of steel leaf […]
The post FEA Analysis of Composite Leaf Spring for Automotive Vehicle appeared first on NevonProjects.
from NevonProjects https://ift.tt/2L0YHke
FEA Analysis of Disc Brake Using Ansys
An automobile disc brake system is used to perform 3 basic functions, i.e. to reduce the speed of a vehicle, to maintain its speed when traveling downhill and to stop the vehicle completely. During these braking events, the disc brake may suffer from structural and wear issues. It is quite typically that the disc brake […]
The post FEA Analysis of Disc Brake Using Ansys appeared first on NevonProjects.
from NevonProjects https://ift.tt/2JbZ1dS
Thursday, 4 July 2019
Diodes Incorporated Introduces New LED Driver-Controller for Automotive Applications
This week, Diodes Inc. introduced a new IC for LEDs in automotive applications.
from All About Circuits News https://ift.tt/2RXBYX1
from All About Circuits News https://ift.tt/2RXBYX1
Understanding Nyquist Plots for Second-Order Filters
This article continues a series on Nyquist diagrams by explaining Nyquist curves that represent the transfer function of a two-pole filter.
from All About Circuits Technical Articles https://ift.tt/30akTMl
from All About Circuits Technical Articles https://ift.tt/30akTMl
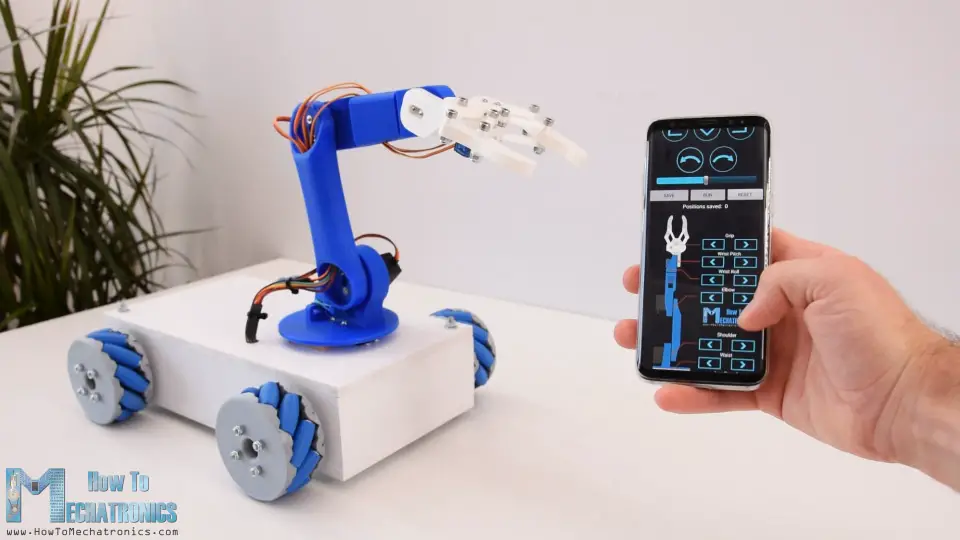
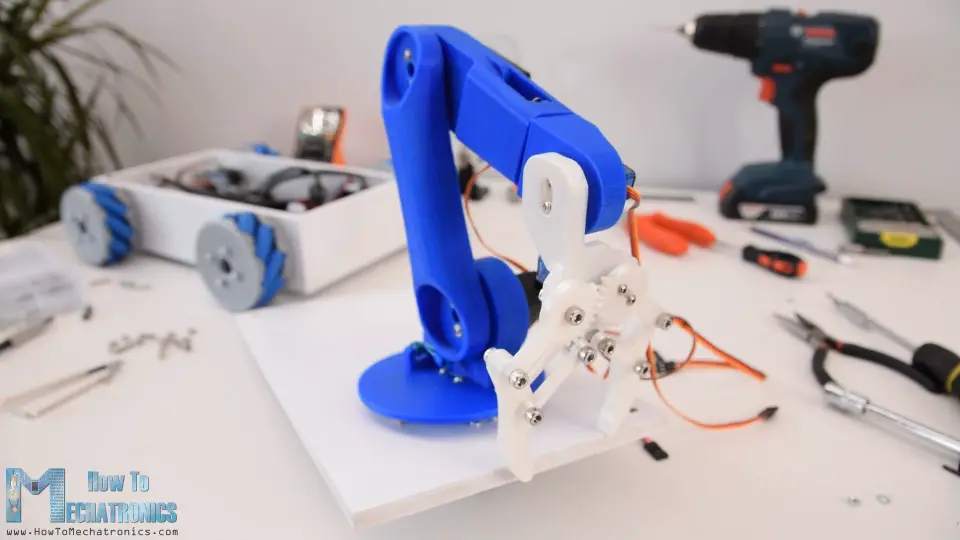
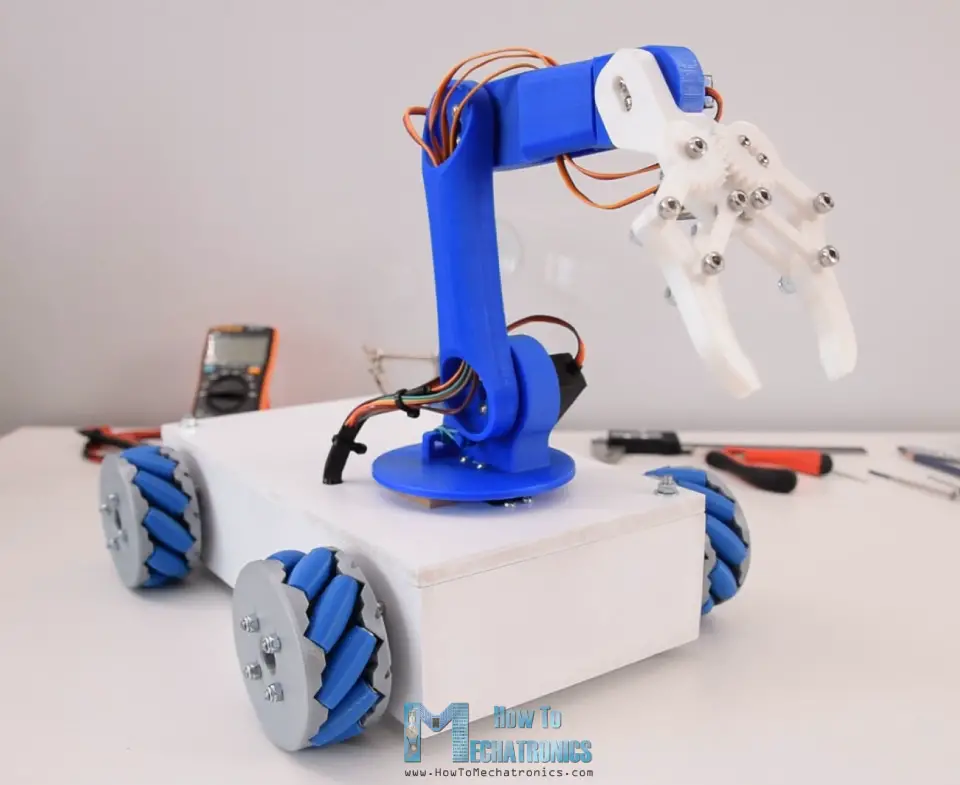
Arduino Robot Arm and Mecanum Wheels Platform Automatic Operation
In this tutorial I will show you how I made my Mecanum Wheels Robot Platform from my previous video, to work together and operate automatically with my 3D printed Robotic Arm, also an Arduino project from one of my previous videos.
Overview
So, we can control the Mecanum wheels robot with the custom-build Android application the same way as explained in the previous video. In addition to that, now the app also has buttons for controlling the robot arm.
The original robot arm control app actually had sliders for controlling the robot joints, but that was causing some problems with the arm stability. In this way the arm works much better, so therefore I will provide this updated version of the robot arm control app and the Arduino code to the original robot arm project as well.
Nevertheless, the coolest feature of this robot is the ability to store the movements and then automatically repeat them.

Using the Save button, we can simply store the positions of the motors for each step. Then we just need to click the Run button and the robot will automatically repeat the stored movements over and over again.
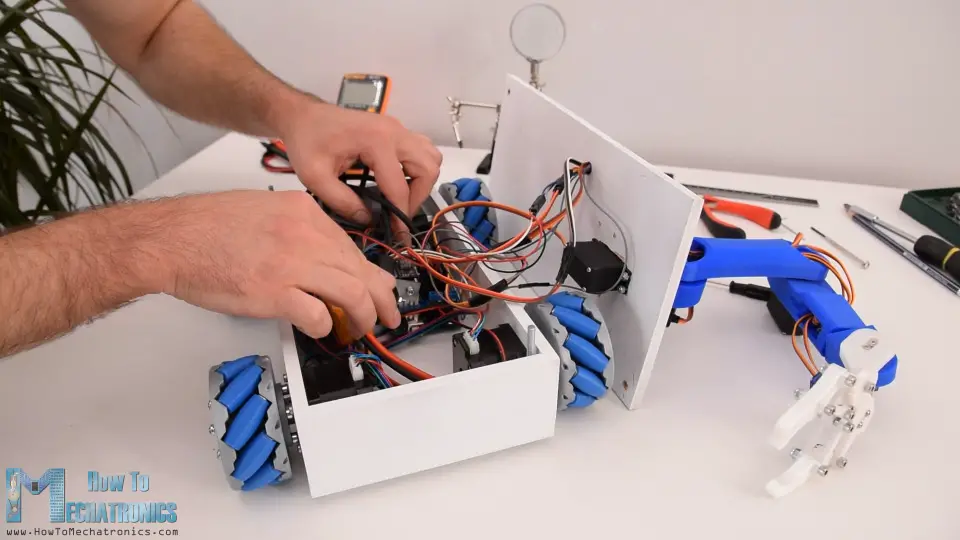
Building the Arduino Robot
Ok, so here I have the Mecanum wheels platform already assembled and you can find all details about it in my previous video.
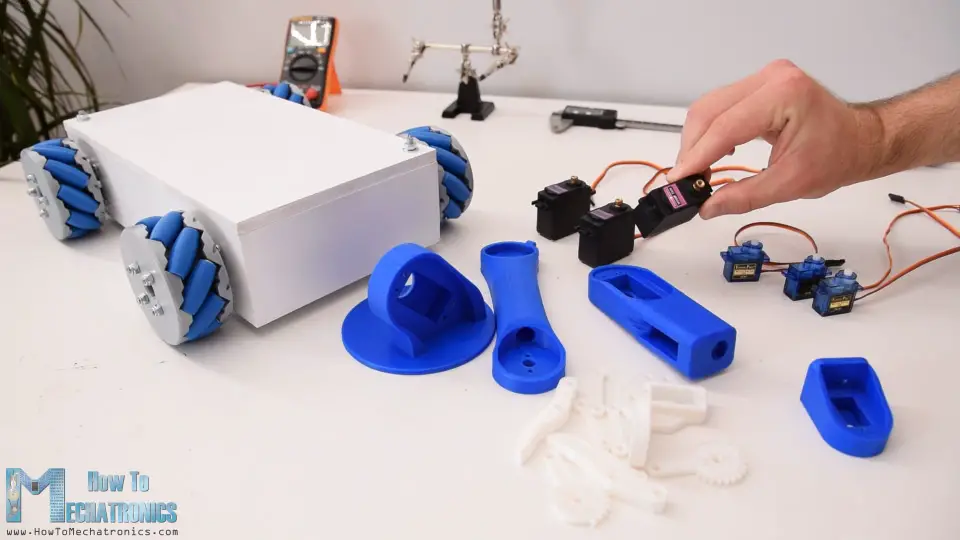
Also, here I have the 3D printed parts of the robot arm and the servo motors and now I will show you how to assembly them. Here’s the 3D model of this project.

You can download the 3D model and the STL files needed for 3D printing below.
STEP file:
Arduino Robotic Arm and Mecanum Wheels Platfrom 3D Model STEP File 3.93 MB
STL files for 3D printing:
Arduino Robotic Arm and Mecanum Wheels Platfrom STL Files 943.42 KB
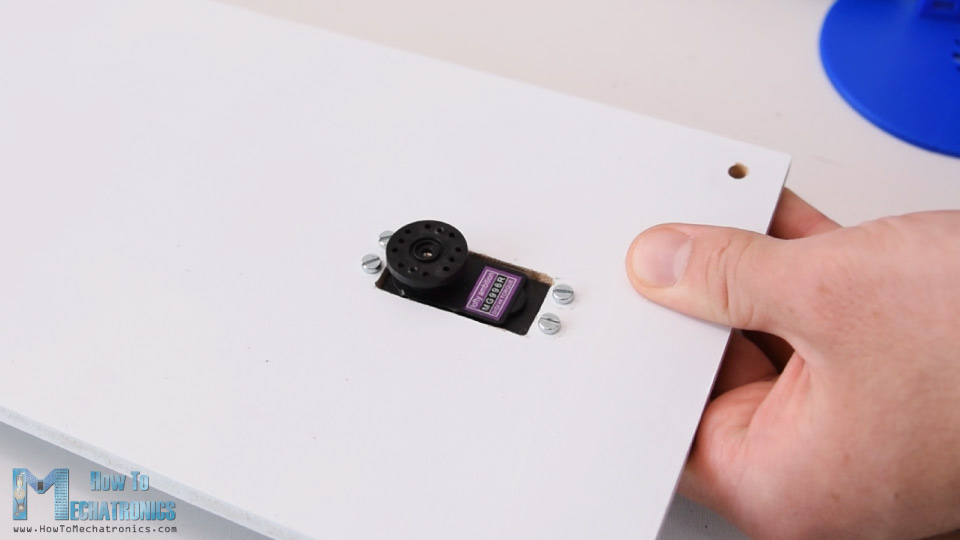
The first servo of the robot arm will be directly mounted on the top cover of the mecanum wheels platform.
I marked the location, and using a 10mm drill I made several holes.

Then using a rasp, I cut through the holes and then fine-tuned the opening for the servo. I secured the servo to the top plate using four M3 bolts and nuts.
Then on this output shaft of this servo, using the round horn that comes as accessory with the servo, we need to attach the next part or the waist of the robot arm. However, we can notice that in this way the part stays around 8mm above the plate. So therefore, I attached two pieces of 8mm MDF boards, so the waist part can slide on them and so the joint will be more stable.
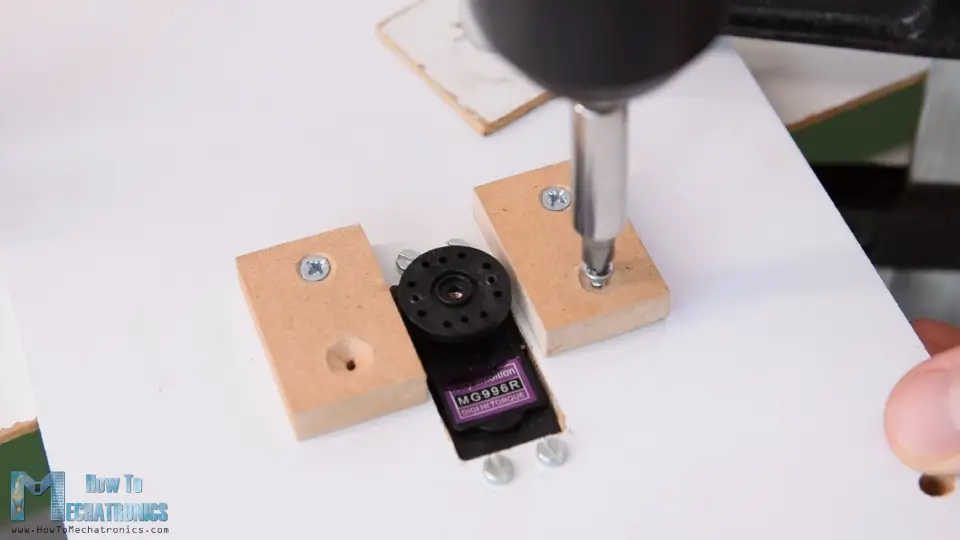
The round horn is secured to the waist part using the self-tapping screws that come as accessories with the servo, and then the round horn is secured to servo shaft using the appropriate bolts that also come with the servo.
Next we have the shoulder servo. We simply put it in place and secure it to the 3D printed part using self-tapping screws.

The round horn goes on the next part, and then the two parts are secured to each other using a bolt on the output shaft of the servo.
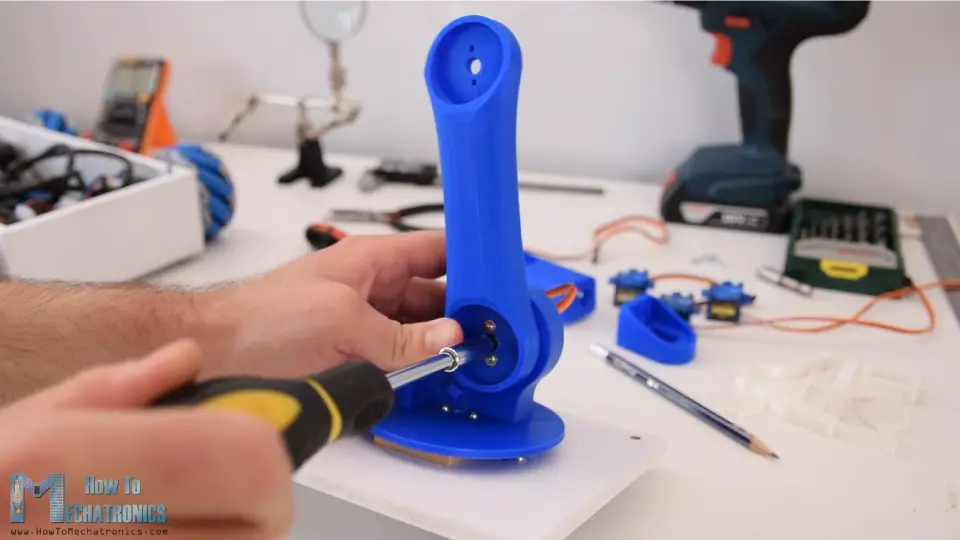
We should note that before securing the parts, we need to make sure that the part has the full range of motion. Here I also added a rubber band to the shoulder joint so that it gives a little bit help to the servo, because this servo carries the weight of the rest of the arm as well as the payload.

In similar way, I assembled the rest of the robot arm.
Next, we need to assemble to gripper mechanism. The gripper is controlled with an SG90 servo motor, on which, first we attach a custom designed geared link. We pair this link with another geared link on the other side, which is secured using M4 bolt and nuts. Actually, all other links are connected using M4 bolts and nuts.
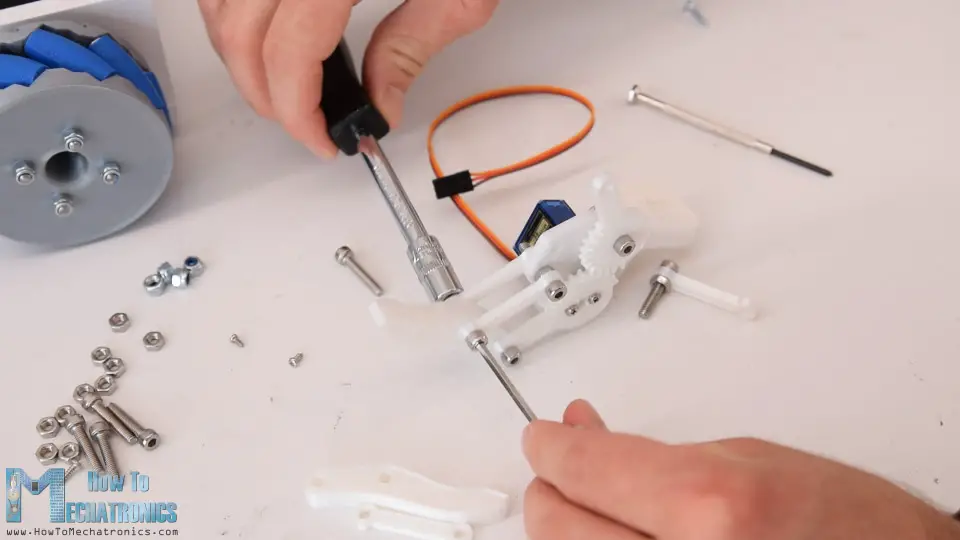
The 3D model of the gripper originally has 3mm holes but I didn’t have enough M3 bolts, so therefore I expanded the holes using 4mm drill and used the M4 bolts instead.
Once I assembled the gripper mechanism, I secured it to the last servo and so the robot arm was completed.
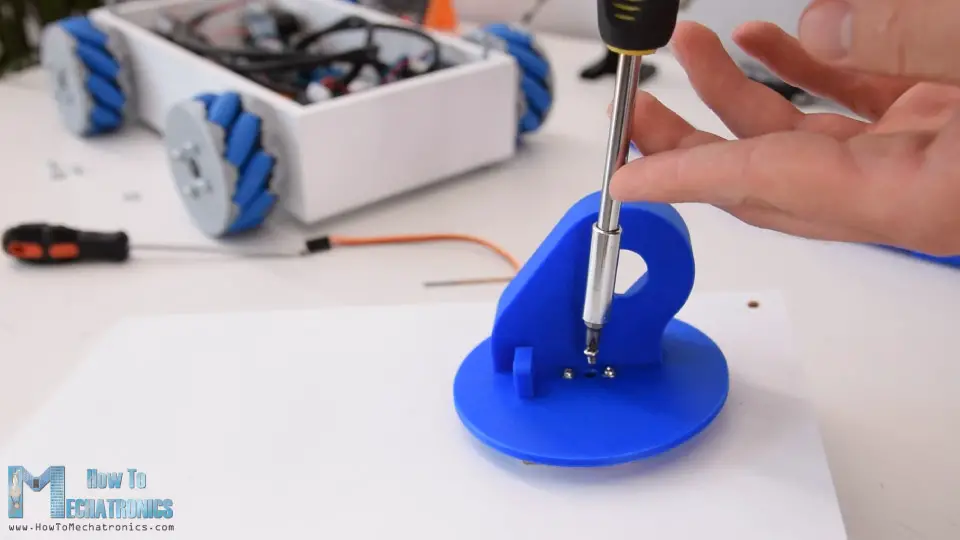
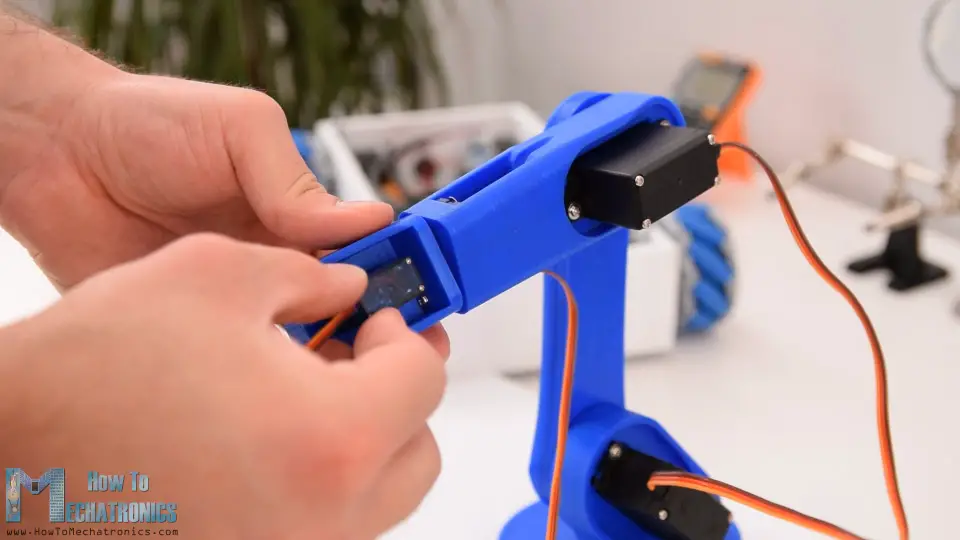
Next I did some cable management. I passed the servo wires through the specifically designed holes of the robot arm. Using a 10mm drill I made a hole on the top plate so that the wires can pass through.
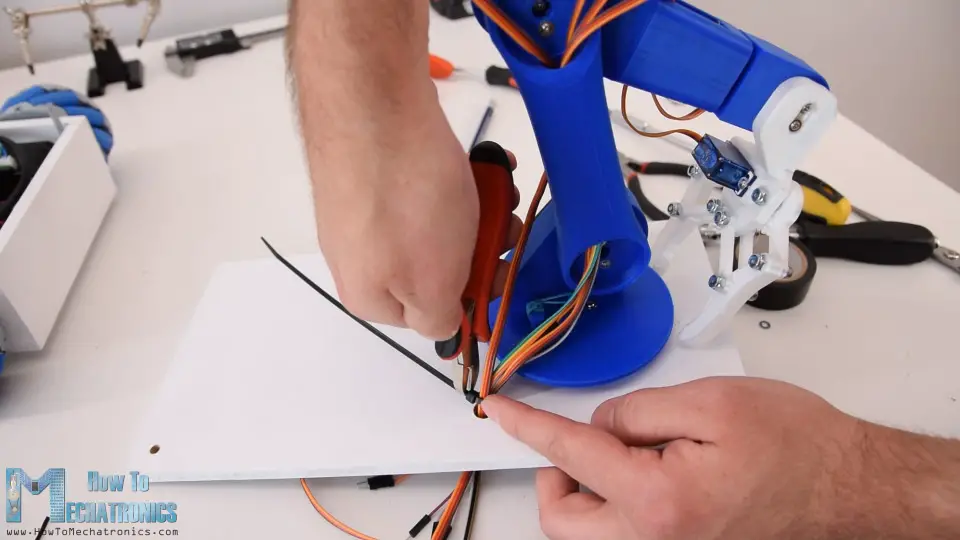
Using a zip-tie I secured all the wires together, and now what’s left is to connect them to the Arduino board.
Arduino Robot Circuit Diagram
Here’s the circuit diagram of this project and how everything needs to be connected.
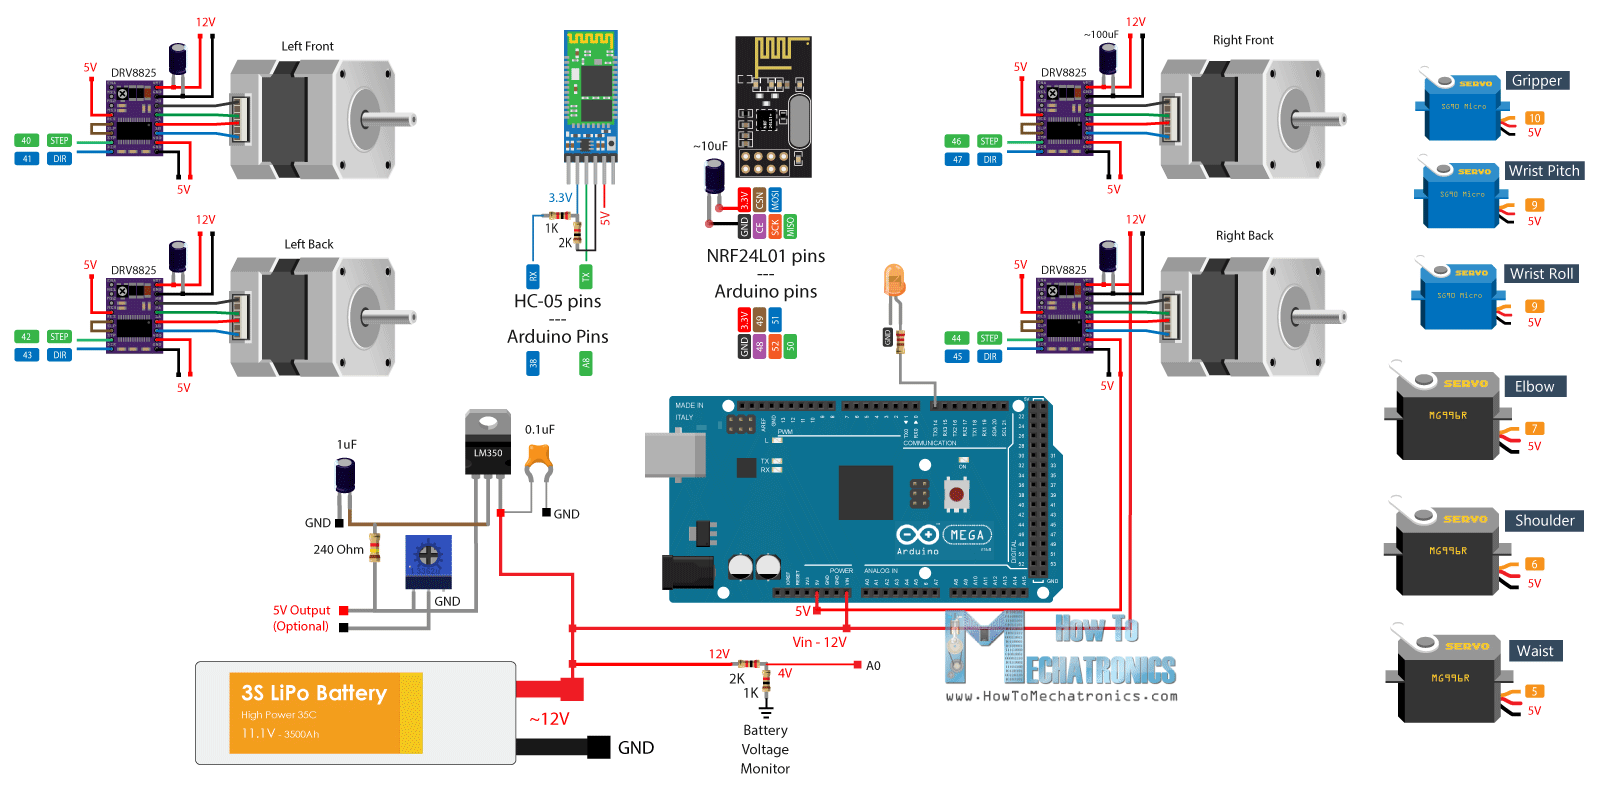
You can get the components needed for this project from the links below:
- Stepper Motor – NEMA 17 …………..… Amazon / Banggood
- DRV8825 Stepper Driver ……….…….… Amazon / Banggood
- MG996R Servo Motor………………….…. Amazon / Banggood
- SG90 Micro Servo Motor …………….…. Amazon / Banggood
- HC-05 Bluetooth Module …………….… Amazon / Banggood
- Li-Po battery …………………………….…… Amazon / Banggood
- Arduino Mega Board ………….……….… Amazon / Banggood
*Please note: These are affiliate links. I may make a commission if you buy the components through these links. I would appreciate your support in this way!
In the previous tutorial I explained how the Mecanum wheels robot part works and also showed you how I made a custom PCB for it.

I included a 5V voltage regulator on this PCB so that we can make this project, or connect the servo motors because they work at 5V. The voltage regulator is the LM350, which can handle up to 3 amps of current. All six servos of the robot arm can draw from around 2 amps to 3 amps of current, which means that it can handle them but that will cause the regulator to get very hot.
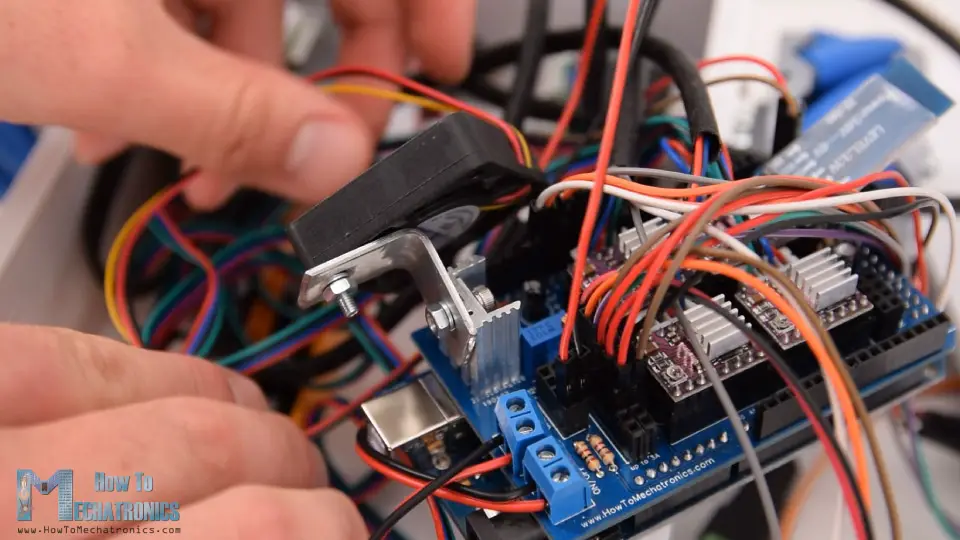
Therefore, I attached a heat sink to it, as well as a small 12V DC fan to blow some air, because the heat sink itself wasn’t enough the cool the regulator.
I connected the servos signal wires to the Arduino digital pins from number 5 to 10, and for powering I used the 5V pin header on the PCB. Finally, I pushed all the wires inside the platform, and secured the top plate to it using the two nuts.
And that’s it, now we are done with this project.
Arduino Code
What’s left is to take a look how the Arduino code and the Android application work. As the code is a bit longer, for better understanding, I will post the source code of the program in sections with description for each section. And at the end of this article I will post the complete source code.
So first we need to define the 6 servo, the 4 stepper motors and the Bluetooth communication, as well as define some variables need for the program below. In the setup section we set the maximum speed of the steppers, define the pins to which the servos are connected, begin the Bluetooth communication and set the robot arm to initial position.
#include <SoftwareSerial.h>
#include <AccelStepper.h>
#include <Servo.h>

Servo servo01;
Servo servo02;
Servo servo03;
Servo servo04;
Servo servo05;
Servo servo06;

SoftwareSerial Bluetooth(A8, 38); // Arduino(RX, TX) - HC-05 Bluetooth (TX, RX)

// Define the stepper motors and the pins the will use
AccelStepper LeftBackWheel(1, 42, 43);   // (Type:driver, STEP, DIR) - Stepper1
AccelStepper LeftFrontWheel(1, 40, 41);  // Stepper2
AccelStepper RightBackWheel(1, 44, 45);  // Stepper3
AccelStepper RightFrontWheel(1, 46, 47); // Stepper4

#define led 14

int wheelSpeed = 1500;

int lbw[50], lfw[50], rbw[50], rfw[50]; // arrays for storing positions/steps

int servo1Pos, servo2Pos, servo3Pos, servo4Pos, servo5Pos, servo6Pos; // current position
int servo1PPos, servo2PPos, servo3PPos, servo4PPos, servo5PPos, servo6PPos; // previous position
int servo01SP[50], servo02SP[50], servo03SP[50], servo04SP[50], servo05SP[50], servo06SP[50]; // for storing positions/steps
int speedDelay = 20;
int index = 0;
int dataIn;
int m = 0;

void setup() {
  // Set initial seed values for the steppers
  LeftFrontWheel.setMaxSpeed(3000);
  LeftBackWheel.setMaxSpeed(3000);
  RightFrontWheel.setMaxSpeed(3000);
  RightBackWheel.setMaxSpeed(3000);
  pinMode(led, OUTPUT);
  servo01.attach(5);
  servo02.attach(6);
  servo03.attach(7);
  servo04.attach(8);
  servo05.attach(9);
  servo06.attach(10);
  Bluetooth.begin(38400); // Default baud rate of the Bluetooth module
  Bluetooth.setTimeout(5);
  delay(20);
  Serial.begin(38400);
  // Move robot arm to initial position
  servo1PPos = 90;
  servo01.write(servo1PPos);
  servo2PPos = 100;
  servo02.write(servo2PPos);
  servo3PPos = 120;
  servo03.write(servo3PPos);
  servo4PPos = 95;
  servo04.write(servo4PPos);
  servo5PPos = 60;
  servo05.write(servo5PPos);
  servo6PPos = 110;
  servo06.write(servo6PPos);
}
Then in the loop section we start by checking whether there is any incoming data.
// Check for incoming data
  if (Bluetooth.available() > 0) {
    dataIn = Bluetooth.read();  // Read the data
This data comes from the smartphone or the Android app, so let’s take a look what kind of data it is actually sending. The Android app is made using the MIT App Inventor online application. It consists of simple buttons which have appropriate images as background.
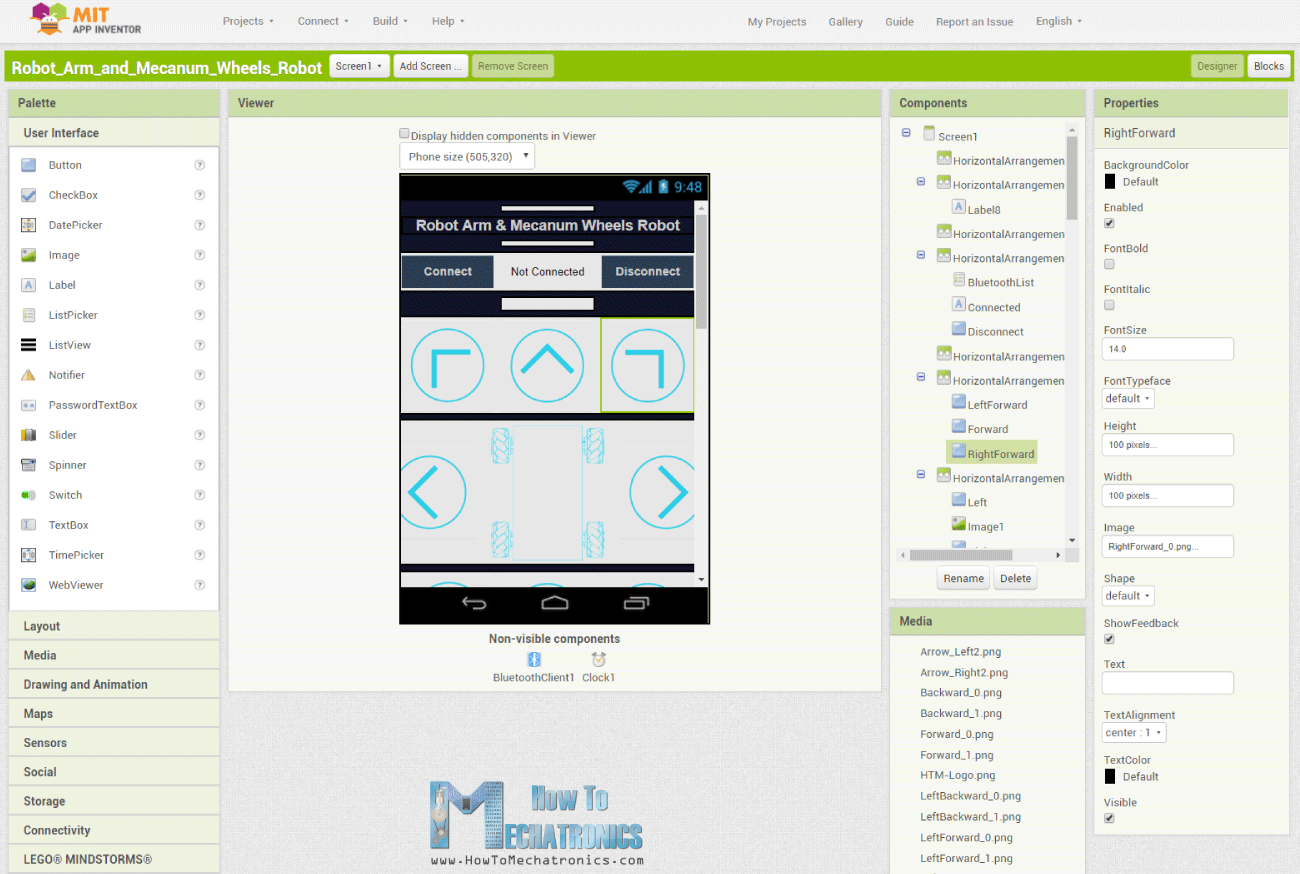
If we take a look at the blocks of the app, we can see that all it does is it sends one-byte numbers when the buttons are clicked.

So, depending on clicked button, we tell the Arduino what to do. For example, if we receive the number ‘2’ the mecanum wheels platform will move forward, using the moveForward custom function.
if (dataIn == 2) {
      m = 2;
    }
//
if (m == 2) {
      moveForward();
    }
This custom function sets all four stepper motors to rotate forward.
void moveForward() {
  LeftFrontWheel.setSpeed(wheelSpeed);
  LeftBackWheel.setSpeed(wheelSpeed);
  RightFrontWheel.setSpeed(wheelSpeed);
  RightBackWheel.setSpeed(wheelSpeed);
}
For moving in any other direction, we just need rotate the wheels in the appropriate directions.
For controlling the robot arm, we use the same method. Again, we have buttons in the app and when holding the buttons, the robot arm joints move in the particular direction.
As I mentioned earlier, in the original Robot Arm control app we were using sliders for controlling the positions of the servos but that was causing some problems because in that way we had to send Text to the Arduino, instead of 1-byte number. The problem is the Arduino sometimes misses the Text coming from the App and makes error or the Robot arm shakes and behaves abnormal.
In this way we simple send a single 1-byte number when a particular button is touched down.

The Arduino code enters the while loop of that number, and stays there until we touch up the button, because at that moment we send the number 0 which means the robot should do nothing.
// Move servo 1 in positive direction
    while (m == 16) {
      if (Bluetooth.available() > 0) {
        m = Bluetooth.read();
      }
      servo01.write(servo1PPos);
      servo1PPos++;
      delay(speedDelay);
    }
    // Move servo 1 in negative direction
    while (m == 17) {
      if (Bluetooth.available() > 0) {
        m = Bluetooth.read();
      }
      servo01.write(servo1PPos);
      servo1PPos--;
      delay(speedDelay);
    }
So, depending on the touched buttons the servos move either in positive or negative direction. The same working principle applies for all servo motors. For changing the speed of movement, we use the values coming from the slider which range from 100 to 250.
// If arm speed slider is changed
    if (dataIn > 101 & dataIn < 250) {
      speedDelay = dataIn / 10; // Change servo speed (delay time)
    }
By dividing them by 10 we get values from 10 to 25, which are used as delay in microseconds in the whiles loops for driving the servos.
For storing the robot movements, we simply save the current positions of the servos and the steppers into arrays, each time the Save button is clicked.
// If button "SAVE" is pressed
    if (m == 12) {
      //if it's initial save, set the steppers position to 0
      if (index == 0) {
        LeftBackWheel.setCurrentPosition(0);
        LeftFrontWheel.setCurrentPosition(0);
        RightBackWheel.setCurrentPosition(0);
        RightFrontWheel.setCurrentPosition(0);
      }
      lbw[index] = LeftBackWheel.currentPosition();  // save position into the array
      lfw[index] = LeftFrontWheel.currentPosition();
      rbw[index] = RightBackWheel.currentPosition();
      rfw[index] = RightFrontWheel.currentPosition();

      servo01SP[index] = servo1PPos;  // save position into the array
      servo02SP[index] = servo2PPos;
      servo03SP[index] = servo3PPos;
      servo04SP[index] = servo4PPos;
      servo05SP[index] = servo5PPos;
      servo06SP[index] = servo6PPos;
      index++;                        // Increase the array index
      m = 0;
    }
Then when we press the Run button we call the runSteps() custom function. This custom function runs through all stored steps using some for and while loops.
if (m == 14) {
      runSteps();

      // If button "RESET" is pressed
      if (dataIn != 14) {
        stopMoving();
        memset(lbw, 0, sizeof(lbw)); // Clear the array data to 0
        memset(lfw, 0, sizeof(lfw));
        memset(rbw, 0, sizeof(rbw));
        memset(rfw, 0, sizeof(rfw));
        memset(servo01SP, 0, sizeof(servo01SP)); // Clear the array data to 0
        memset(servo02SP, 0, sizeof(servo02SP));
        memset(servo03SP, 0, sizeof(servo03SP));
        memset(servo04SP, 0, sizeof(servo04SP));
        memset(servo05SP, 0, sizeof(servo05SP));
        memset(servo06SP, 0, sizeof(servo06SP));
        index = 0;  // Index to 0
      }
    }
We should note that it starts from the first position and goes the last position, and repeats that over and over again. Therefore, when saving the steps, we actually need to position the robot in a way that the first step has the same position as the last step. While running through the steps we can also change the speed of both the platform and the robot arm, as well as pause and reset all the steps.
Here’s the complete Arduino code for this Arduino robot project:
/*
       Arduino Robot Arm and Mecanum Wheels Robot
          Smartphone Control via Bluetooth
       by Dejan, www.HowToMechatronics.com
*/

#include <SoftwareSerial.h>
#include <AccelStepper.h>
#include <Servo.h>

Servo servo01;
Servo servo02;
Servo servo03;
Servo servo04;
Servo servo05;
Servo servo06;

SoftwareSerial Bluetooth(A8, 38); // Arduino(RX, TX) - HC-05 Bluetooth (TX, RX)

// Define the stepper motors and the pins the will use
AccelStepper LeftBackWheel(1, 42, 43);   // (Type:driver, STEP, DIR) - Stepper1
AccelStepper LeftFrontWheel(1, 40, 41);  // Stepper2
AccelStepper RightBackWheel(1, 44, 45);  // Stepper3
AccelStepper RightFrontWheel(1, 46, 47); // Stepper4

#define led 14

int wheelSpeed = 1500;

int lbw[50], lfw[50], rbw[50], rfw[50]; // arrays for storing positions/steps

int servo1Pos, servo2Pos, servo3Pos, servo4Pos, servo5Pos, servo6Pos; // current position
int servo1PPos, servo2PPos, servo3PPos, servo4PPos, servo5PPos, servo6PPos; // previous position
int servo01SP[50], servo02SP[50], servo03SP[50], servo04SP[50], servo05SP[50], servo06SP[50]; // for storing positions/steps
int speedDelay = 20;
int index = 0;
int dataIn;
int m = 0;

void setup() {
  // Set initial seed values for the steppers
  LeftFrontWheel.setMaxSpeed(3000);
  LeftBackWheel.setMaxSpeed(3000);
  RightFrontWheel.setMaxSpeed(3000);
  RightBackWheel.setMaxSpeed(3000);
  pinMode(led, OUTPUT);
  servo01.attach(5);
  servo02.attach(6);
  servo03.attach(7);
  servo04.attach(8);
  servo05.attach(9);
  servo06.attach(10);
  Bluetooth.begin(38400); // Default baud rate of the Bluetooth module
  Bluetooth.setTimeout(5);
  delay(20);
  Serial.begin(38400);
  // Move robot arm to initial position
  servo1PPos = 90;
  servo01.write(servo1PPos);
  servo2PPos = 100;
  servo02.write(servo2PPos);
  servo3PPos = 120;
  servo03.write(servo3PPos);
  servo4PPos = 95;
  servo04.write(servo4PPos);
  servo5PPos = 60;
  servo05.write(servo5PPos);
  servo6PPos = 110;
  servo06.write(servo6PPos);
}

void loop() {
  // Check for incoming data
  if (Bluetooth.available() > 0) {
    dataIn = Bluetooth.read();  // Read the data

    if (dataIn == 0) {
      m = 0;
    }
    if (dataIn == 1) {
      m = 1;
    }
    if (dataIn == 2) {
      m = 2;
    }
    if (dataIn == 3) {
      m = 3;
    }
    if (dataIn == 4) {
      m = 4;
    }
    if (dataIn == 5) {
      m = 5;
    }
    if (dataIn == 6) {
      m = 6;
    }
    if (dataIn == 7) {
      m = 7;
    }
    if (dataIn == 8) {
      m = 8;
    }
    if (dataIn == 9) {
      m = 9;
    }
    if (dataIn == 10) {
      m = 10;
    }
    if (dataIn == 11) {
      m = 11;
    }
    if (dataIn == 12) {
      m = 12;
    }
    if (dataIn == 14) {
      m = 14;
    }
    if (dataIn == 16) {
      m = 16;
    }
    if (dataIn == 17) {
      m = 17;
    }
    if (dataIn == 18) {
      m = 18;
    }
    if (dataIn == 19) {
      m = 19;
    }
    if (dataIn == 20) {
      m = 20;
    }
    if (dataIn == 21) {
      m = 21;
    }
    if (dataIn == 22) {
      m = 22;
    }
    if (dataIn == 23) {
      m = 23;
    }
    if (dataIn == 24) {
      m = 24;
    }
    if (dataIn == 25) {
      m = 25;
    }
    if (dataIn == 26) {
      m = 26;
    }
    if (dataIn == 27) {
      m = 27;
    }

    // Move the Mecanum wheels platform
    if (m == 4) {
      moveSidewaysLeft();
    }
    if (m == 5) {
      moveSidewaysRight();
    }
    if (m == 2) {
      moveForward();
    }
    if (m == 7) {
      moveBackward();
    }
    if (m == 3) {
      moveRightForward();
    }
    if (m == 1) {
      moveLeftForward();
    }
    if (m == 8) {
      moveRightBackward();
    }
    if (m == 6) {
      moveLeftBackward();
    }
    if (m == 9) {
      rotateLeft();
    }
    if (m == 10) {
      rotateRight();
    }

    if (m == 0) {
      stopMoving();
    }

    // Mecanum wheels speed
    if (dataIn > 30 & dataIn < 100) {
      wheelSpeed = dataIn * 20;
    }

    // Move robot arm
    // Move servo 1 in positive direction
    while (m == 16) {
      if (Bluetooth.available() > 0) {
        m = Bluetooth.read();
      }
      servo01.write(servo1PPos);
      servo1PPos++;
      delay(speedDelay);
    }
    // Move servo 1 in negative direction
    while (m == 17) {
      if (Bluetooth.available() > 0) {
        m = Bluetooth.read();
      }
      servo01.write(servo1PPos);
      servo1PPos--;
      delay(speedDelay);
    }
    // Move servo 2
    while (m == 19) {
      if (Bluetooth.available() > 0) {
        m = Bluetooth.read();
      }
      servo02.write(servo2PPos);
      servo2PPos++;
      delay(speedDelay);
    }
    while (m == 18) {
      if (Bluetooth.available() > 0) {
        m = Bluetooth.read();
      }
      servo02.write(servo2PPos);
      servo2PPos--;
      delay(speedDelay);
    }
    // Move servo 3
    while (m == 20) {
      if (Bluetooth.available() > 0) {
        m = Bluetooth.read();
      }
      servo03.write(servo3PPos);
      servo3PPos++;
      delay(speedDelay);
    }
    while (m == 21) {
      if (Bluetooth.available() > 0) {
        m = Bluetooth.read();
      }
      servo03.write(servo3PPos);
      servo3PPos--;
      delay(speedDelay);
    }
    // Move servo 4
    while (m == 23) {
      if (Bluetooth.available() > 0) {
        m = Bluetooth.read();
      }
      servo04.write(servo4PPos);
      servo4PPos++;
      delay(speedDelay);
    }
    while (m == 22) {
      if (Bluetooth.available() > 0) {
        m = Bluetooth.read();
      }
      servo04.write(servo4PPos);
      servo4PPos--;
      delay(speedDelay);
    }
    // Move servo 5
    while (m == 25) {
      if (Bluetooth.available() > 0) {
        m = Bluetooth.read();
      }
      servo05.write(servo5PPos);
      servo5PPos++;
      delay(speedDelay);
    }
    while (m == 24) {
      if (Bluetooth.available() > 0) {
        m = Bluetooth.read();
      }
      servo05.write(servo5PPos);
      servo5PPos--;
      delay(speedDelay);
    }
    // Move servo 6
    while (m == 26) {
      if (Bluetooth.available() > 0) {
        m = Bluetooth.read();
      }
      servo06.write(servo6PPos);
      servo6PPos++;
      delay(speedDelay);
    }
    while (m == 27) {
      if (Bluetooth.available() > 0) {
        m = Bluetooth.read();
      }
      servo06.write(servo6PPos);
      servo6PPos--;
      delay(speedDelay);
    }

    // If arm speed slider is changed
    if (dataIn > 101 & dataIn < 250) {
      speedDelay = dataIn / 10; // Change servo speed (delay time)
    }

    // If button "SAVE" is pressed
    if (m == 12) {
      //if it's initial save, set the steppers position to 0
      if (index == 0) {
        LeftBackWheel.setCurrentPosition(0);
        LeftFrontWheel.setCurrentPosition(0);
        RightBackWheel.setCurrentPosition(0);
        RightFrontWheel.setCurrentPosition(0);
      }
      lbw[index] = LeftBackWheel.currentPosition();  // save position into the array
      lfw[index] = LeftFrontWheel.currentPosition();
      rbw[index] = RightBackWheel.currentPosition();
      rfw[index] = RightFrontWheel.currentPosition();

      servo01SP[index] = servo1PPos;  // save position into the array
      servo02SP[index] = servo2PPos;
      servo03SP[index] = servo3PPos;
      servo04SP[index] = servo4PPos;
      servo05SP[index] = servo5PPos;
      servo06SP[index] = servo6PPos;
      index++;                        // Increase the array index
      m = 0;
    }

    // If button "RUN" is pressed
    if (m == 14) {
      runSteps();

      // If button "RESET" is pressed
      if (dataIn != 14) {
        stopMoving();
        memset(lbw, 0, sizeof(lbw)); // Clear the array data to 0
        memset(lfw, 0, sizeof(lfw));
        memset(rbw, 0, sizeof(rbw));
        memset(rfw, 0, sizeof(rfw));
        memset(servo01SP, 0, sizeof(servo01SP)); // Clear the array data to 0
        memset(servo02SP, 0, sizeof(servo02SP));
        memset(servo03SP, 0, sizeof(servo03SP));
        memset(servo04SP, 0, sizeof(servo04SP));
        memset(servo05SP, 0, sizeof(servo05SP));
        memset(servo06SP, 0, sizeof(servo06SP));
        index = 0;  // Index to 0
      }
    }
  }
  LeftFrontWheel.runSpeed();
  LeftBackWheel.runSpeed();
  RightFrontWheel.runSpeed();
  RightBackWheel.runSpeed();

  // Monitor the battery voltage
  int sensorValue = analogRead(A0);
  float voltage = sensorValue * (5.0 / 1023.00) * 3; // Convert the reading values from 5v to suitable 12V i
  //Serial.println(voltage);
  // If voltage is below 11V turn on the LED
  if (voltage < 11) {
    digitalWrite(led, HIGH);
  }
  else {
    digitalWrite(led, LOW);
  }
}
void moveForward() {
  LeftFrontWheel.setSpeed(wheelSpeed);
  LeftBackWheel.setSpeed(wheelSpeed);
  RightFrontWheel.setSpeed(wheelSpeed);
  RightBackWheel.setSpeed(wheelSpeed);
}
void moveBackward() {
  LeftFrontWheel.setSpeed(-wheelSpeed);
  LeftBackWheel.setSpeed(-wheelSpeed);
  RightFrontWheel.setSpeed(-wheelSpeed);
  RightBackWheel.setSpeed(-wheelSpeed);
}
void moveSidewaysRight() {
  LeftFrontWheel.setSpeed(wheelSpeed);
  LeftBackWheel.setSpeed(-wheelSpeed);
  RightFrontWheel.setSpeed(-wheelSpeed);
  RightBackWheel.setSpeed(wheelSpeed);
}
void moveSidewaysLeft() {
  LeftFrontWheel.setSpeed(-wheelSpeed);
  LeftBackWheel.setSpeed(wheelSpeed);
  RightFrontWheel.setSpeed(wheelSpeed);
  RightBackWheel.setSpeed(-wheelSpeed);
}
void rotateLeft() {
  LeftFrontWheel.setSpeed(-wheelSpeed);
  LeftBackWheel.setSpeed(-wheelSpeed);
  RightFrontWheel.setSpeed(wheelSpeed);
  RightBackWheel.setSpeed(wheelSpeed);
}
void rotateRight() {
  LeftFrontWheel.setSpeed(wheelSpeed);
  LeftBackWheel.setSpeed(wheelSpeed);
  RightFrontWheel.setSpeed(-wheelSpeed);
  RightBackWheel.setSpeed(-wheelSpeed);
}
void moveRightForward() {
  LeftFrontWheel.setSpeed(wheelSpeed);
  LeftBackWheel.setSpeed(0);
  RightFrontWheel.setSpeed(0);
  RightBackWheel.setSpeed(wheelSpeed);
}
void moveRightBackward() {
  LeftFrontWheel.setSpeed(0);
  LeftBackWheel.setSpeed(-wheelSpeed);
  RightFrontWheel.setSpeed(-wheelSpeed);
  RightBackWheel.setSpeed(0);
}
void moveLeftForward() {
  LeftFrontWheel.setSpeed(0);
  LeftBackWheel.setSpeed(wheelSpeed);
  RightFrontWheel.setSpeed(wheelSpeed);
  RightBackWheel.setSpeed(0);
}
void moveLeftBackward() {
  LeftFrontWheel.setSpeed(-wheelSpeed);
  LeftBackWheel.setSpeed(0);
  RightFrontWheel.setSpeed(0);
  RightBackWheel.setSpeed(-wheelSpeed);
}
void stopMoving() {
  LeftFrontWheel.setSpeed(0);
  LeftBackWheel.setSpeed(0);
  RightFrontWheel.setSpeed(0);
  RightBackWheel.setSpeed(0);
}

// Automatic mode custom function - run the saved steps
void runSteps() {
  while (dataIn != 13) {   // Run the steps over and over again until "RESET" button is pressed
    for (int i = 0; i <= index - 2; i++) {  // Run through all steps(index)
      if (Bluetooth.available() > 0) {      // Check for incomding data
        dataIn = Bluetooth.read();
        if ( dataIn == 15) {           // If button "PAUSE" is pressed
          while (dataIn != 14) {         // Wait until "RUN" is pressed again
            if (Bluetooth.available() > 0) {
              dataIn = Bluetooth.read();
              if ( dataIn == 13) {
                break;
              }
            }
          }
        }
        // If speed slider is changed
        if (dataIn > 100 & dataIn < 150) {
          speedDelay = dataIn / 10; // Change servo speed (delay time)
        }
        // Mecanum wheels speed
        if (dataIn > 30 & dataIn < 100) {
          wheelSpeed = dataIn * 10;
          dataIn = 14;
        }
      }
      LeftFrontWheel.moveTo(lfw[i]);
      LeftFrontWheel.setSpeed(wheelSpeed);
      LeftBackWheel.moveTo(lbw[i]);
      LeftBackWheel.setSpeed(wheelSpeed);
      RightFrontWheel.moveTo(rfw[i]);
      RightFrontWheel.setSpeed(wheelSpeed);
      RightBackWheel.moveTo(rbw[i]);
      RightBackWheel.setSpeed(wheelSpeed);

      while (LeftBackWheel.currentPosition() != lbw[i] & LeftFrontWheel.currentPosition() != lfw[i] & RightFrontWheel.currentPosition() != rfw[i] & RightBackWheel.currentPosition() != rbw[i]) {
        LeftFrontWheel.runSpeedToPosition();
        LeftBackWheel.runSpeedToPosition();
        RightFrontWheel.runSpeedToPosition();
        RightBackWheel.runSpeedToPosition();
      }
      // Servo 1
      if (servo01SP[i] == servo01SP[i + 1]) {
      }
      if (servo01SP[i] > servo01SP[i + 1]) {
        for ( int j = servo01SP[i]; j >= servo01SP[i + 1]; j--) {
          servo01.write(j);
          delay(speedDelay);
        }
      }
      if (servo01SP[i] < servo01SP[i + 1]) {
        for ( int j = servo01SP[i]; j <= servo01SP[i + 1]; j++) {
          servo01.write(j);
          delay(speedDelay);
        }
      }

      // Servo 2
      if (servo02SP[i] == servo02SP[i + 1]) {
      }
      if (servo02SP[i] > servo02SP[i + 1]) {
        for ( int j = servo02SP[i]; j >= servo02SP[i + 1]; j--) {
          servo02.write(j);
          delay(speedDelay);
        }
      }
      if (servo02SP[i] < servo02SP[i + 1]) {
        for ( int j = servo02SP[i]; j <= servo02SP[i + 1]; j++) {
          servo02.write(j);
          delay(speedDelay);
        }
      }

      // Servo 3
      if (servo03SP[i] == servo03SP[i + 1]) {
      }
      if (servo03SP[i] > servo03SP[i + 1]) {
        for ( int j = servo03SP[i]; j >= servo03SP[i + 1]; j--) {
          servo03.write(j);
          delay(speedDelay);
        }
      }
      if (servo03SP[i] < servo03SP[i + 1]) {
        for ( int j = servo03SP[i]; j <= servo03SP[i + 1]; j++) {
          servo03.write(j);
          delay(speedDelay);
        }
      }

      // Servo 4
      if (servo04SP[i] == servo04SP[i + 1]) {
      }
      if (servo04SP[i] > servo04SP[i + 1]) {
        for ( int j = servo04SP[i]; j >= servo04SP[i + 1]; j--) {
          servo04.write(j);
          delay(speedDelay);
        }
      }
      if (servo04SP[i] < servo04SP[i + 1]) {
        for ( int j = servo04SP[i]; j <= servo04SP[i + 1]; j++) {
          servo04.write(j);
          delay(speedDelay);
        }
      }

      // Servo 5
      if (servo05SP[i] == servo05SP[i + 1]) {
      }
      if (servo05SP[i] > servo05SP[i + 1]) {
        for ( int j = servo05SP[i]; j >= servo05SP[i + 1]; j--) {
          servo05.write(j);
          delay(speedDelay);
        }
      }
      if (servo05SP[i] < servo05SP[i + 1]) {
        for ( int j = servo05SP[i]; j <= servo05SP[i + 1]; j++) {
          servo05.write(j);
          delay(speedDelay);
        }
      }

      // Servo 6
      if (servo06SP[i] == servo06SP[i + 1]) {
      }
      if (servo06SP[i] > servo06SP[i + 1]) {
        for ( int j = servo06SP[i]; j >= servo06SP[i + 1]; j--) {
          servo06.write(j);
          delay(speedDelay);
        }
      }
      if (servo06SP[i] < servo06SP[i + 1]) {
        for ( int j = servo06SP[i]; j <= servo06SP[i + 1]; j++) {
          servo06.write(j);
          delay(speedDelay);
        }
      }
    }
  }
}
So that’s pretty much everything for this tutorial. The project works well, but please note that it’s far from perfect. The automatic movements might not be that precise because of the slipping of the mecanum wheels as well as the poor performance of the servo motors. These cheap servo motors can also shake or jitter even when not moving just because don’t have enough strength to hold the weight of the 3D printed parts.
I hope you enjoyed this tutorial and learned something new. Feel free to ask any question in the comments section below and check my Arduino Projects Collection.
The post Arduino Robot Arm and Mecanum Wheels Platform Automatic Operation appeared first on HowToMechatronics.
from HowToMechatronics https://ift.tt/328VoNh
Subscribe to:
Posts (Atom)