Saturday 29 September 2018

12 Best Drone Kits for Beginners & Advanced: All Features, Pros & Cons [2018]

Before looking into the best DIY drone available I want to give a brief difference between a drone and quadcopter. Drones and quadcopters can be called as UAVs (Unmanned aerial vehicles.) A quadcopter is a specific type of drone, While drone is a broad category such as tricopters, hexacopters, octocopters.

Drones are very expensive, because of which it is limited to a certain group of people. But in the last few years, drones which are affordable drones are available. Depending on your requirement you can choose the best drone. If you are a beginner and looking to learn how to fly a drone then you can start with low budget drones. If you are a professional you can choose drones with more features.

BEST CHOICE
Holy Stone HS170 Predator Mini RC Helicopter Drone 2.4Ghz 6-Axis Gyro 4 Channels Quadcopter Good Choice for Drone Training
SYMA X5C 4 Channel 2.4GHz RC Explorers Quad Copter w/ Camera
Holy Stone GPS FPV RC Drone HS100 with Camera Live Video and GPS Return Home Quadcopter with Adjustable Wide-Angle 720P HD WIFI Camera- Follow Me, Altitude Hold, Intelligent Battery Long Control Range
Holy Stone F181C RC Quadcopter Drone with HD Camera RTF 4 Channel 2.4GHz 6-Gyro with Altitude Hold Function,Headless Mode and One Key Return Home, Color Black
RC Quadcopter Drones with Camera – “Force1 U818A Discovery” Camera Drone Kit with 720p RC Quadcopter Drone Camera + Micro SD Card and Bonus Battery
Title
Holystone Predator
Syma X5C
Holystone HS100
Holystone F181C
UDI U818A Discovery
Flight time
Up to 8 min
7-10 min
12-15 min
7-9 min
8-10 min
Charging Time
80 min
90 min
N/A
80 min
80 min
Range
30-40 meter
50 meter
500 meters
50-100 meter
50-100 meter
Controller
2.4 GHZ
2.4 GHZ
2.4 GHZ
2.4 GHZ
2.4 GHZ
Camera
Return Home
Prime
Star Rating
Reviews
4,629 Reviews
4,678 Reviews
1,255 Reviews
3,147 Reviews
2,035 Reviews
BEST CHOICE
Holy Stone HS170 Predator Mini RC Helicopter Drone 2.4Ghz 6-Axis Gyro 4 Channels Quadcopter Good Choice for Drone Training
Title
Holystone Predator
Flight time
Up to 8 min
Charging Time
80 min
Range
30-40 meter
Controller
2.4 GHZ
Camera
Return Home
Prime
Star Rating
Reviews
4,629 Reviews
Buy Now
SYMA X5C 4 Channel 2.4GHz RC Explorers Quad Copter w/ Camera
Title
Syma X5C
Flight time
7-10 min
Charging Time
90 min
Range
50 meter
Controller
2.4 GHZ
Camera
Return Home
Prime
Star Rating
Reviews
4,678 Reviews
Buy Now
Holy Stone GPS FPV RC Drone HS100 with Camera Live Video and GPS Return Home Quadcopter with Adjustable Wide-Angle 720P HD WIFI Camera- Follow Me, Altitude Hold, Intelligent Battery Long Control Range
Title
Holystone HS100
Flight time
12-15 min
Charging Time
N/A
Range
500 meters
Controller
2.4 GHZ
Camera
Return Home
Prime
Star Rating
Reviews
1,255 Reviews
Buy Now
Holy Stone F181C RC Quadcopter Drone with HD Camera RTF 4 Channel 2.4GHz 6-Gyro with Altitude Hold Function,Headless Mode and One Key Return Home, Color Black
Title
Holystone F181C
Flight time
7-9 min
Charging Time
80 min
Range
50-100 meter
Controller
2.4 GHZ
Camera
Return Home
Prime
Star Rating
Reviews
3,147 Reviews
Buy Now
RC Quadcopter Drones with Camera – “Force1 U818A Discovery” Camera Drone Kit with 720p RC Quadcopter Drone Camera + Micro SD Card and Bonus Battery
Title
UDI U818A Discovery
Flight time
8-10 min
Charging Time
80 min
Range
50-100 meter
Controller
2.4 GHZ
Camera
Return Home
Prime
Star Rating
Reviews
2,035 Reviews
Buy Now

Before buying any drone one should consider the following factors

  • Flight time: The average time A done can stay in the air for one time charging is flight time. It is good to have a longer flight time. Extra batteries can be added to increase flight time.
  • Range: Range is the maximum distance to which a drone can be controlled, without losing contact with the controller.
  • Speed: The maximum speed a drone can fly is the most important factor generally considered.
  • Controller: Controller can be used to control Drone. This can either Hardware such as remote or an app. Depending on your Requirement you can choose the controller.
  • Camera: Almost all drones will have a camera feature. Some drones are provided with the mount to attach your own camera to it. There are more chances of taking videos and images from the sky with high clarity.
  • Return home button: This feature tells the drone to come home automatically using GPS. Generally, basic models don’t have this mode.

Let’s get started!

1. Holystone Predator

Holy Stone HS170 Predator Mini RC Helicopter Drone

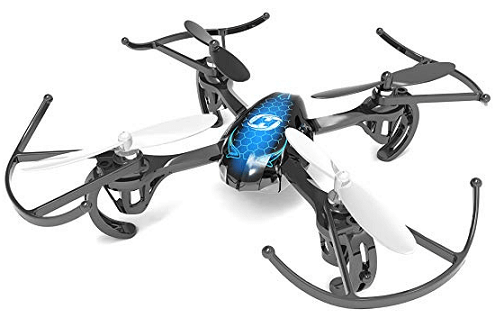
Holystone predator is the best budget drone. It is easy to Fly and can be easily handled by the kids. Though it looks small it is robust and performs well. It is durable for crashes. It is very precise and it is suitable for indoor and outdoor environments. It can be operated in headless mode Which means its orientation is fixed towards the controller. and it can flip to 360 degrees. The 6 axis gyro Stabilizers and high powered engines make the drone stand still in the air.

Features:

  • Flight time: For charging time of 30 Minutes it can fly up to 8 minutes. You can add extra batteries to increase this flight time.
  • Range:30-40 meter
  • Controller: Remote controller. It looks large in size And is operated at 2.4 GHZ.
  • Camera: Not included
  • Return Home: Included

Pros:

  • Easy to use
  • No FAA registration required
  • Can flip 360 degrees
  • Good for beginners

Cons:

  • Long charging time
  • The efficiency of batteries is less.
  • A controller does not have inscriptions.
  • Camera not included
Buy Now From Amazon


2. Syma X5C

SYMA X5C 4 Channel 2.4GHz RC Explorers Quad Copter Camera

Best drone with the camera in low budget. All parts are available when you need them. This is good in indoor and outdoor. The camera is included in this. A 4 GB Micro SD card is also available

Features:

  • Flight time: 7-10 min for 90 minutes charging time.
  • Range: 50 meter
  • Controller: A transmitter is used as a controller. It is operated at 2.4 GHZ and this is provided with small LCD in the bottom to display parameters like battery level, trim level, yaw rate etc
  • Camera: A 720 p HD is included.

Pros:

  • Easy to use
  • Good design
  • Can flip 360 degrees
  • Good for beginners

Cons:

  • Long charging time
  • Batteries are not efficient
Buy Now From Amazon


3. Holystone HS100

Holy Stone GPS FPV RC Drone HS100 with Camera

The HS 100 is a large drone with a 50 cm length/width and 20 cm height. It weighs around 700 gms along with the battery. The camera is placed below the drone while the battery is behind the drone. The drone is provided with LEDs, to indicate its connectivity with the transmitter, GPS Lock and Battery status. If the drone is out of range of the transmitter, drone automatically activates GPS aided return home function. It has some other special features like one Key take off/land, Altitude hold, VR.

Features:

  • Flight time: 12-15 min
  • Range: 500 meters, 120 meters height,150 m FPV
  • Controller: A transmitter is used as a controller. It is operated at 2.4 GHZ.
  • Camera: 720 p camera.
  • Sensors:GPS,Barometer,6-axis gyroscope.

Pros:

  • Large and powerful motors allow the drone to withstand the wind
  • Range is good
  • Camera with 720 p and 90 degrees adjustable tilt adds an advantage
  • It has VR mode in the built-in FPV app, but goggles have to be bought separately
  • It has a good altitude stable mode
  • The speed of the drone is adjustable using the scroll wheel on the transmitter
  • Good for beginners.

Cons:

  • Camera Quality could be better for this price
  • Though drone range is good FPV range could be better
  • Charging time could be low
Buy Now From Amazon


4. Holystone F181C

Holy Stone F181C RC Quadcopter Drone with HD Camera

Holystone F181C is suitable for professionals, intermediate, beginners. This is a great drone for beginners photography. If you are a professional and want to fly as fast as possible then this drone is best for you. It has four-speed settings.

F181 chaser is of 20.5 cm in size and weighs about 131 g. It has one key return home and one key takeoff/landing. It can be operated in headless mode. It has double batteries.

Features:

  • Flight time: 7-9 min for charging time of 80 minutes.
  • Range: 50-100 meter, 120 meters height.
  • Controller: A transmitter is used as a controller. It is operated at 2.4GHZ.
  • Camera: 720p HD camera
  • Return Home: Included

Pros:

  • Four adjustable speed modes are good.
  • The range is good.

Cons:

  • Camera Quality could be better.
Buy Now From Amazon


5. UDI U818A Discovery

RC Quadcopter Drones with Camera

This is a good drone for learning and practicing with quality recording and good image quality. It can perform 3D Flips. Another important feature is it gives an alarm at low battery. This helps in avoiding crashes. This drone is made of light, thin plastic making it weigh low.500MAh battery is in the holder on the bottom where the camera is also placed. It has a headless mode feature.

Features:

  • Flight time: 8-10 min for charging time of 80 minutes
  • Range: 50-100 meter
  • Controller: A transmitter is used as a controller. It is operated at 2.4GHZ
  • Camera: 1MP camera
  • Return Home: Included.

Pros:

  • Cost is affordable
  • It arrives with an extra battery
  • Camera quality is good
  • Very easy to fly and control

Cons:

  • It does not have new features like one key landing/takeoff, altitude hold.
  • Short battery life.
Buy Now From Amazon


6. DJI Phantom 3 Professional

DJI Phantom 3 Professional Quadcopter 4K UHD Video

The Phantom 3 professional is an advanced drone with a little high price. It has many new flying features. It has the best camera of 4k video recording and a 12-megapixel sensor. The remote controller is very well improved. It can accommodate tablets, mobiles. This drone can also be used indoors.

Features:

  • Flight time: 25 minutes
  • Range: 2 Km
  • Controller: Remote
  • Camera: It comes with 4 k Camera with 12 MP sensor
  • Return Home: Included.
  • Speed: 16m/s

Pros:

  • Easy to use
  • Small and less weight
  • Camera video quality
  • Customisable remote control

Cons:

  • Short battery life
  • The camera does not rotate
  • Batteries are expensive
  • Android app can be made more user-friendly.
Buy Now From Amazon


7. Qcopter

Quadcopter Drone with Camera Live Video

This is a great drone for beginners. This drone is provided with LEDs switched on night time. A basic user manual is provided with this quadcopter. Its stability makes beginners to easily control the drone. It has a battery of capacity 3.7v and 1100mAh.It has FPV feature. The Qcopter team Provides excellent customer services.

Features:

  • Flight time: 30 minutes
  • Range: 100 m
  • Controller: Remote
  • Camera: This had HD 1080P HD Wifi Camera
  • Return Home: Included
  • Speed: 20m/s

Pros:

  • Flight time is good
  • Bonus battery and crash kit adds an advantage
  • Easy to fly
  • Customer services are good

Cons:

  • Issues about durability
  • Camera quality.
Buy Now From Amazon


8. Holystone F181W

Holy Stone F181W Wifi FPV Drone with 720P Wide-Angle HD Camera

F181W is ready to fly the drone. This is a pre-assembled drone. Some small things like attaching batteries, camera, propellers have to be done before flying it. It comes with some extra features which are not seen in other drones at this price.

Battery capacity of this drone is 3.7v 750 mA. It has 6 axis gyroscope stabilization. It weighs around 138 grams. Some of the features like headless mode, one key takeoff/landing, hover mode,3D flips are also included.

.One of the best feature it has is FPV live transmission. The video is transmitted from the camera to phone via wifi. To take clear images use the drone in hover mode.
Controller requires four 1.5v batteries. The controller has multiple speed level options. Such as low, medium.high and expert. The kit consists of an extra battery, extra propellers and propeller guard screws.

Features:

  • Flight time: 7-10 minutes
  • Range: 100m,FPV range :30-50m
  • Controller: Remote/app
  • Camera: This had HD 720P HD Wifi Camera.
  • Return Home: Included
  • Speed: Multiple speed control

Pros:

  • This is ready to fly a drone as it is pre-assembled
  • Double batteries increase the flying time
  • Easy to fly
  • FAA registration is not required

Cons:

  • It can not handle winds
  • Parts of the drone are delicate
  • It gets heated easily, so there is an interruption in flying to ensure no damage to the components.
Buy Now From Amazon


9. HolyStone HS 160

Holy Stone HS160 Shadow FPV RC Drone

HS 160 is a beginners drone. It is very small and can fit it into a pocket. This easy to carry as it is foldable. It can fly smoothly in calm weather, but it cannot withstand a windy weather. It can be operated using a mobile. Video quality of the drone is good. But to watch the drone flying in real time, you need to stay in the wifi range of the camera i.e 30 meters. It comes with an extra battery so that flight time can be increased.

Features: 

  • Flight time: 8 minutes.
  • Range: 50-70 meters,FPV range:30 meters
  • Controller :App
  • Camera: 720P HD Wifi Camera.
  • Return Home: Not Included.

Pros:

  • Foldable and pocket-sized drone
  • FPV Camera
  • Smooth flying

Cons:

  • No headless mode
  • Less durability
  • Video download link is laggy
  • No GPS
  • Hovering is hard as it does not have sensors
Buy Now From Amazon


10. Phantom 3 Standard Drone

DJI Phantom 3 Standard Quadcopter Drone

This is a well-known drone for beginners. It has the capability of recording videos in 3 modes HD, HHD,2.7k. Images can be taken at 12MP capability. It consists of a Li-polymer battery of 4800 mAH.It weighs around 1.2kg. It has a horizontal speed of 35 miles/hr and a vertical speed of 11 miles/hour. It can be controlled either by a hardware remote controller or by an app. App has automatic control over the quadcopter.

Features: 

  • Flight time: 25 minutes.
  • Range: 50-70 meters,FPV range:30 meters
  • Controller :App
  • Speed :16m/s
  • Camera:720P HD Wifi Camera.
  • Return Home: Not Included.

Pros:

  • Photos and video quality is impressive
  • The app is very interactive
  • Intelligent flight modes

Cons:

  • Charging time is more
  • Sudden malfunctioning is observed while taking video
  • Spare batteries are costly
Buy Now From Amazon


11. DBPOWER X400W

DBPOWER X400W FPV RC Quadcopter Drone

This is ready to fly a drone. It has FPV capcbility.No VR headset is included in the package. The user should download an app to watch the view.it can be used in indoor and outdoor environments. It weighs around 1.6 pounds. Battery capacity is 33.7v, 750mAh.This drone has 6 axis gyro technology. This can be used in headless mode. Some other features like3D split screen are also available.

Features: 

  • Flight time – 8-9 minutes charging time -120 min
  • Range -100m
  • Controller – remote
  • Camera – 720 P HD Wifi Camera.

Pros:

  • Has LEDs for night visibility
  • Battery lasts long
  • No permission is required for flying.
  • Compatible with VR headsets.

Cons:

  • It does not have VR set.
  • SYMA X5C
Buy Now From Amazon


12. SYMA X5C 4

SYMA X5C 4 Channel 2.4GHz RC Explorers Quad Copter Camera

The SYMA X5C comes with many features. This is a great drone for beginners. Gyro stabilization makes the performance of the flight smooth. This drone is good for beginners for aerial photography and professional to explore surroundings.

  • Flight time – 7min
  • Control range – 80m
  • Camera – 2MP HD camera
  • Charge time – 1.5hr

Pros:

  • Affordable
  • Durable
  • All parts are available for repair
  • Can fly in indoors and outdoors

Cons:

  • It is affected by the winds.
  • It has a low flight time.
  • Camera quality is not good compared to other cameras.
Buy Now From Amazon


Conclusion


The post 12 Best Drone Kits for Beginners & Advanced: All Features, Pros & Cons [2018] appeared first on Electronics Hub.


from Electronics Hub https://ift.tt/2qEn7qk

How to Burn Bootloader on ATmega328 using Arduino UNO?

In this project, I will show you how to burn bootloader on ATmega328 Microcontroller. Using this method, you can use your ATmega328 Microcontroller as a standalone on a custom design or PCB or simply burn bootloader on ATmega328 (as well as you can upload the code).

How to Burn Bootloader on ATmega328 Image 4

Introduction

If you are viewing this project, then you might probably have used Arduino board. There is a high possibility that the ATmega328 Microcontroller on Arduino UNO might fail after certain time (or improper connection). In order to reuse that Arduino Board, you need a new ATmega328 IC with Bootloader loaded (I will talk about Bootloader in a minute).

There are other reasons for burning Bootloader on ATmega328 Microcontroller like if you have written your own Bootloader and want to test it out or you want understand the working of microcontroller in detail.

WARNING: It is not recommended to tweak the Bootloader in Arduino if you are new to this kind of stuff.

What is Bootloader?

Simply speaking, Bootloader is small piece of code (executable code in .hex format) that resides in the Microcontroller’s memory. Bootloader in Arduino allows us to program Arduino over serial port i.e. using an USB cable.

The job of Bootloader in Arduino is to accept the code from the computer and place it in the memory of the microcontroller.

Why do we need a Bootloader?

Traditionally, microcontrollers like ATmega328 from Atmel are programmed with the help of dedicated programmers which involves some fancy connections. Bootloaders take out this complexity and provides us with an easy way of programming the microcontroller i.e. just by using an USB cable.

Bootloaders resides in a special secured location of the Programmable Flash Memory of the Microcontroller and usually occupies less than 1KB of memory.

What is the need for Burning Bootloader on ATmega328?

As I mentioned earlier, if you want to upload programs onto a brand new ATmega328 Microcontroller IC, you have to use a special programmer (and also set the fuse bits). But if you burn Bootloader on ATmega328, you can simply program the microcontroller over serial port (USB cable).

Once the ATmega328 Microcontroller is ready with bootloader, you can simply use it in your Arduino Board (as a replacement) or use it as the microcontroller if you are planning to make your own Arduino board.

How to Burn Bootloader on ATmega328?

There are couple of ways to burn bootloader on ATmega328 IC. The first way is to use a Dedicated AVR Programmer Hardware. The second way is to use a working Arduino board as the programmer and burn the bootloader on the target ATmega328 Microcontroller.

In this project, I will be using the second method i.e. use Arduino as a Programmer.

Circuit Diagram

The circuit diagram for burning bootloader on ATmega328 Microcontroller using Arduino is shown below.

How to Burn Bootloader on ATmega328 Circuit Diagram

Pin diagram of the ATmega328 Microcontroller is shown in the following image, just in case.

How to Burn Bootloader on ATmega328 Pin Diagram

Components Required

  • Arduino UNO
  • ATmega328 Microcontroller IC
  • 16MHz Crystal
  • 22pF x 2 Ceramic Capacitors
  • 10KΩ Resistor
  • Push Button
  • 330Ω Resistor
  • LED
  • Breadboard
  • Connecting Wires
  • 5V Power Supply

Procedure for Programming Bootloader on Atmega328

As mentioned earlier, Arduino UNO is being used as an AVR programmer here. In order to achieve that, you have to upload a special program onto your working Arduino UNO board called “Arduino ISP”.

So, before making the connections, connect the working Arduino UNO to the computer using USB cable and select the appropriate board and PORT in the Arduino IDE.

Now, go to File > Examples > ArduinoISP > ArduinoISP. Upload this code to you Arduino UNO in order to turn your Arduino UNO board into an AVRISP Programmer.

How to Burn Bootloader on ATmega328 Image 2

After completing this step, make the necessary connections (if not made already). Now go to Tools > Programmer and select “Arduino as ISP” option. After this, you are ready to burn the bootloader.

How to Burn Bootloader on ATmega328 Image 1

Simply, go to Tools and click on “Burn Bootloader”. Your target ATmega328 Microcontroller will be programmed with bootloader.

How to Burn Bootloader on ATmega328 Image 3

Upload Sketches to ATmega328

Once you are done with uploading the Bootloader on ATmega328 Microcontroller, you can continue further by uploading a test sketch on to it. For this, retain the same connections as earlier and open any sketch like Blink Sketch, for example.

Do not change any options i.e. the programmer is still set to “Arduino as ISP”. Now, by holding the “Shift” button on the keyboard, click on “Upload” icon. This will upload the sketch to the ATmega328 Microcontroller IC by using Arduino UNO as the programmer.

After completing this, you can disconnect the Arduino UNO from ATmega328 Microcontroller and use ATmega328 IC as a standalone device with Blink sketch running on it.

How to Burn Bootloader on ATmega328 Standalone Circuit

The following image shows the ATmega328 Microcontroller running Blink sketch after being uploaded with the help of Arduino UNO.

NOTE: In order to upload code to Arduino UNO, make sure to switch the programmer back to “AVRISP mkII”.

How to Burn Bootloader on ATmega328 Standalone

Conclusion

In this project, I have shown you how to burn Bootloader on ATmega328 Microcontroller IC and also as an extra option I have also shown you how to upload Arduino sketches onto ATmega328 with Bootloader using Arduino UNO.

The post How to Burn Bootloader on ATmega328 using Arduino UNO? appeared first on Electronics Hub.


from Electronics Hub https://ift.tt/2zE45mu

Friday 28 September 2018

What are the Differences Between M2M and the IoT?

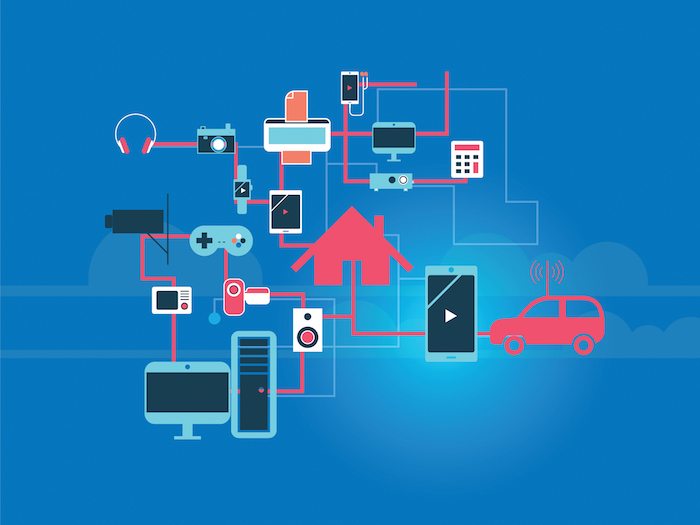
M2M, or machine-to-machine, is a direct communication between devices using wired or wireless communication channels. M2M refers to the interaction of two or more devices/machines that are connected to each other. These devices capture data and share with other connected devices, creating an intelligent network of things or systems. Devices could be sensors, actuators, embedded […]

The post What are the Differences Between M2M and the IoT? appeared first on Electronics For You.


from Electronics For You https://ift.tt/2zE4R2N

Digital Signal Processing in Scilab: Understanding Phase Misalignment in FSK Decoding

In this article we’ll use Scilab to explore the effect of unpredictable phase variations in a demodulated frequency-shift-keying baseband signal.

from All About Circuits Technical Articles https://ift.tt/2IoJ0iQ

Two-Channel Wireless Audio Amplifier Using Bluetooth and TA8210AH

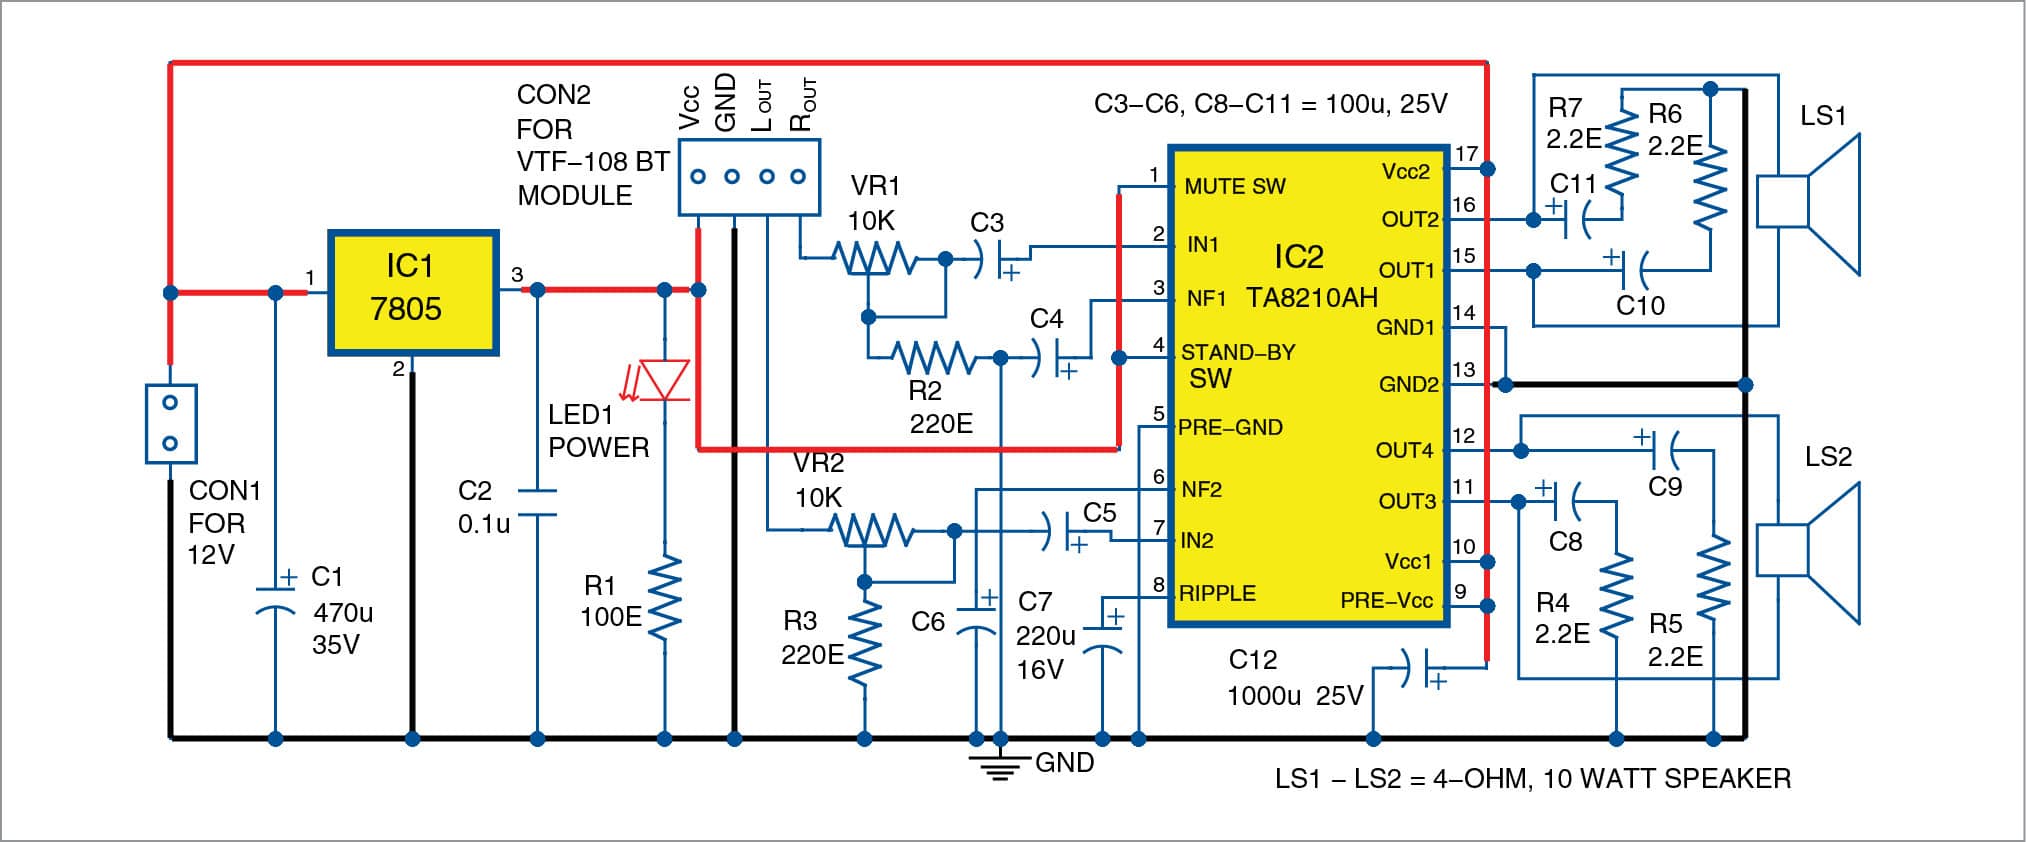
Use of audio amplifiers is increasing day by day. This project deals with the transmission of the audio signal wirelessly and amplification of the received signal using VTF-108 Bluetooth module and audio amplifier IC TA8210AH. Bluetooth module can connect to devices such as Hi-Fi equipment, mobile phones and MP3 players. Audio sources such as mobilephones […]

The post Two-Channel Wireless Audio Amplifier Using Bluetooth and TA8210AH appeared first on Electronics For You.


from Electronics For You https://ift.tt/2IoeaqG

Tools for Engineers, Coders and Media Enthusiasts

PICSimLab PICSimLab is an electronics development board emulator. It comes with an integrated MPLABX debugger. It supports PICs and simavr microcontrollers. This open source emulator supports real-time emulation and has support for Arduino board programming. KDevelop This free, open source integrated development environment (IDE) is available for Microsoft Windows and other Unix-like operating systems (OSes). […]

The post Tools for Engineers, Coders and Media Enthusiasts appeared first on Electronics For You.


from Electronics For You https://ift.tt/2NONGEE

Arduino Wattmeter – Voltage, Current and Power Measurement

In this project, I will show you how to build an Arduino Wattmeter, a device that can be used to measure the power consumed by a load. In addition to the Wattmeter, this circuit can also act as a Voltmeter and Ammeter to measure voltage and current.

Arduino Wattmeter Image 3

Introduction

Measuring Voltage, Current and subsequently the Power is an essential task of any electronics engineer. For measuring voltage and current, you can use simple handheld multimeters as they provide both the range and accuracy for normal usage.

But in order to measure power, you have several options like simple wattmeters to complex power analyzers and power meters.

What if I told you that you can make your own Wattmeter with simple components as a DIY Project, which can be used in your LED or Solar related projects?

Instead of buying a readily available and an expensive Wattmeter, you can easily make your own Arduino Wattmeter. I will explain all necessary steps required for the same.

Concept of Arduino Wattmeter Project

There are number of ways that you can implement the Arduino Wattmeter Project. One of the easy ways is to interface a Voltage Sensor and a Current Sensor with Arduino, measure the voltage and current values and finally with some mathematics, you can calculate the Power in Watts.

Although using sensors can provide accurate results, where is the fun in using sensors if you can build the entire system yourself. This is beneficial if you are a student and trying to grab the underlying concepts.

The method which I will be implementing involves complete design of the circuit. For ease of understanding I will divide the circuit into two halves: The Sensor part and The Control Part.

The Sensor Part of the circuit is responsible for measuring the Voltage across the load and Current through the load. Both these values, which are analog in nature, are given to the Arduino to its ADC. Arduino converts these values to digital values and makes a few calculations as displays the results on the LCD.

Circuit Diagram

The following image shows the circuit diagram of Arduino Wattmeter.

Arduino Wattmeter Circuit Diagram

Components Required

  • Arduino UNO or Nano
  • 16×2 LCD Display
  • LM358 Op Amp
  • 7805 Voltage Regulator
  • Resistors – 0.22Ω/3W, 1KΩ x 2, 2.2KΩ, 10KΩ, 20KΩ
  • 10KΩ Potentiometer
  • Capacitors – 100nF x 2 (0.1µF – Code 104)
  • Push ON – Push OFF Button
  • Connecting Wires
  • Terminals for connecting Load
  • 12V Power Supply

Code

The code for project is given below.

Working of Arduino Wattmeter

In the sensor part of the circuit, there are two areas which are responsible for measuring voltage and current. For measuring the voltage, a voltage divider circuit is implemented using a 10KΩ and a 2.2KΩ Resistor.

Arduino Wattmeter Image 2

Using these resistors, you can measure voltages up to 24V. These resistors also help us bringing the voltage range to 0V – 5V, which is the range Arduino works on.

Now, coming to the current measurement, Arduino or any Microcontroller for that matter can only accept analog voltage as input i.e. it can only read voltages. If Arduino can only read voltages, then how can we measure current?

In order to measure current, you have to convert the current values to appropriate voltage values. Here comes the Ohm’s Law to the rescue. As per Ohm’s Law, the voltage drop across a load is proportional to the current. Hence, a small shunt resistor is placed with respect to the load. By measuring the voltage across this resistor, you can measure the current.

The shunt resistor used here is of 0.22Ω (3W). Even when the load draws a current of 1A (which is the theoretical limit of this circuit and shouldn’t exceed this value), the voltage across the shunt resistor is only 0.2V.

This value is very low for Arduino’s ADC circuit. Hence, I have used LM358 Op Amp in Non-Inverting Amplifier Mode to amplify the values provided to Arduino. The voltage divider network for the feedback control consists of 20KΩ Resistor and 1KΩ Resistor. These resistors contribute to a gain of approximately 21.

Output of the Amplifier is filtered and given to Analog Input pin of Arduino. Arduino takes both the voltage and current (masked as voltage) values at Analog Input pins A1 and A0 respectively. After performing few calculations, it then displays the values of Voltage, Current and Power on the LCD Display.

Testing Arduino Wattmeter Circuit

After designing the circuit on a perf board and making all the necessary connections, I have used the circuit to test a couple of loads like LED and a Motor. I have used a 12V Power supply and all the results are satisfactory.

Arduino Wattmeter Image 1

Conclusion

A simple Arduino Wattmeter is designed in this project with the aim of measuring power consumed by small loads (up to 12W). In a future implementation, as an extension to this project, I will design a new circuit based on Voltage and Current Sensors for more accurate results.

The post Arduino Wattmeter – Voltage, Current and Power Measurement appeared first on Electronics Hub.


from Electronics Hub https://ift.tt/2xVuURg