This article explains the use of Verilog “If” and “Case” statements to describe a combinational circuit.
from All About Circuits Technical Articles http://bit.ly/2TwBFlO
Thursday, 31 January 2019
Microsemi Releases Libero SoC 12.0, a New Unified Design Suite for SoC FPGA Development
This week, Microsemi announced their latest unified design suite to help streamline the process of developing on FPGAs.
from All About Circuits News http://bit.ly/2RtKwTC
from All About Circuits News http://bit.ly/2RtKwTC
Advanced Automatic Self-Car Parking using Arduino Project
Download Project Document/Synopsis Car parking is a major problem in urban areas in both developed and developing countries. Following the rapid increase of car ownership, many cities are lacking car parking areas. This imbalance is partially due to ineffective land use planning and miscalculations of space requirements during first stage of planning. Shortage of parking […]
The post Advanced Automatic Self-Car Parking using Arduino Project appeared first on NevonProjects.
from NevonProjects http://bit.ly/2GddYLB
IOT Based Coal Mine Safety Monitoring and Alerting System
Download Project Document/Synopsis Coal mining is the process of extracting coal from the ground. Steel and cement industries use coal as a fuel for extraction of iron from iron ore and for cement production. Underground mining industry comes to the category, where each and every parameter such as methane gas, high temperature, fire accidents and […]
The post IOT Based Coal Mine Safety Monitoring and Alerting System appeared first on NevonProjects.
from NevonProjects http://bit.ly/2G14Tq8
15 Free eBooks On Electronics!
 Hardware engineers out there can not ignore the importance of learning electronics as a subject. From designing and programming chips and circuits to assembling, knowledge on electronics is a indispensable requisite! So here we bring to you a sorted collection of free electronics ebooks on semi-conductors, circuits, controllers and various other aspects of electronics. Enjoy! […]
The post 15 Free eBooks On Electronics! appeared first on Electronics For You.
from Electronics For You http://bit.ly/2sXKTfi
DIY: Constructing An Induction Forge
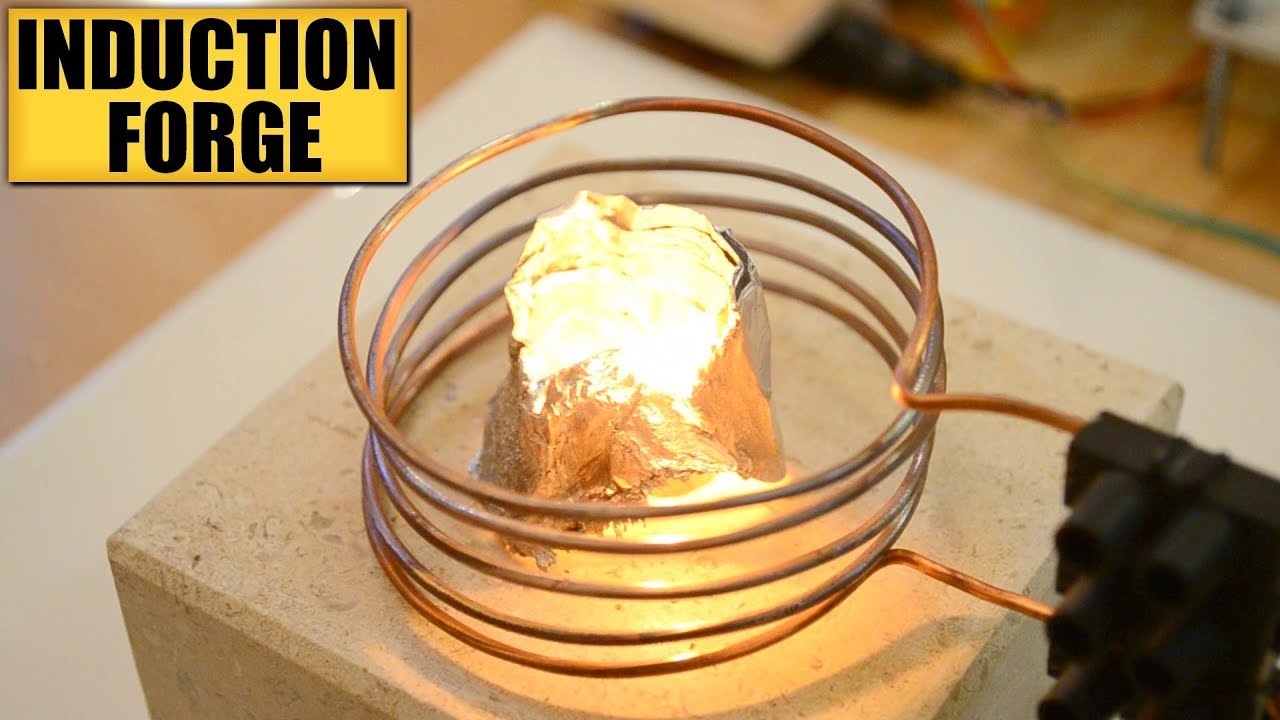 In this video, the presenter is going to construct an Induction forge i.e. he will use induction to heat metals. The idea is to produce a high-power electromagnetic field, that will induce a huge electric current in metals. He will be explaining the full process of the experiment. Courtesy: DIY Experiments
The post DIY: Constructing An Induction Forge appeared first on Electronics For You.
from Electronics For You http://bit.ly/2HGXb6e
Wednesday, 30 January 2019
Five Tips for Using Functions in C-Language Firmware
In this article we’ll conclude our exploration of C functions with some additional information and a few useful implementation techniques.
from All About Circuits Technical Articles http://bit.ly/2CPZcqM
from All About Circuits Technical Articles http://bit.ly/2CPZcqM
A New Series of Isolated DC/DC Converters for Space-Constrained Applications from RECOM
RECOM recently released a line of user-friendly 15 W DC/DC converters that incorporate a variety of useful features.
from All About Circuits News http://bit.ly/2MGZKDZ
from All About Circuits News http://bit.ly/2MGZKDZ
All You Wanted to Know About GSM Module and GPRS Module
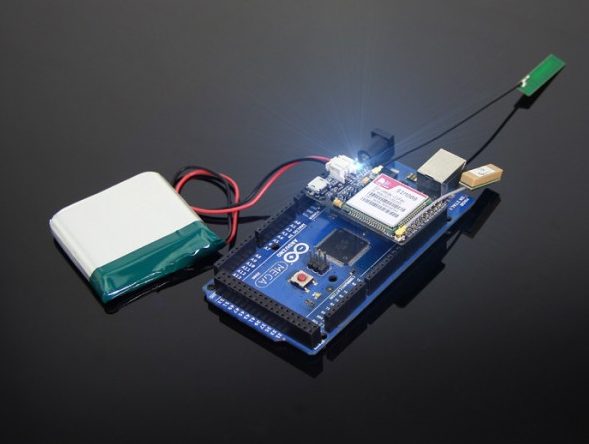 Before we get into what a GSM module is, let us get our fundamentals right and understand what GSM and GPRS are. A GSM module or a GPRS module is a chip or circuit that will be used to establish communication between a mobile device or a computing machine and a GSM or GPRS system. Contents What is GSM/GPRS? What […]
The post All You Wanted to Know About GSM Module and GPRS Module appeared first on Electronics For You.
from Electronics For You http://bit.ly/2WnyoHs
IoT-Based PM2.5 and PM10 Air Quality Monitoring System
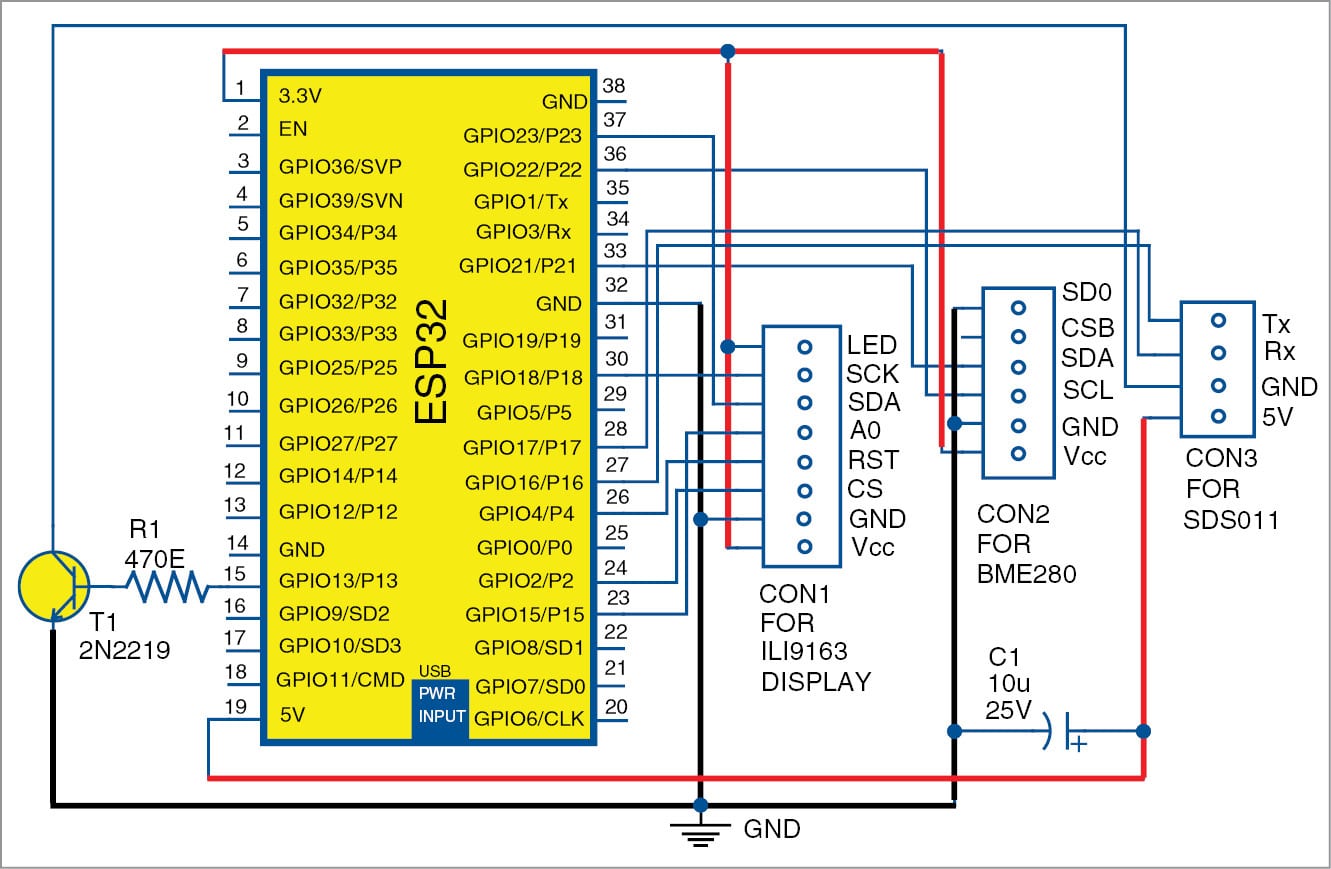 This is an ESP32 NodeMCU-based Air Quality monitoring system to check particulate matter (PM), humidity, temperature, altitude and pressure levels. Various environmental conditions of the place are tested and displayed on the TFT display as well as on ThingSpeak IoT (Internet of Things) platform. The author’s prototype is shown in Fig. 1. Particulate matter High […]
The post IoT-Based PM2.5 and PM10 Air Quality Monitoring System appeared first on Electronics For You.
from Electronics For You http://bit.ly/2RtuvNL
Tuesday, 29 January 2019
Meeting EMI Standards: Options Continue to Grow for EMC Testing
Testing for EMI (electromagnetic interference) is a critical step in product design due to FCC and CE regulations. In this article, we will look at MuRooms; modular metal rooms that significantly reduce outside EMI sources for testing and experimentation purposes.
from All About Circuits News http://bit.ly/2DGXDxg
from All About Circuits News http://bit.ly/2DGXDxg
DesignCon 2019 Begins, Highlights Signal Integrity and Test and Measurement Needed for 5G
DesignCon 2019 begins today in Santa Clara, California. Here's a brief overview of the show's goals and events.
from All About Circuits News http://bit.ly/2FUtcWF
from All About Circuits News http://bit.ly/2FUtcWF
Turn Your Old Inverter Into An Emergency Power System
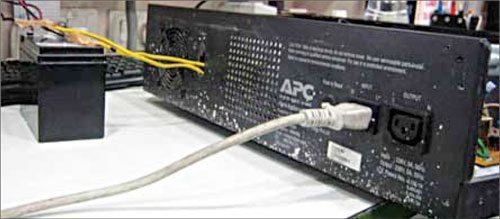 An inverter turned into an emergency power system, which turns on when the mains supply fails, and more importantly doesn’t turn on when the main supply is available. Can you give me a setup (emergency lighting system) where few of my lights will turn on when the supply from mains is unavailable, and more importantly, […]
The post Turn Your Old Inverter Into An Emergency Power System appeared first on Electronics For You.
from Electronics For You http://bit.ly/2Tleqeq
All You Wanted To Know About AT And GSM AT Commands
 What are AT commands? AT commands are commands which are used to control the modems where AT stands for Attention. These commands were derived from Hayes commands which were used by the Hayes smart modems. Every wireless, as well as the dial up modems, require an AT command to interact with a computer machine. These […]
The post All You Wanted To Know About AT And GSM AT Commands appeared first on Electronics For You.
from Electronics For You http://bit.ly/2sUM4fK
Monday, 28 January 2019
Introduction to Supercapacitors
Get a primer on the basics of supercapacitors, their functionality, and which applications they're best for.
from All About Circuits Technical Articles http://bit.ly/2CP4brX
from All About Circuits Technical Articles http://bit.ly/2CP4brX
A New Ideal Diode for Low- and Medium-Voltage Power Supply Circuitry
Analog Devices has released an IC that provides high-performance diode functionality for automotive applications, portable devices, computing equipment, and photovoltaic systems.
from All About Circuits News http://bit.ly/2G3gG6o
from All About Circuits News http://bit.ly/2G3gG6o
Online Employee Payroll Management System Project
Download Project Document/Synopsis Payslips are provided to the employees to record their monthly pay and allowances. It is a document that provides the employees with details of their incomes and deductions as it would differ from employee to employee. Manual salary slips are outdated, now as most of them work in technology using companies and […]
The post Online Employee Payroll Management System Project appeared first on NevonProjects.
from NevonProjects http://bit.ly/2RkshzZ
Online Property Management System Project
Download Project Document/Synopsis Real estate is a type of business for selling, buying, renting land, buildings and offices. Real estate agencies duties include, to give the property on rent or else to sell the property. Properties like building, retail sites, flats, houses, bungalows etc. Many people search for property for many purposes like residence, offices, […]
The post Online Property Management System Project appeared first on NevonProjects.
from NevonProjects http://bit.ly/2CRQUif
Web Based Blood Donation Management System Project
Download Project Document/Synopsis Blood donation is required during an organ transplant, accidents, cancer treatment etc. For blood donation, one needs to check for a donation camp or needs to visit blood bank. The Manual Blood donation system has many disadvantages which includes, it is too time consuming, often leads to error prone results, consumes lot […]
The post Web Based Blood Donation Management System Project appeared first on NevonProjects.
from NevonProjects http://bit.ly/2RVc5ug
Online College Admission Management System Project
Download Project Document/Synopsis Traditional college admission is a hectic process, which involves students visiting off-site campus, taking application, filling it and then submission is another hectic story. 0n the day of admission, the flow of candidates is very high and it requires both manual processing and record keeping at the same time that makes the […]
The post Online College Admission Management System Project appeared first on NevonProjects.
from NevonProjects http://bit.ly/2CNWRwJ
Price Comparison Website for Online Shopping Project
Download Project Document/Synopsis Price comparison sites and comparison-shopping engines gives ecommerce traders a good opportunity to boost their sales, attract new customers and go ahead against their competitors. Even Shoppers often look for best deals and offers for a particular product which they are looking for. It is difficult to visit each and every website […]
The post Price Comparison Website for Online Shopping Project appeared first on NevonProjects.
from NevonProjects http://bit.ly/2RSrI5C
Online Sports Turf Playground Booking System
Download Project Document/Synopsis Turf playground are used to play various sports like football, rugby, tennis, cricket, etc. People enjoy playing on the turf, it has vibrant environment and very safe to play. Many school teams and clubs prefer turf playground for practice and training purpose. Sometime it becomes difficult to book turf playground because of […]
The post Online Sports Turf Playground Booking System appeared first on NevonProjects.
from NevonProjects http://bit.ly/2CQ3dLT
Sensors For Deep-Sea Applications
 This article covers some important sensors used for different deep-sea applications, including civil, military, research, communication, seismic and energy. Mysteries of the deep sea, vastness of the blue waters stretching out to the horizon, and the tremendous potential of the oceans for military and civil applications have let humans explore the world of the mighty […]
The post Sensors For Deep-Sea Applications appeared first on Electronics For You.
from Electronics For You http://bit.ly/2Uh2JFU
“We Need The Capability To Create Customised Sensors, Readout Circuitry And Other Components Domestically”
 The ESDM industry and the IoT space provide strong opportunities for India to become a value-added product creation hub in the globe. But for that, we need to enhance our capacity of solving complex challenges with technology and designing those solutions from within our country. During a visit to CSIR-CEERI, Pilani, to get a glimpse […]
The post “We Need The Capability To Create Customised Sensors, Readout Circuitry And Other Components Domestically” appeared first on Electronics For You.
from Electronics For You http://bit.ly/2ThZxd7
Sunday, 27 January 2019
Silicon Labs Releases New Low-Power Wi-Fi Module Portfolio
Take a look at a new range of Wi-Fi modules from Silicon Labs.
from All About Circuits News http://bit.ly/2TnfTRP
from All About Circuits News http://bit.ly/2TnfTRP
Saturday, 26 January 2019
nanotron Releases RF Module Collision Detection System for Mine Safety Applications
Learn more about nanotron's recently-announced RF-based collision avoidance system for mine safety.
from All About Circuits News http://bit.ly/2HIG0Rs
from All About Circuits News http://bit.ly/2HIG0Rs
Friday, 25 January 2019
How to Use Pointers in C-Language Firmware
In this article we’ll discuss pointer operators, pointer arithmetic, and two situations in which pointers can improve your code.
from All About Circuits Technical Articles http://bit.ly/2Mx4lIU
from All About Circuits Technical Articles http://bit.ly/2Mx4lIU
A New Line of Fast-Recovery Power MOSFETs from STMicroelectronics
These superjunction devices are rated for a drain–source voltage of 600 V and target high-performance switching applications.
from All About Circuits News http://bit.ly/2DzlNJS
from All About Circuits News http://bit.ly/2DzlNJS
Temperature Controller System Based on PLC Project
Download Project Document/Synopsis In many fields of scientific research and production practice, the temperature control system occupies a very big and important position, especially in metallurgy, chemical industry, building materials, food, etc. By using this temperature control system, we can set temperature as per our requirements. This system consists of “Programmable Logic Controller” or commonly […]
The post Temperature Controller System Based on PLC Project appeared first on NevonProjects.
from NevonProjects http://bit.ly/2FPcEz4
Audio Mixer With Multiple Controls
 When recording sound from several orchestral instruments being played by different musicians using a single microphone, the only way to adjust the sound balance is to change the position of the musicians relative to the microphone. When recording direct to stereo master tape, it’s crucial to make sure that all the voices and instruments sound […]
The post Audio Mixer With Multiple Controls appeared first on Electronics For You.
from Electronics For You http://bit.ly/2HwXekU
Setting Up Qt On Raspberry Pi And Basic Application
 This project describes the steps to get started with Qt software on Raspberry Pi operating system. Qt is a platform-independent application that can run on all desktop and mobile operating systems (OSes), in addition to most embedded OSes—including Linux Embedded, Windows Embedded, QNX, vxWorks and Integrity—with one technology and one codebase. When developed, the application […]
The post Setting Up Qt On Raspberry Pi And Basic Application appeared first on Electronics For You.
from Electronics For You http://bit.ly/2T9pHyu
Thursday, 24 January 2019
Is 2019 the Year of the Self-Driving Car? The State of Autonomous Vehicles 2018-2019
Here's a look back at last year and a hint of what may be coming in 2019 for self-driving cars.
from All About Circuits News http://bit.ly/2WdJ1MY
from All About Circuits News http://bit.ly/2WdJ1MY
How to Incorporate Functions into Embedded Firmware
This article explains why you should use functions in your C-language code and discusses situations in which functions are particularly helpful.
from All About Circuits Technical Articles http://bit.ly/2FWrKCj
from All About Circuits Technical Articles http://bit.ly/2FWrKCj
Employee Transport Management System Project
Download Project Document/Synopsis Pickups and drop-offs are an essential service that organisations provide transport for employees. If not managed well, it can be a problem rather than being a solution. The Employee transportation solution will provide an application platform to organise all the pick and drop related services. The employee transport service application to be […]
The post Employee Transport Management System Project appeared first on NevonProjects.
from NevonProjects http://bit.ly/2CEXkBk
Online Paying Guest Accommodation Project in PHP
Download Project Document/Synopsis It has become easy to search pg accommodation nearby the work place. It was difficult earlier to go a place to work which was situated at long-distances and hence had to lose good opportunities, as we don’t know where to stay and where unaware about a particular city. But now it has […]
The post Online Paying Guest Accommodation Project in PHP appeared first on NevonProjects.
from NevonProjects http://bit.ly/2MumAi3
VESC Open Source Electronic Speed Control
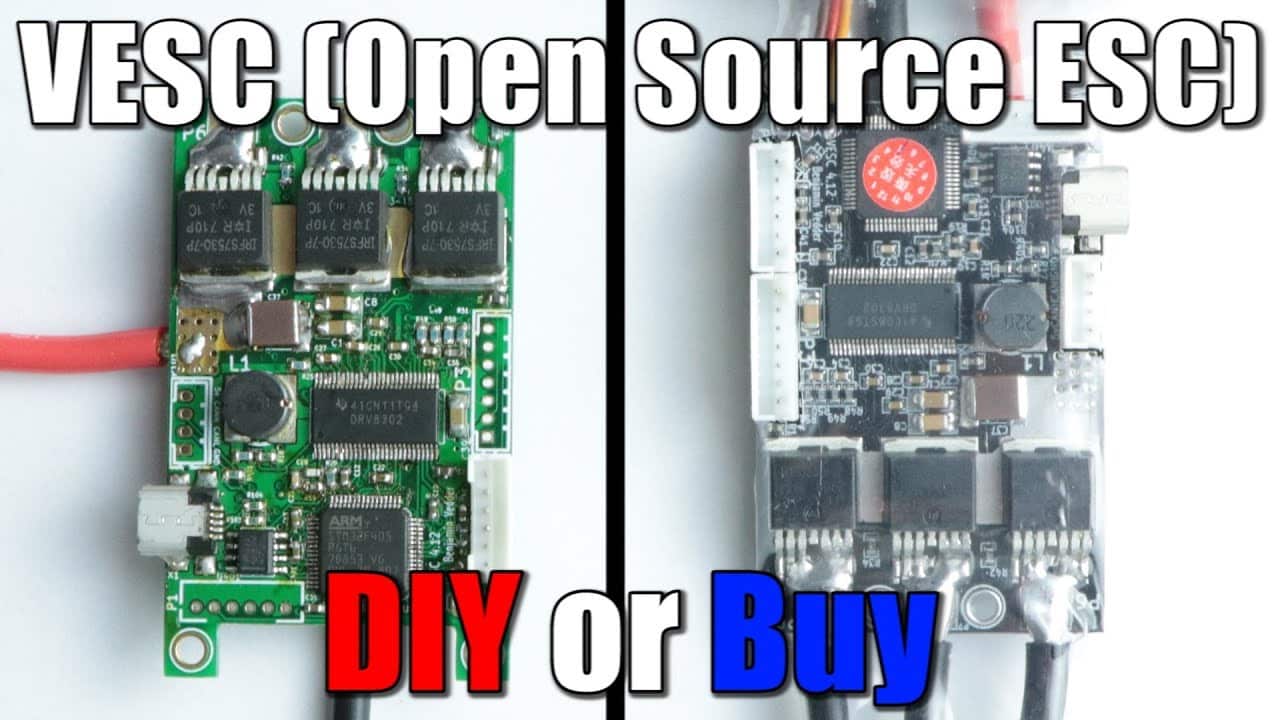 In this video, the presenter will review VESC Electronic Speed Control along with its working and applications. It is an Open Source ESC. He will also be building his own VESC in order to find out whether DIYing the circuit is cheaper. Courtesy: GreatScott! Have a look at other interesting video tutorials.
The post VESC Open Source Electronic Speed Control appeared first on Electronics For You.
from Electronics For You http://bit.ly/2DwFbY3
Wednesday, 23 January 2019
Toshiba Memory America Introduces UFS Ver 3.0 Embedded Flash Memory
Toshiba Memory America has unveiled new embedded flash memory devices that utilize the UFS Version 3.0 specification.
from All About Circuits News http://bit.ly/2ThqUni
from All About Circuits News http://bit.ly/2ThqUni
Is GaN Replacing Silicon? The Applications and Limitations of Gallium Nitride in 2019
GaN transistors are faster and more efficient than classic silicon devices. But if these devices are so great, what's holding them back?
from All About Circuits News http://bit.ly/2Ue1yqO
from All About Circuits News http://bit.ly/2Ue1yqO
How Accurate are Non-Invasive Blood Glucose Meters
 Non-invasive blood glucose testing makes traditional blood sampling a thing of the past. This technology allows monitoring of blood glucose levels without piercing the skin. There is a precise difference between glucose concentrations (mg/dl) when blood sample is taken from arteries, capillaries and veins of the same subject due to biologically dynamic conditions. Diabetes healthcare […]
The post How Accurate are Non-Invasive Blood Glucose Meters appeared first on Electronics For You.
from Electronics For You http://bit.ly/2RYdteV
Tuesday, 22 January 2019
High Speed Video Cameras: Interview with Dr. Jim Bales, Associate Director of MIT’s Edgerton Center
High-speed cameras
from All About Circuits News http://bit.ly/2Ub91a4
from All About Circuits News http://bit.ly/2Ub91a4
LED Scrolling Display
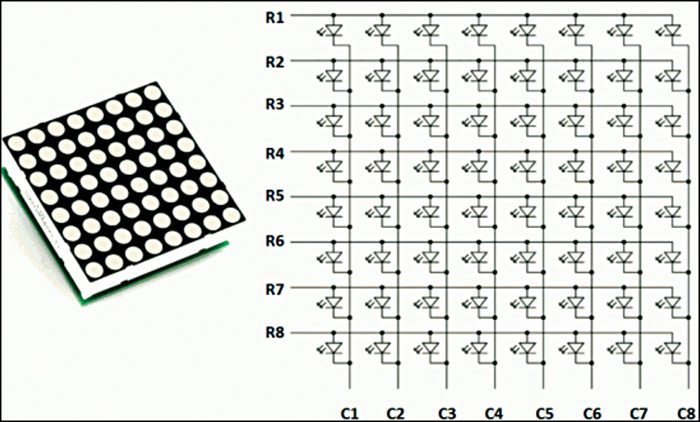 A light-dependent resistor (LDR) whose resistance is inversely proportional to the intensity of light is often used as a sensor in electronic projects that involve the use of light. This project uses an LDR to control the speed of a DC motor. Most outdoor LED displays and some indoor LED displays are built around individually […]
The post LED Scrolling Display appeared first on Electronics For You.
from Electronics For You http://bit.ly/2T2hkF2
Working Principle Of Multivibrators
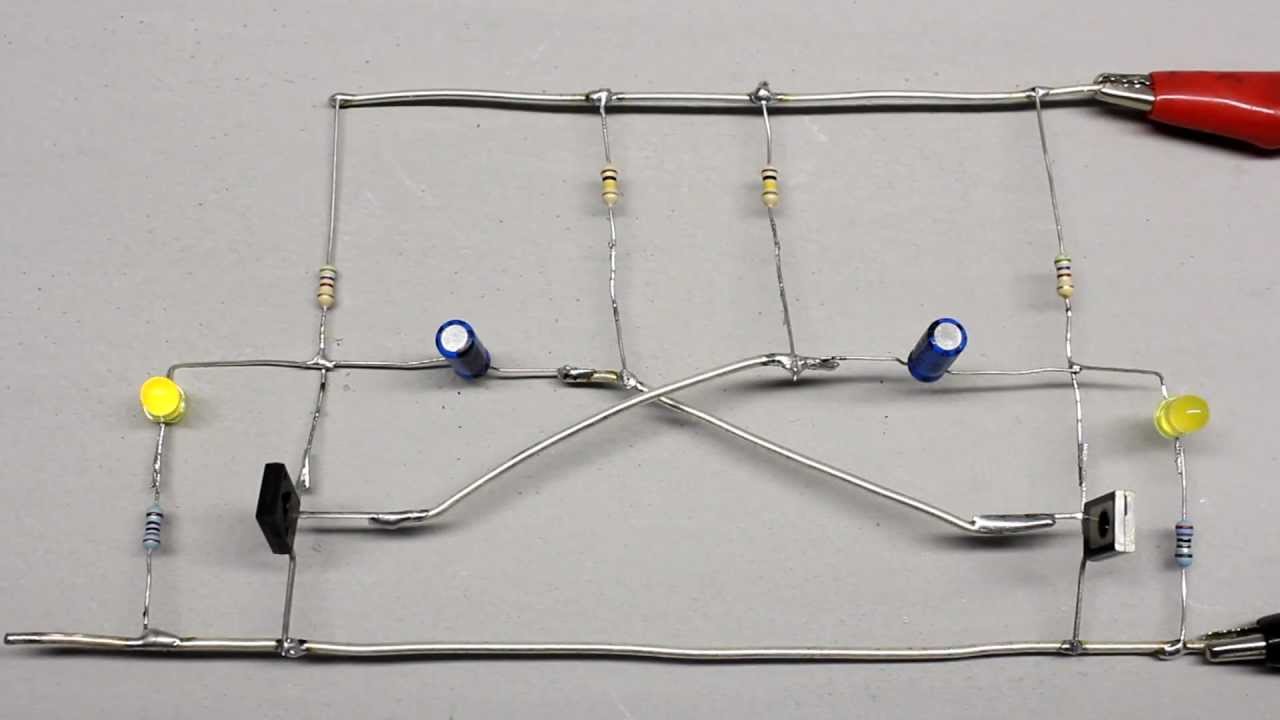 In this video tutorial, the presenter is going to give you a brief explanation of the working principle of multivibrators along with its types. He would be explaining the following: Transistor switching another transistor Bistable multivibrator (flip-flop) Monostable multivibrator Turn-on time Astable multivibrator Distortions of the output signal Astable multivibrator with OP-AMP Courtesy: HomoFaciens
The post Working Principle Of Multivibrators appeared first on Electronics For You.
from Electronics For You http://bit.ly/2RW30R6
Monday, 21 January 2019
Introduction to Functions in C Programming
This article will help you to understand what functions are, why they are used, and how they are implemented in embedded hardware.
from All About Circuits Technical Articles http://bit.ly/2DpPXzj
from All About Circuits Technical Articles http://bit.ly/2DpPXzj
GPS- and GSM-Based Vehicle Tracking System
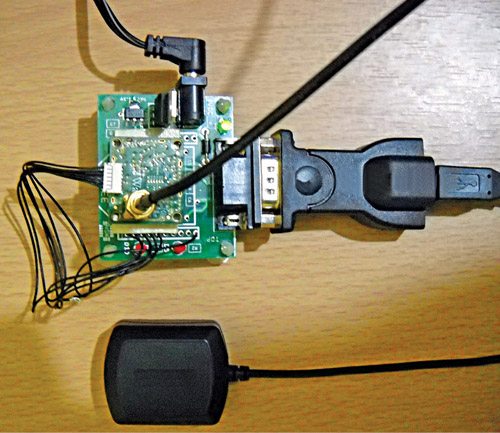 Presented here is a GPS based vehicle tracking system based on the ATMega16 microcontroller using global positioning system (GPS) and global system for mobile communication (GSM). Contents An introduction to GPS based vehicle tracking system GPS based vehicle tracking system: applications and benefits Components Circuit explanation Software GPS based vehicle tracking system: construction and testing […]
The post GPS- and GSM-Based Vehicle Tracking System appeared first on Electronics For You.
from Electronics For You http://bit.ly/2sFIG8o
Simple Line Follower Robot Using LM358
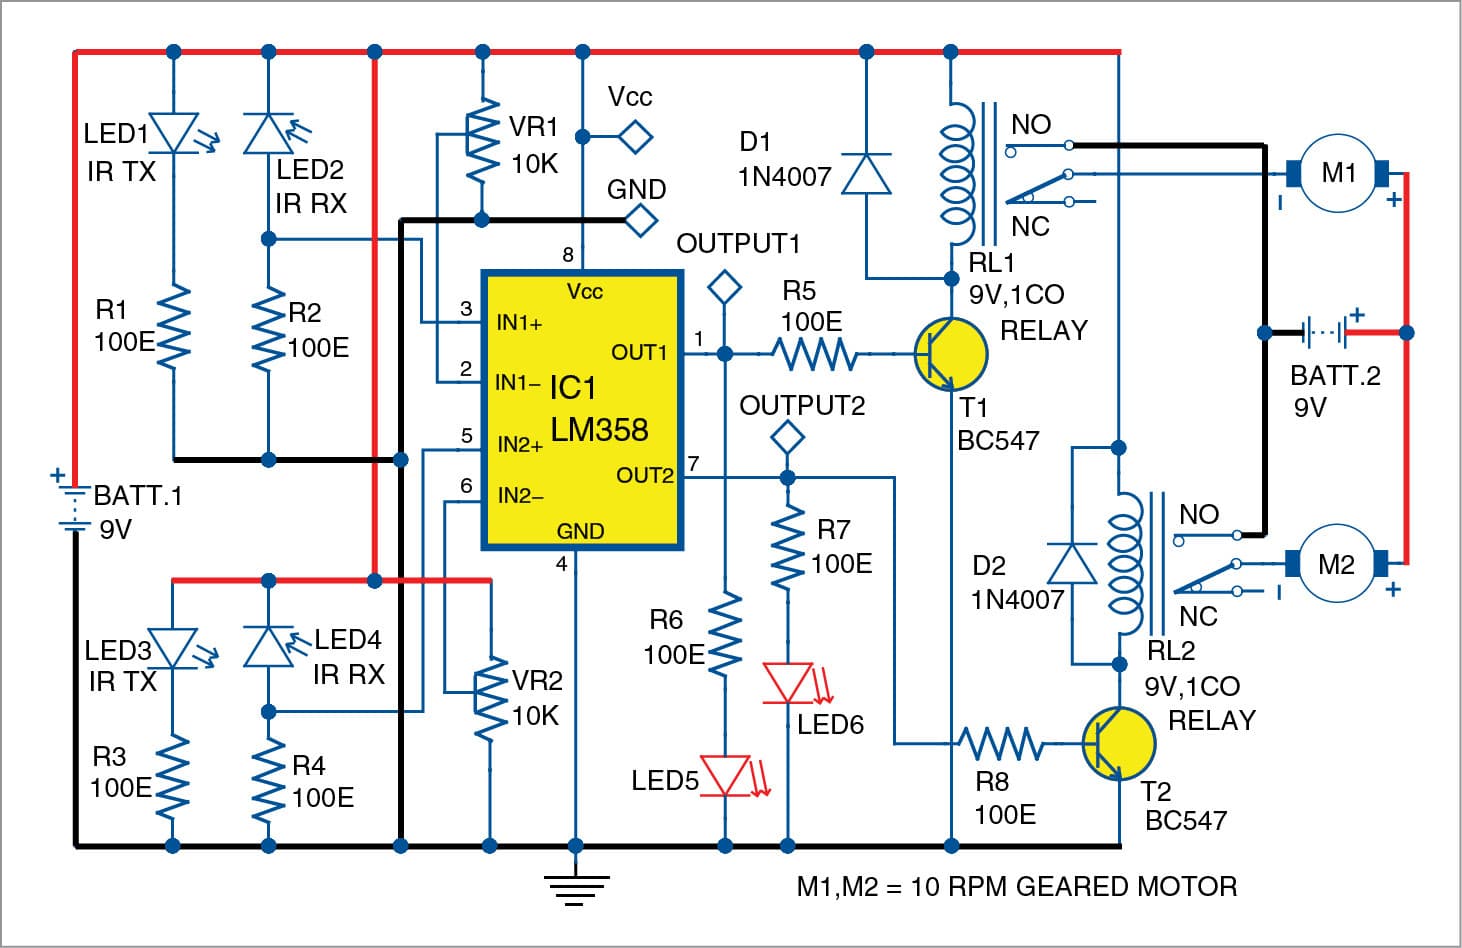 Presented here is the design for a relay-based line follower robot without using a microcontroller (MCU). The robot provides a simple application to get started with sensor-based projects for newbie electronic hobbyists and enthusiasts. It can follow a black line/track (on white surface) or a white line/track (on black surface). The authors’ prototype of the […]
The post Simple Line Follower Robot Using LM358 appeared first on Electronics For You.
from Electronics For You http://bit.ly/2sDgu5O
Indoor Localization Using Bluetooth Beacons
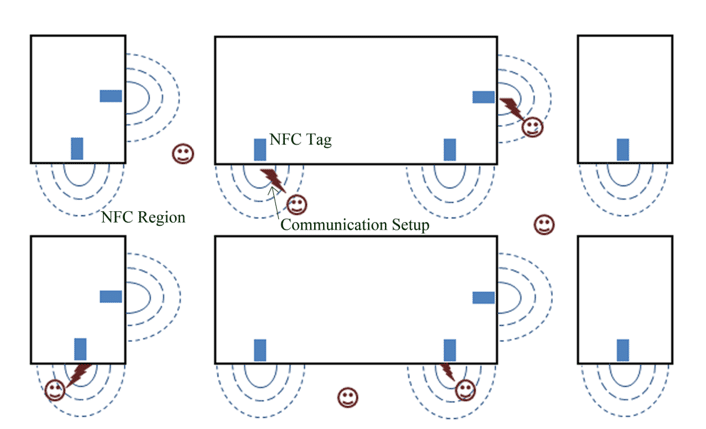 Location based services are rapidly emerging in the modern era where users are provided with various application softwares to comply their requirements. Applications such as Google Maps, Cab Service, Food delivery service etc. have now even become the necessity for smooth survival. All these applications rely upon Global Positioning System (GPS) (Barth and Farrell 1999; […]
The post Indoor Localization Using Bluetooth Beacons appeared first on Electronics For You.
from Electronics For You http://bit.ly/2FCYIrX
Sunday, 20 January 2019
Sensors for IoT, Robotics, and Mobile: ams Optical Imaging Sensors Roundup
An update on some new ams optical imaging sensors coming down the pipe in 2019.
from All About Circuits News http://bit.ly/2AS7LkQ
from All About Circuits News http://bit.ly/2AS7LkQ
Mobile Applications For 3D Modelling And Electronic Circuit Designing
 Scan the QR codes to download the apps based on the operating system of your device. AstroPrint Updated: March 2018 OS: iOS and Android Download: Full version (free) AstroPrint is an easy way to manage and monitor desktop 3D printers via a smartphone. Connect the 3D printer to AstroPrint Cloud. Then, use the app to […]
The post Mobile Applications For 3D Modelling And Electronic Circuit Designing appeared first on Electronics For You.
from Electronics For You http://bit.ly/2FDXih1
Software Platforms Making 3D Printing Simple
 Cura Visit: https://ultimaker.com Full version: Free Cura is a popular 3D slicing application software to process 3D printing of ready models. Made by 3D printer producer Ultimaker, Cura supports an array of input file formats, including STL, X3D, 3MF, OBJ, and image formats like JPG, PNG and GIF. It also supports popular 3D printing plugins […]
The post Software Platforms Making 3D Printing Simple appeared first on Electronics For You.
from Electronics For You http://bit.ly/2RZ5nm2
Saturday, 19 January 2019
Catch Up on Tiny Sensors: Bitty Accelerometer, Gas Sensor, and Biometric Sensor
Check out three tiny sensors for environment sensing and biometric monitoring applications.
from All About Circuits News http://bit.ly/2FDCO86
from All About Circuits News http://bit.ly/2FDCO86
General Task Allocation and Auction Community System
Download Project Document/Synopsis This online task auction system is basically to employ people and make the employment process easier, by just sitting at home people can auction the task and get the work done. We don’t need to go out and search for work. Users can get the work done with high quality on cheap […]
The post General Task Allocation and Auction Community System appeared first on NevonProjects.
from NevonProjects http://bit.ly/2RRAIqU
Artificial Intelligence HealthCare Chatbot System
Download Project Document/Synopsis Through chatbots one can communicate with text or voice interface and get reply through artificial intelligence. Typically, a chat bot will communicate with a real person. Chat bots are used in applications such as ecommerce customer service, call centres and Internet gaming. Chatbots are programs built to automatically engage with received messages. […]
The post Artificial Intelligence HealthCare Chatbot System appeared first on NevonProjects.
from NevonProjects http://bit.ly/2FI5rA2
Artificial Intelligence HealthCare Chatbot System
Download Project Document/Synopsis Through chatbots one can communicate with text or voice interface and get reply through artificial intelligence. Typically, a chat bot will communicate with a real person. Chat bots are used in applications such as ecommerce customer service, call centres and Internet gaming. Chatbots are programs built to automatically engage with received messages. [�]
The post Artificial Intelligence HealthCare Chatbot System appeared first on NevonProjects.
from NevonProjects http://bit.ly/2FI5rA2
Cellphone Operated Land Rover Without Using Microcontroller
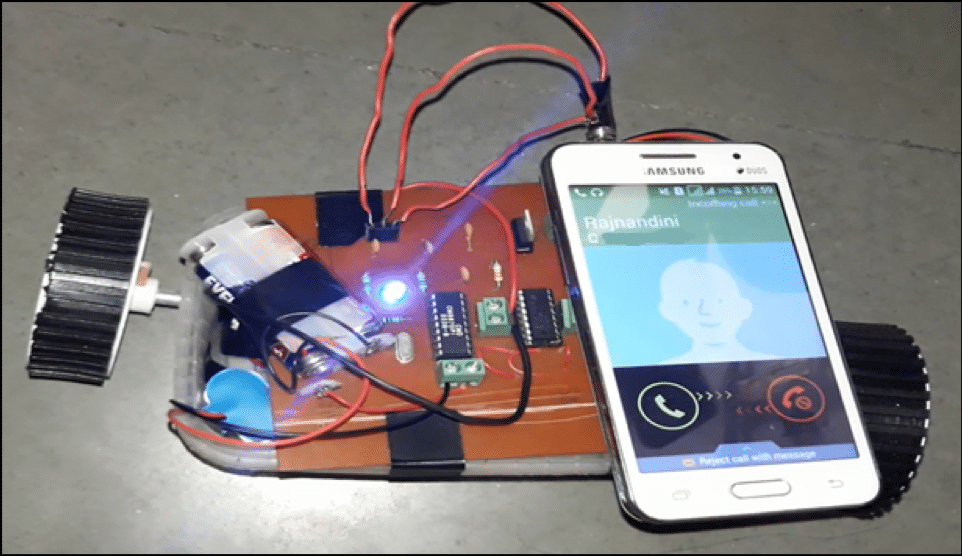 Mobile robots have the capability to move around in their environment and are not fixed to one physical location. Mobile robots can be “autonomous” which means they are capable of navigating an uncontrolled environment without the need for physical or electro-mechanical guidance devices. Alternatively, mobile robots can rely on guidance devices that allow them to […]
The post Cellphone Operated Land Rover Without Using Microcontroller appeared first on Electronics For You.
from Electronics For You http://bit.ly/2MiaPva
Friday, 18 January 2019
Sensors Behind Device Screens, Expression Tracking, and a New SDK: Facial Recognition Roundup
A look at some facial recognition-related info from around the industry.
from All About Circuits News http://bit.ly/2sCtNDL
from All About Circuits News http://bit.ly/2sCtNDL
Pointers in C Programming: What Is a Pointer and What Does It Do?
This article will help you to understand the pointer, which is an interesting and important aspect of the C language.
from All About Circuits Technical Articles http://bit.ly/2HivOit
from All About Circuits Technical Articles http://bit.ly/2HivOit
3 Phase Motor Programmable On and Off Controller
 A 3 phase motor programmable controller that automatically turns on/off controller can be made with a programmable time switch. In this case, a maximum of eight-time duration can be programmed. The system has two programmable time switches for setting the starting and stopping times of the motor and two control circuits, which are interfaced with […]
The post 3 Phase Motor Programmable On and Off Controller appeared first on Electronics For You.
from Electronics For You http://bit.ly/2QYliwk
Building Your Own ESC/Servo Tester
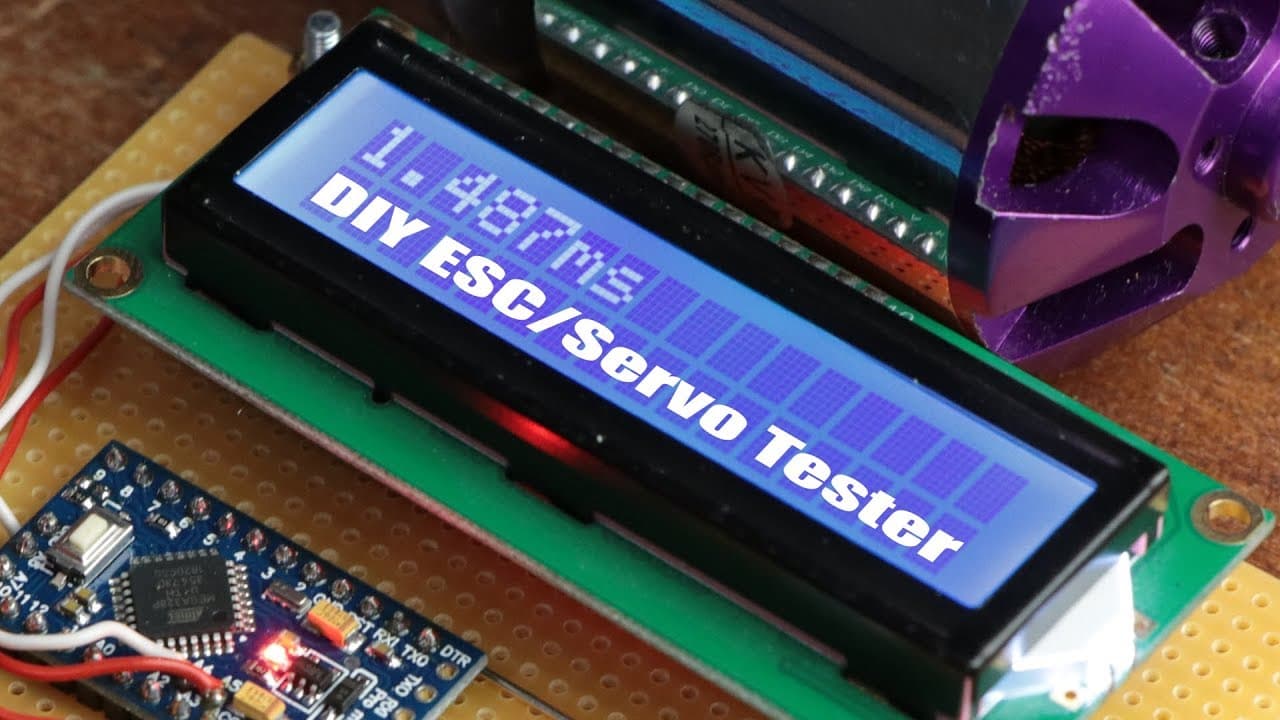 In this small project, the presenter will show you how to build a custom ESC/Servo Tester. He will also show you how to setup the timer of the ATmega328P in order to create the required control signal. In the end, he will then add tactile switches, a potentiometer and an LCD to adjust the control […]
The post Building Your Own ESC/Servo Tester appeared first on Electronics For You.
from Electronics For You http://bit.ly/2T3xcHe
Thursday, 17 January 2019
How to Analyze Data from a Custom PCB Sensor Subsystem
A quick walkthrough of how to analyze data from a custom precision sensor system.
from All About Circuits Technical Articles http://bit.ly/2ATtWHl
from All About Circuits Technical Articles http://bit.ly/2ATtWHl
Sensor Fusion for Autonomous Vehicles: Interview with Tactile Mobility CEO Amit Nisenbaum
An interview with Amit Nisenbaum, CEO of Tactile Mobility, a company that achieves software sensor fusion to make sensor data useful for autonomous vehicles.
from All About Circuits News http://bit.ly/2HfdsyZ
from All About Circuits News http://bit.ly/2HfdsyZ
Online Applicant Tracking System and Talent Lookup Portal
Download Project Document/Synopsis Finding a job that suits one’s interest and skill set is quite a challenging task for the job seekers. This system can help the job seekers to find their desire jobs by just sitting at home. This online Applicant Tracking system software can connect employer with jobseeker, here employer can find the […]
The post Online Applicant Tracking System and Talent Lookup Portal appeared first on NevonProjects.
from NevonProjects http://bit.ly/2AR5QgB
Online Assignment Plagiarism Checker Project using Data Mining
Download Project Document/Synopsis Plagiarism is defined as to take or theft some work and present it has one’s own work. This grammar and plagiarism checker system is used to analyze the plagiarism data. Plagiarism affects the education quality of the students and thereby reduce the economic status of the country. Plagiarism is done by paraphrased […]
The post Online Assignment Plagiarism Checker Project using Data Mining appeared first on NevonProjects.
from NevonProjects http://bit.ly/2Hi1pku
Android Smart Sticky Notes Application Project
Download Project Document/Synopsis In a busy schedule, we tend to forget many important things easily, and to remember these things we need to note down things in a piece of paper. In such busy schedules people need some personal assistant or a reminder to remind them about the important work that needs to be done. […]
The post Android Smart Sticky Notes Application Project appeared first on NevonProjects.
from NevonProjects http://bit.ly/2CqOqal
The Scope For Blockchain Adoption In The Energy Sector
 As everyone jumps onto the blockchain bandwagon to implement it in sectors like finance and land records, its use in the energy distribution sector seems to hold a lot of promise. This article explores its potential. After Bitcoin demonstrated the potential of blockchain, people from many industries sat up. Though the financial services sector was […]
The post The Scope For Blockchain Adoption In The Energy Sector appeared first on Electronics For You.
from Electronics For You http://bit.ly/2RNQIu0
Wednesday, 16 January 2019
How to Characterize Noise in a Custom PCB: Precision Inclinometer
Learn about the process of identifying and eliminating noise in data capture.
from All About Circuits Technical Articles http://bit.ly/2VQKTuS
from All About Circuits Technical Articles http://bit.ly/2VQKTuS
Hardware-Based Security and a Dev Kit for Alexa: A Look at Microchip Technology at CES 2019
Catch up on what Microchip released at CES this year and which trends they're focusing on for 2019.
from All About Circuits News http://bit.ly/2Mc9m9u
from All About Circuits News http://bit.ly/2Mc9m9u
Tuesday, 15 January 2019
The Future Of Decentralised Web (Part 2)
 In the year 2015, four years before the global explosion of privacy-awareness dialogues, starting in the wake of facebook’s Cambridge analytical scandal, a blog post was written by an anonymous developer, who uses the internet handle go1dfish appeared online. It contained the details of a new software architecture for a radically new social aggregator, resistant […]
The post The Future Of Decentralised Web (Part 2) appeared first on Electronics For You.
from Electronics For You http://bit.ly/2HghXJH
The Future Of Decentralised Web (Part 1)
 In the year 2015, 4 years before the global explosion of privacy-awareness dialogues, starting in the wake of facebook’s Cambridge analytical scandal, a blog post written by an anonymous developer, who uses the internet handle go1dfish appeared online. It contained the details of a new software architecture for a radically new social aggregator, resistant to […]
The post The Future Of Decentralised Web (Part 1) appeared first on Electronics For You.
from Electronics For You http://bit.ly/2RuiyvL
How to Design a Custom PCB Holder: Mechanical Considerations for a Precision Inclinometer Project
When working with high-precision sensors, it's crucial to consider housing. In this article, we discuss an approach to designing a custom board holder for an inclinometer subsystem.
from All About Circuits Technical Articles http://bit.ly/2RsHSCy
from All About Circuits Technical Articles http://bit.ly/2RsHSCy
Warning System for Over-Height Vehicles
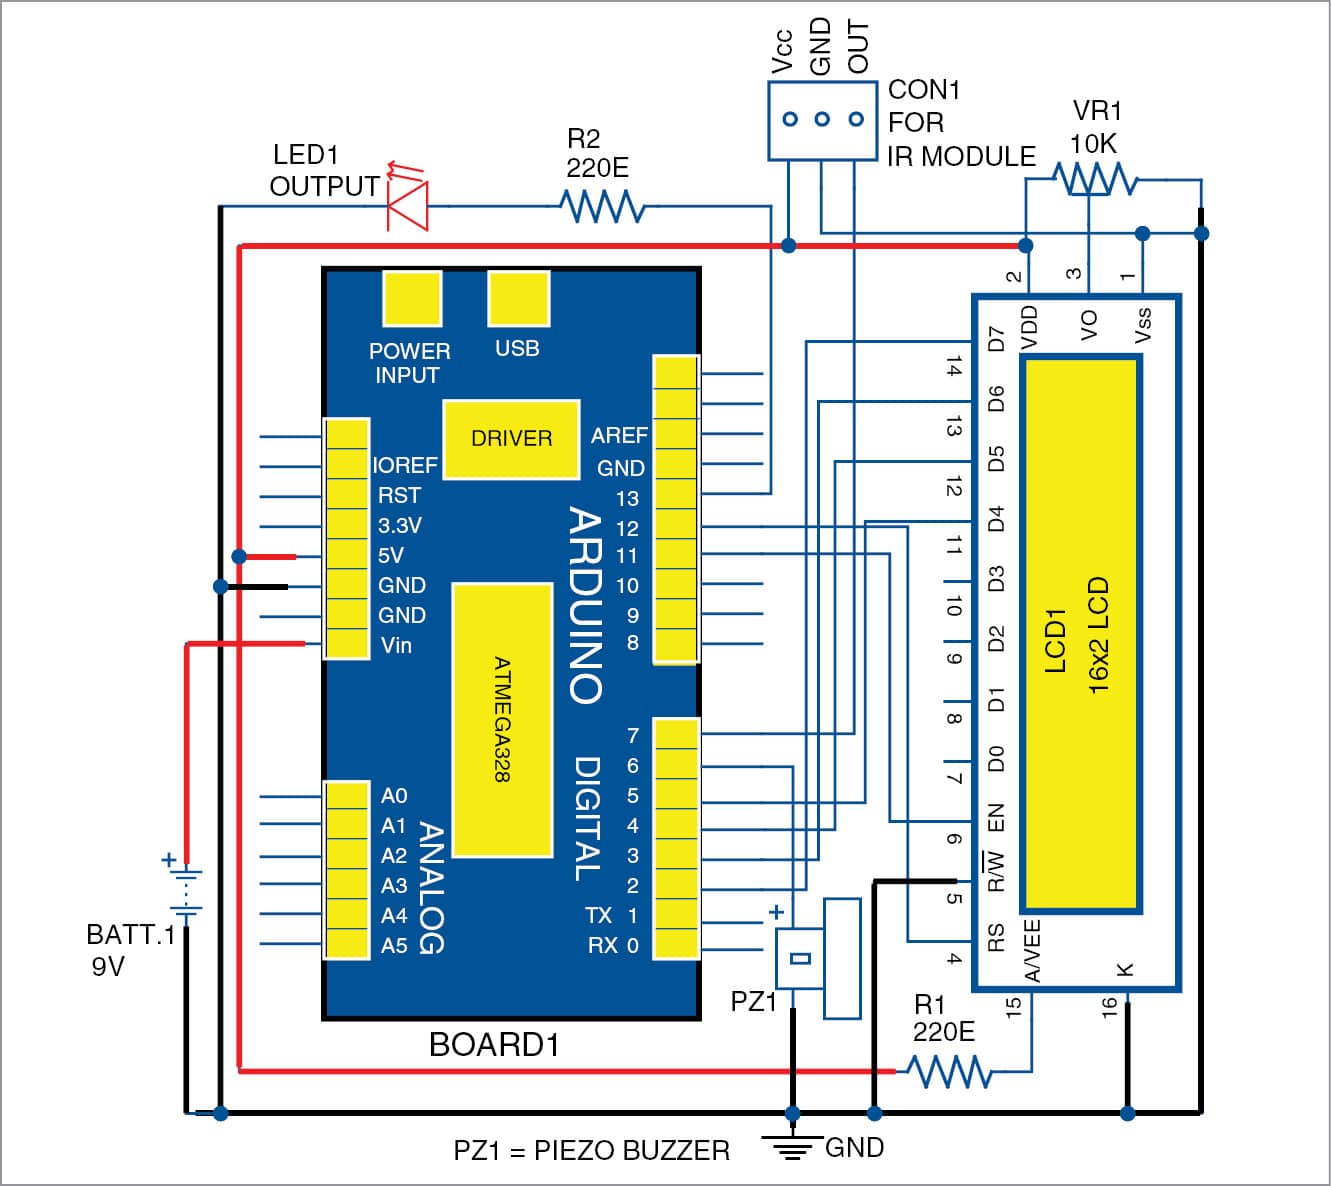 This circuit can be used to detect big over-height vehicle moving towards bridges, tunnel entrances and overhead structures, and warn the drivers. It can be developed for monitoring such a vehicle approaching, say, a bridge at night. The system uses an infrared (IR) sensor to monitor the vehicle. An audio-visual alarm is activated when the […]
The post Warning System for Over-Height Vehicles appeared first on Electronics For You.
from Electronics For You http://bit.ly/2FpNyqF
Monday, 14 January 2019
Firmware Design: How to Program an MSP430 Microcontroller to Gather Data from an Inclinometer
This article goes over the design of firmware for a custom PCB project: a precision inclinometer subsystem.
from All About Circuits Technical Articles http://bit.ly/2CnPqfD
from All About Circuits Technical Articles http://bit.ly/2CnPqfD
A New Non-Contact Current Sensor IC from ROHM Semiconductor
This high-sensitivity device is designed for space-constrained and low-power applications.
from All About Circuits News http://bit.ly/2smtH30
from All About Circuits News http://bit.ly/2smtH30
Sunday, 13 January 2019
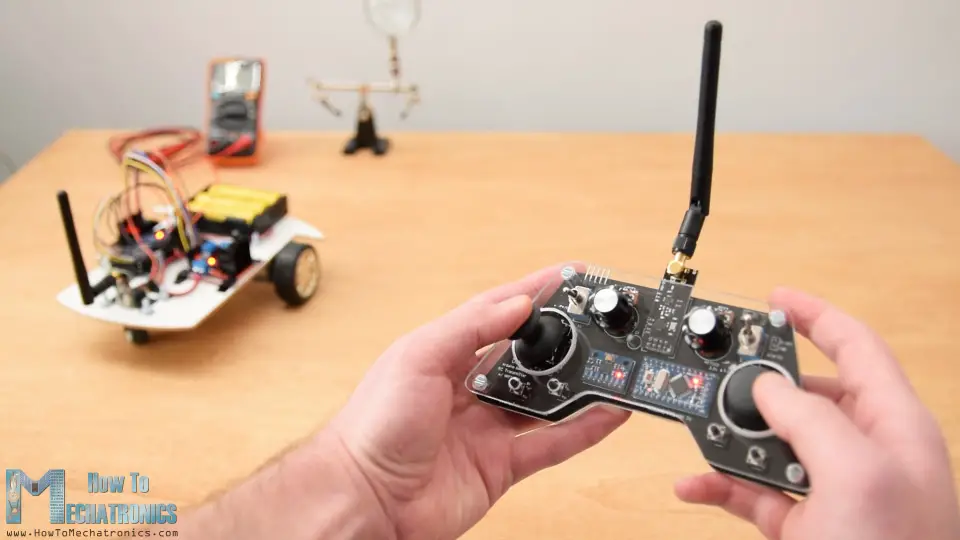
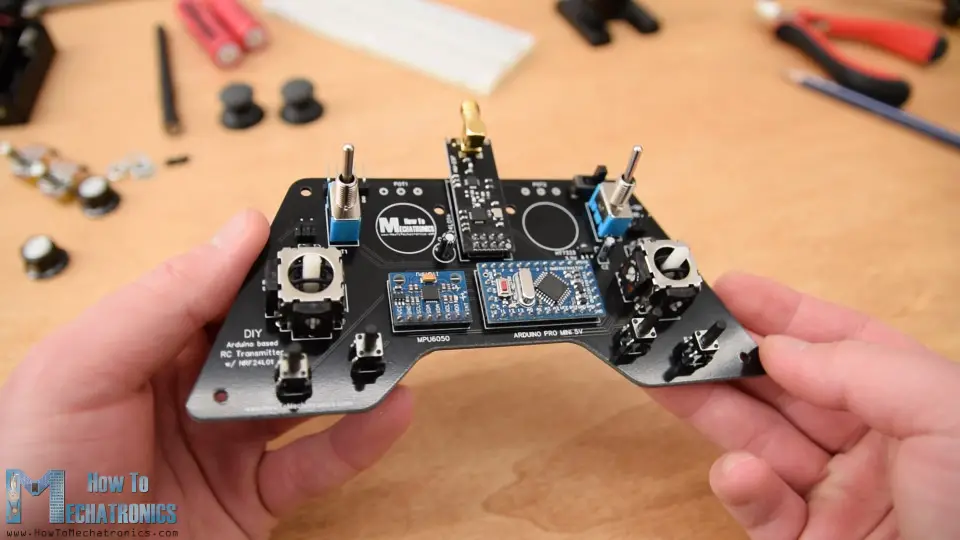
DIY Arduino RC Transmitter
In tutorial we will learn how to build a DIY Arduino RC transmitter. Very often I need wireless control for the projects that I make, so therefore I built this multifunctional radio controller which can be used for pretty much everything.
Overview
Now I can wirelessly control any Arduino project with just some small adjustments at the receiver side. This transmitter can be also used as any commercial RC transmitter for controlling RC toys, cars, drones and so on. For that purpose it just needs a simple Arduino receiver which then generates the appropriate signals for controlling those commercial RC devices. I will explain how everything works in this video through few examples of controlling an Arduino robot car, controlling the Arduino Ant Robot from my previous video and controlling a brushless DC motor using an ESC and some servo motors.
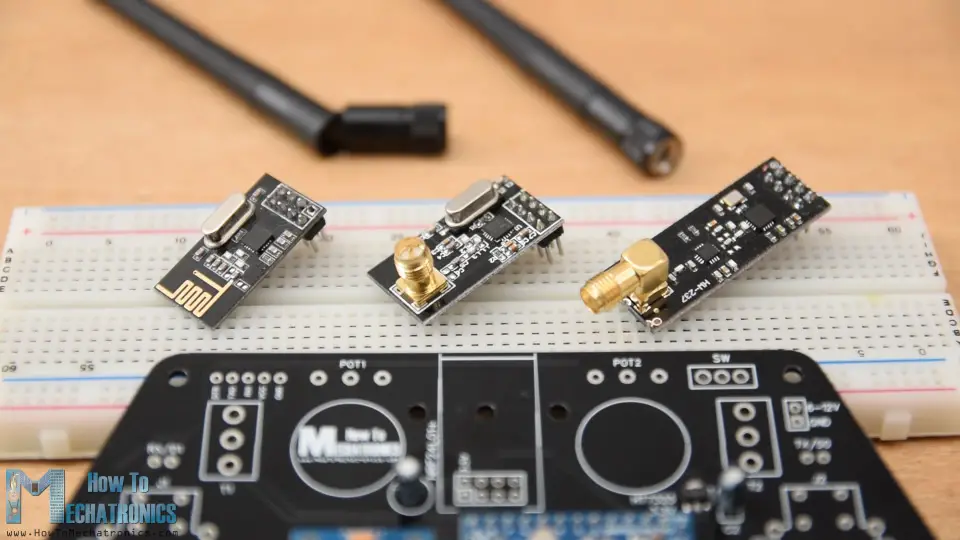
The radio communication of this controller is based on the NRF24L01 transceiver module which if used with an amplified antenna it can have a stable range of up to 700 meters in open space. It features 14 channels, 6 of which are analog inputs and 8 digital inputs.
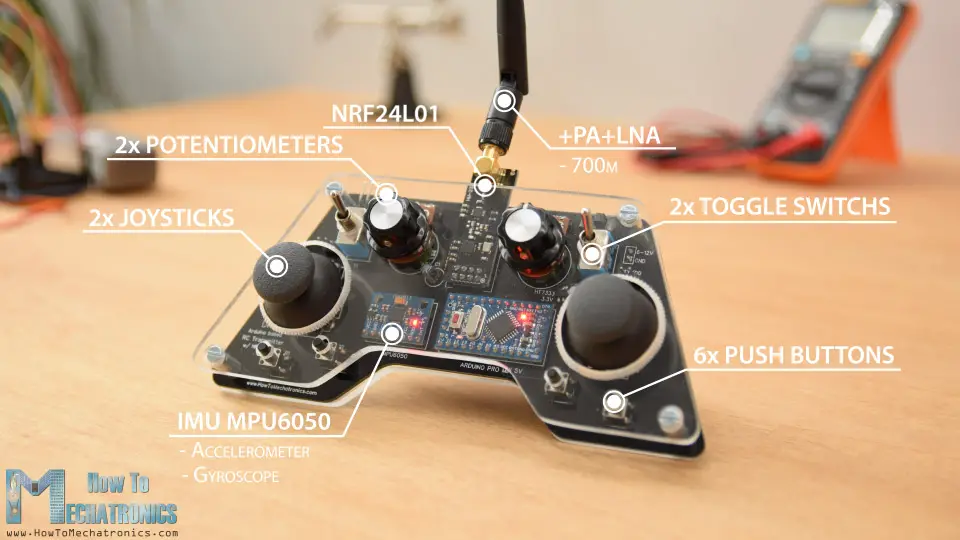
It has two joysticks, two potentiometers, two toggle switches, six buttons and additionally an internal measuring unit consisting of an accelerometer and a gyroscope which can be also used for controlling things with just moving around or tilting the controller.
Arduino RC Transmitter Circuit Diagram
To begin with, let’s take a look at the circuit diagram.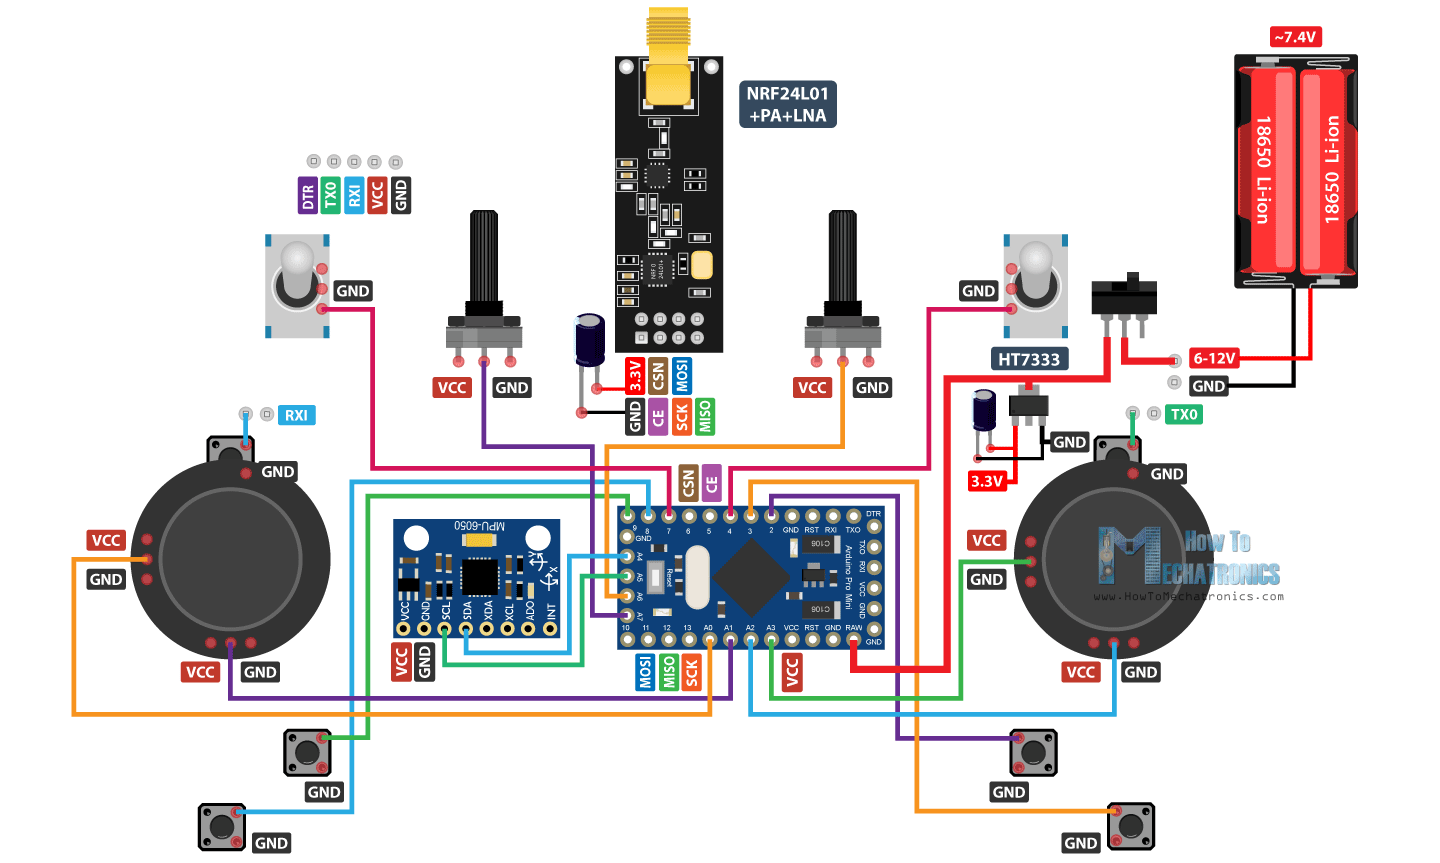
The brain of this RC controller is an Arduino Pro Mini which is powered using 2 LiPo batteries producing around 7.4 volts. We can connect them directly to the RAW pin of the Pro Mini which has a voltage regulator that reduced the voltage to 5V. Note that there are two versions of the Arduino Pro Mini, like the one I have that operates at 5V and the other operates at 3.3V. On the other hand, the NRF24L01 module strictly needs 3.3V and it’s recommended to come from a dedicated source. Therefore we need to use a 3.3V voltage regulator which is connected to the batteries and convert the 7.4V to 3.3V. Also we need to use a decoupling capacitor right next to the module in order to keep the voltage more stable, thus the radio communication will be more stable as well. The NRF24L01 module communicates with the Arduino using SPI protocol, while the MPU6050 accelerometer and gyro module uses the I2C protocol.
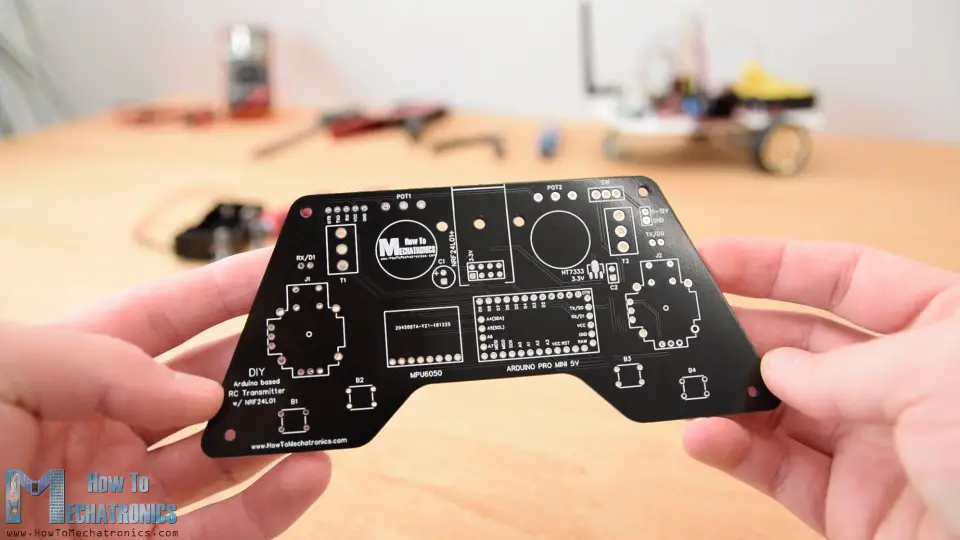
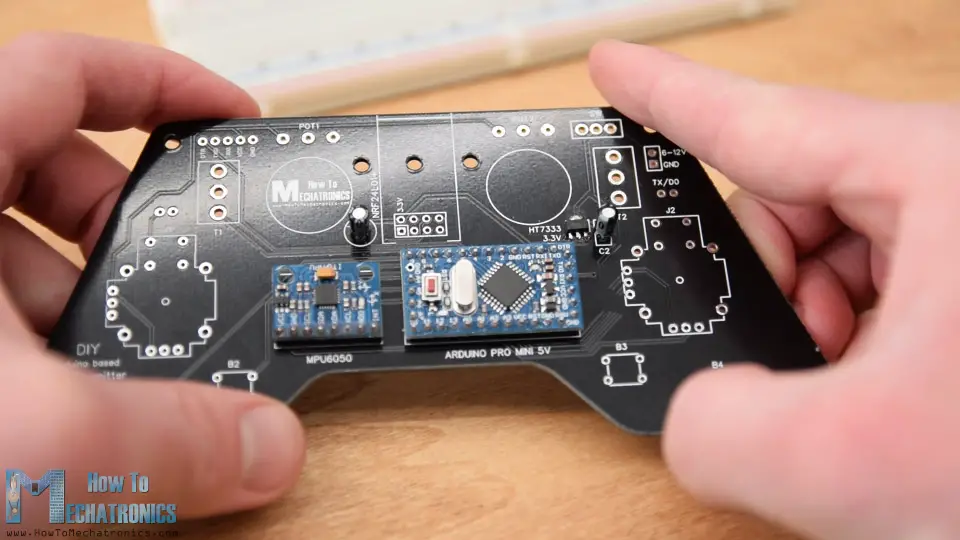
PCB Design
I actually ended up utilizing all analog and digital pins of the Arduino Pro Mini. So now if I try to connect everything together using jump wires it will be quite a mess. Therefore I designed a custom PCB using the EasyEDA free online circuit design software.
![]()
Here I took into consideration the ergonomics of the controller and designed it to be easily held by two hands, while all controls are within the range of the fingers. I made the edges round and added some 3mm holes so I can mount the PCB onto something later. I placed the pins for programming the Arduino Pro Mini at the top side of the controller so they can be easily accessed in case we want to reprogram the Arduino. We can also notice here that I used the RX and TX pins of the Arduino for the joystick buttons. However these two lines needs to be disconnected from anything while we are uploading the sketch to the Arduino. So therefore they are interrupted with two pins which can be then easily connected using simple jumper caps.
Here’s a link to the project files of this PCB design. So once I finished the design, I generated the Gerber file needed for manufacturing the PCB.
Gerber file:
DIY Arduino based RC Transmitter PCB Gerber file 303.01 KB
Then I ordered the PCB from JLCPCB which are also the sponsor of this video.

Here we can simply drag and drop the Gerber file and once uploaded, we can review our PCB in the Gerber viewer. If everything is all right then we can go on and select the properties that we want for our PCB. This time I chose the PCB color to be black. And that’s it, now we can simply order our PCB at a reasonable price. Note that if it’s your first order from JLCPCB, you can get up to 10 PCBs for only $2.
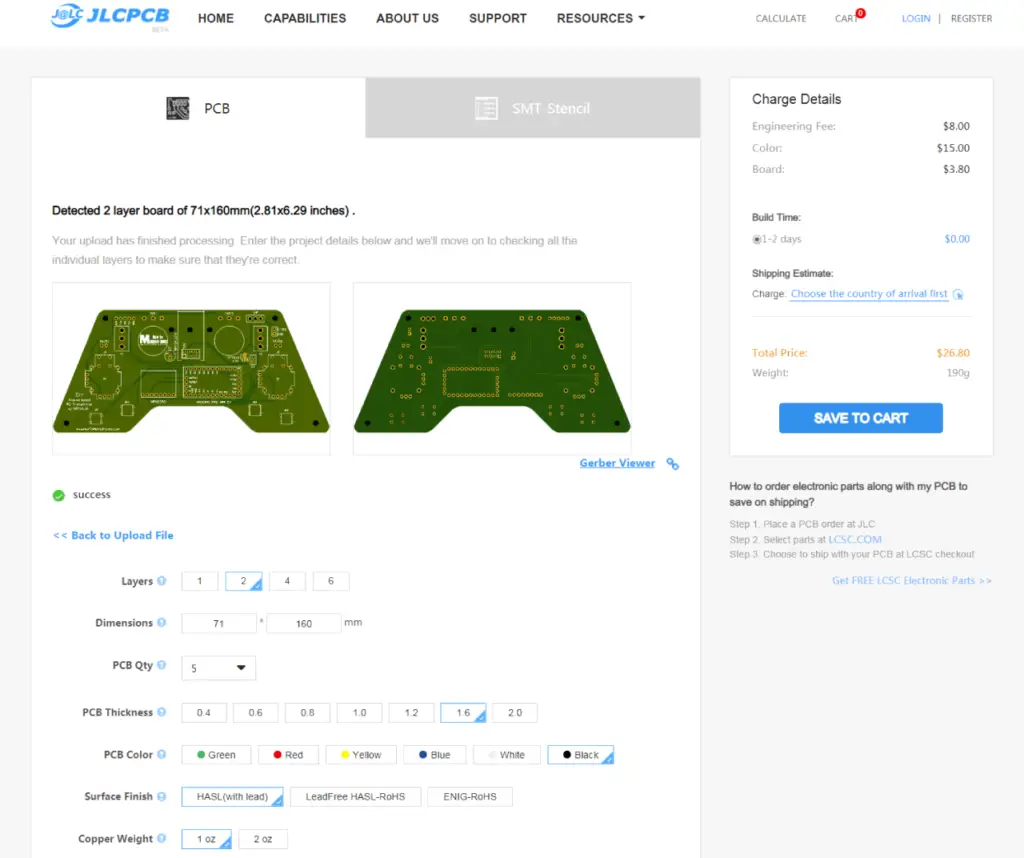
And here it is. I just really love how this PCB turned out in this black color. The quality of the PCB is great, and everything is exactly the same as in the design.
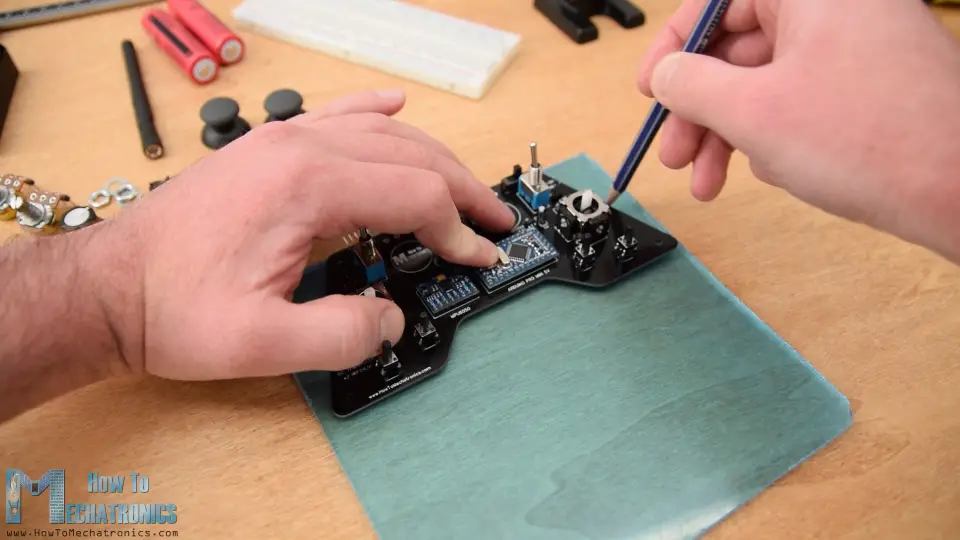
Assembling the PCB
Ok now we can move on with assembling the PCB.
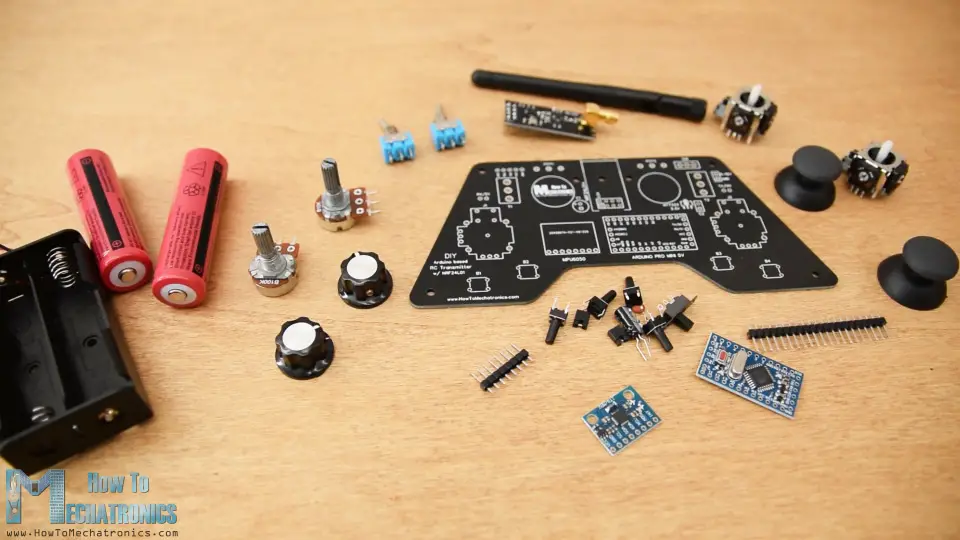
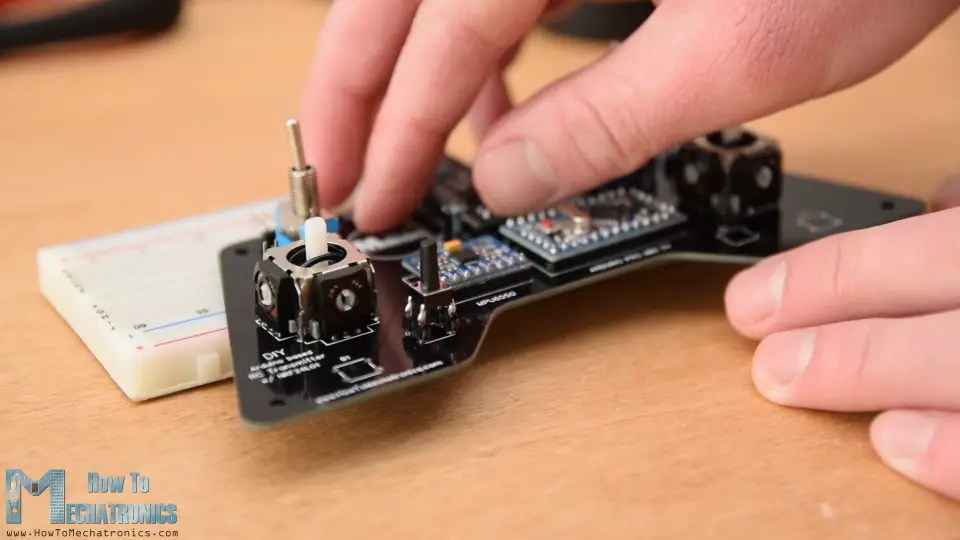
I started with a soldering the pin headers of the Arduino Pro Mini. An easy and good way to do that is to place them onto a breadboard and so they will stay firmly in place while soldering. The Pro Mini also have pins on the sides, but note that these pins location might vary depending on the manufacturer.
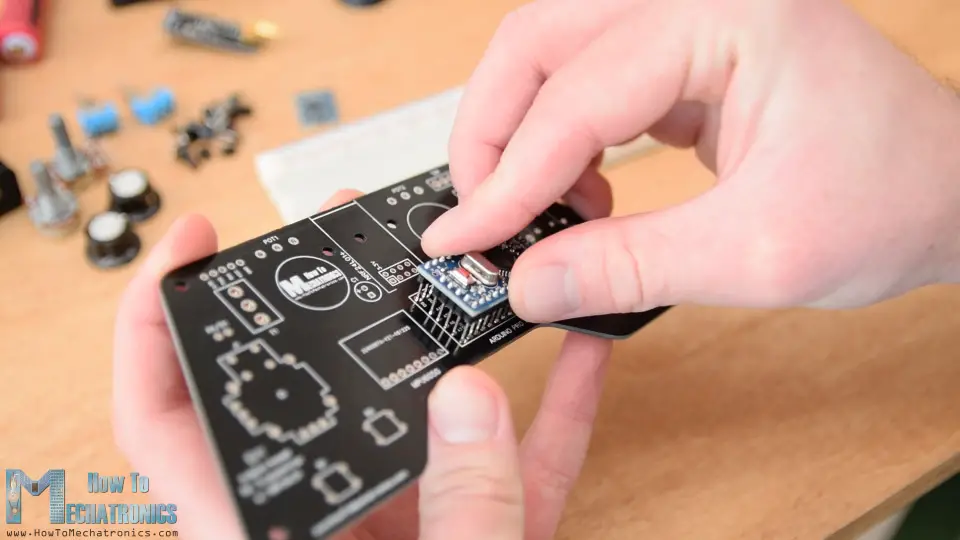
For the particular model that I have, I need 5 pins for each side, while leaving one GND pin empty because I used its area below on the PCB for running some traces. I soldered the Arduino Pro Mini directly onto the PCB and cut the execs length of the headers. Right next to it goes the MPU6050 accelerometer and gyroscope module.
Then I soldered the 3.3V voltage regulator with a capacitor next to it, and another capacitor near the NRF24L01 module. This module have three different versions and we can use any of them here.
I continued with the pins for programming the Arduino, the RX and TX pins, the power supply pins and the power switch.
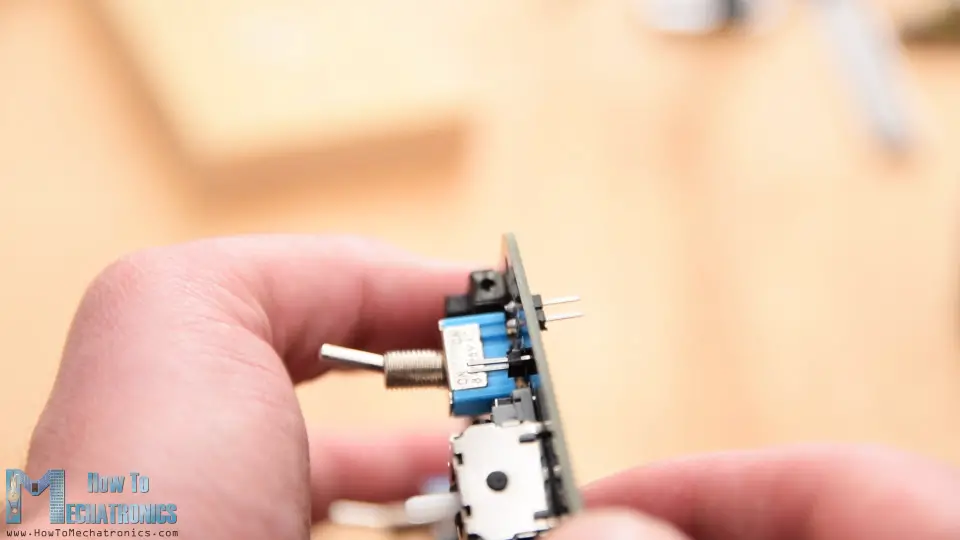
Next for soldering the potentiometers to the PCB I had to extend their pins using some pin headers.
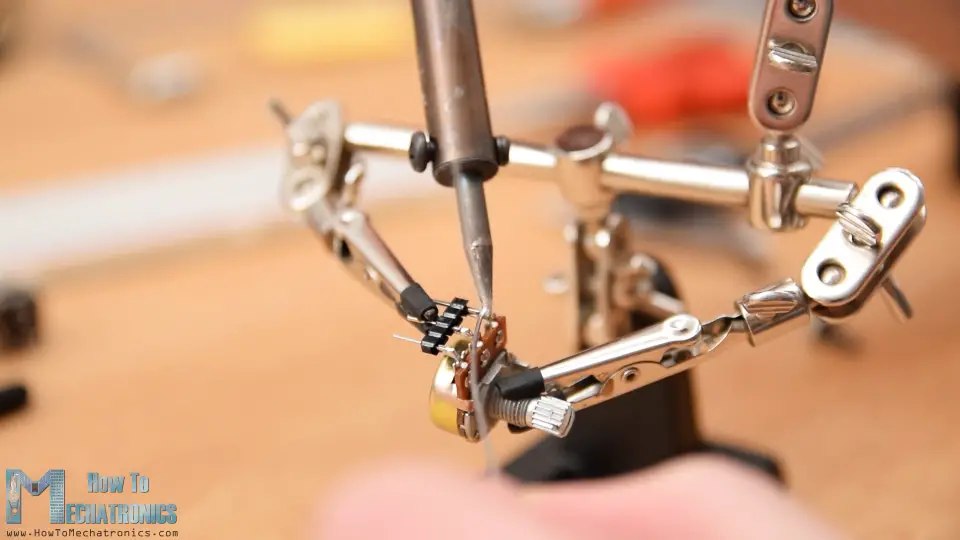
We can note here that I previously cut the length of the knobs so I can properly fit some caps onto them. However, we will solder the potentiometers to the PCB a bit later.
Then I inserted and soldered the two toggle switches and the two joysticks in place.
Finally what’s left is to solder the four push buttons. However they don’t have the proper height, so again I used pin headers to extend their pins a little bit.
And that’s it, our PCB is now ready so we can continue with making the cover for it. Because I like how the PCB looks and I want to be visible I decided to use transparent acrylic for the cover.
Here I have 4 mm tick transparent acrylic which currently have a protective foil and appears to be blue. The idea for the cover is to make two plates with the shape of the PCB and secure one of them at the top side and the other at the bottom side of the PCB.
So I marked PCB shape and using a metal hand saw I cut the acrylic according to it.
Then using a simple rasp I fine-tuned the shape of the acrylic. The two plates came out great and they perfectly match with the PCB.

Next I marked the locations where I need to make openings for the components to pass through. Using a 3mm drill I first made the 4 holes for securing the plates to the PCB. For these holes I also made counter sinks so that the bolts can be placed flash with the plates.

For the openings for the toggle switches and the potentiometers I used 6mm drill, and for the joystick openings I used 25mm Forstner bit. Again, using a rasp, I fine-tuned all the openings.

Before assembling the cover, just a quite note that I actually soldered the pin header for the power supply upside down so it can be reached from the back side where the battery will be located.
Ok now we can start with assembling the cover. I started with peeling off the protective foil from the acrylic which I must admit was quite satisfying because the acrylic was so clean now. So first I secured the two potentiometers on the top plate, inserted the 3mm mounting bolts and placed the 11mm distance rings in place.
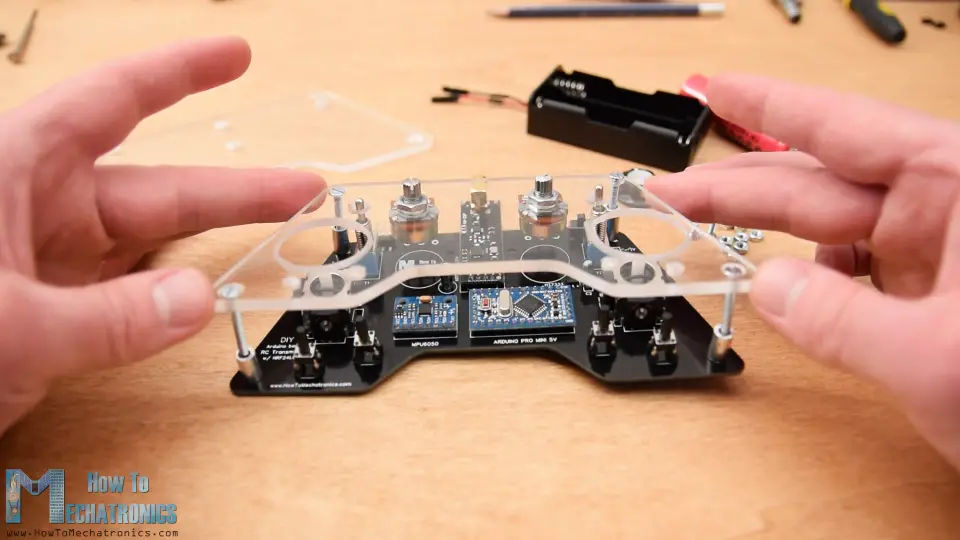
Then I carefully merged and secured the top plate and the PCB using some bolts. At this point I finally soldered the potentiometers to the PCB because earlier I didn’t know exactly at what height they will be placed.

Next on the back plate I attached the battery holder using 2 bolts. I finished the cover assembly by securing the back plate to the back side of the PCB using the four mounting bolts.
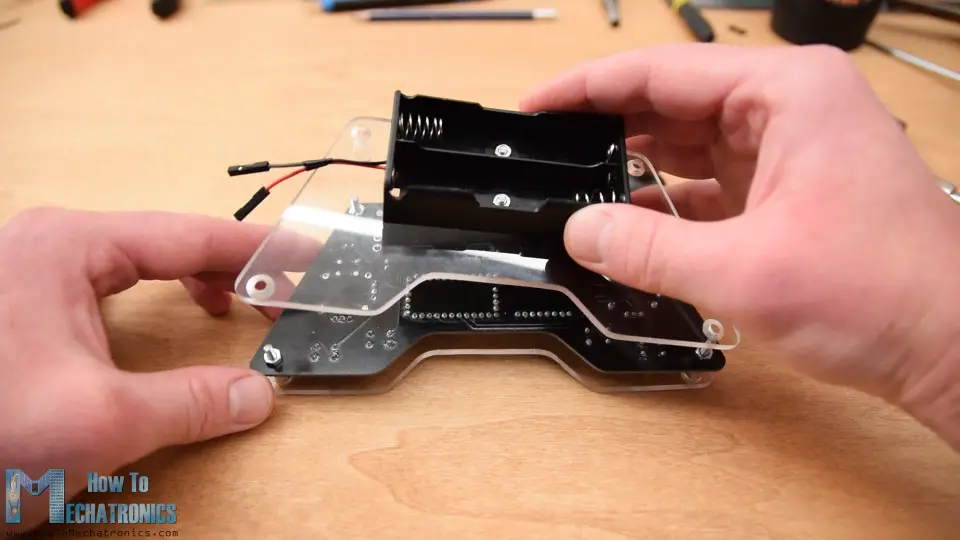
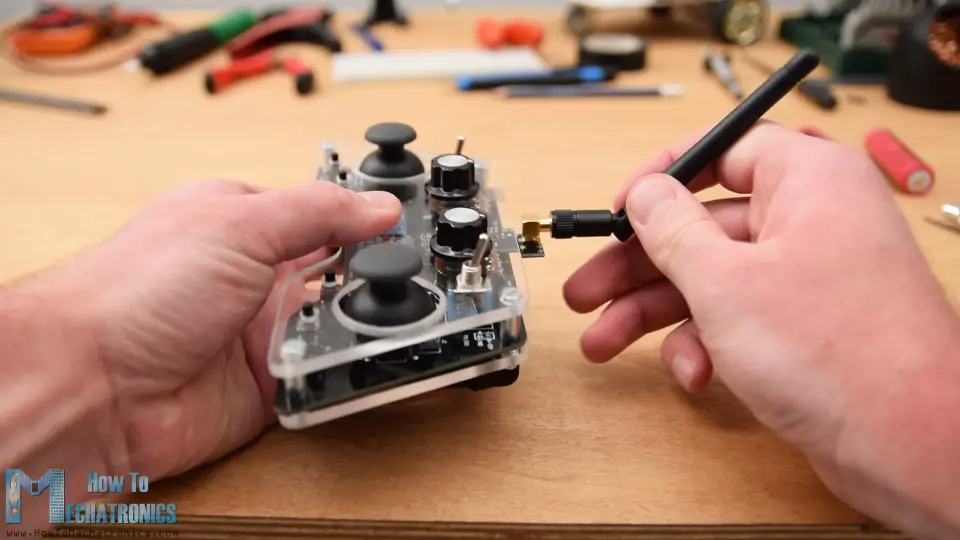
Finally, we can attach the battery lines to the power supply pins, insert and secure the knobs on the potentiometers, insert the joysticks knobs and attach the antenna to the NRF24l01 module. And that’s it, we are finally done with the DIY Arduino based RC transmitter.
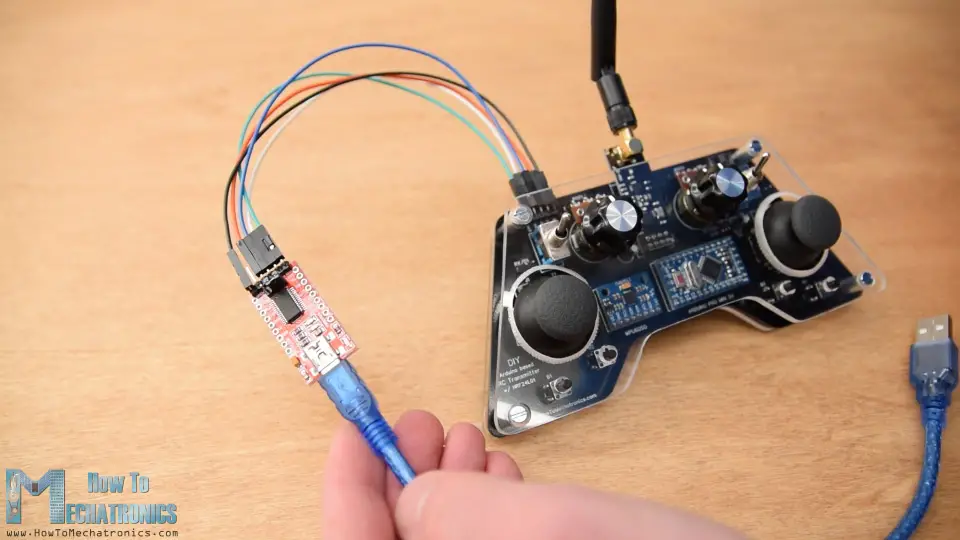
What’s left now is to program the Arduino. For programming a Pro Mini board we need an USB to serial UART interface which can be hooked up to the programing header located on the top side of our controller.
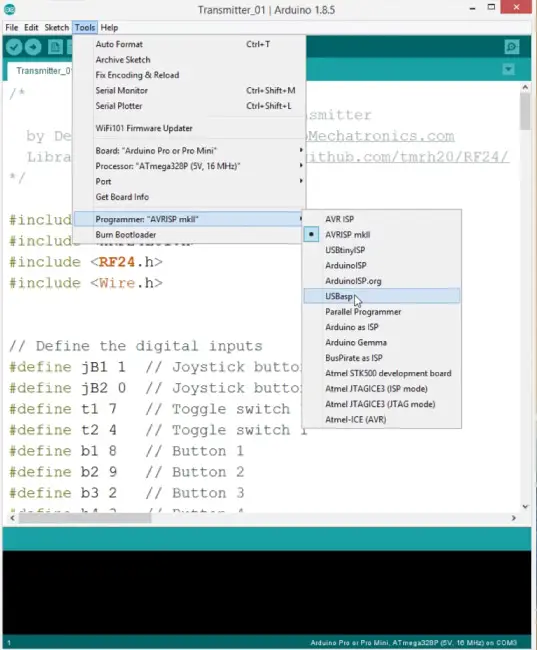
Then in the Arduino IDE tools menu we need to select the Arduino Pro or Pro Mini board, select the proper version of the processor, select the port and select the programming method to “USBasp”. And so now we are able to upload the code to the Arduino.
DIY Arduino based RC Transmitter Code
Let’s explain how the transmitter code works. So first we need to include the SPI and RF24 library for the wireless communication, and the I2C library for the accelerometer module. Then we need to define the digital inputs, some variables needed for the program below, define the radio object and the communication address. Then we need to define a structure where we will store the 14 input values of the controller. The maximum size of this structure can be 32 bytes because that’s the NRF24L01 buffer limit or the amount of data the module can send at once.
/*
        DIY Arduino based RC Transmitter
  by Dejan Nedelkovski, www.HowToMechatronics.com
  Library: TMRh20/RF24, https://github.com/tmrh20/RF24/
*/

#include <SPI.h>
#include <nRF24L01.h>
#include <RF24.h>
#include <Wire.h>


// Define the digital inputs
#define jB1 1  // Joystick button 1
#define jB2 0  // Joystick button 2
#define t1 7   // Toggle switch 1
#define t2 4   // Toggle switch 1
#define b1 8   // Button 1
#define b2 9   // Button 2
#define b3 2   // Button 3
#define b4 3   // Button 4

const int MPU = 0x68; // MPU6050 I2C address
float AccX, AccY, AccZ;
float GyroX, GyroY, GyroZ;
float accAngleX, accAngleY, gyroAngleX, gyroAngleY;
float angleX, angleY;
float AccErrorX, AccErrorY, GyroErrorX, GyroErrorY;
float elapsedTime, currentTime, previousTime;
int c = 0;


RF24 radio(5, 6);   // nRF24L01 (CE, CSN)
const byte address[6] = "00001"; // Address

// Max size of this struct is 32 bytes - NRF24L01 buffer limit
struct Data_Package {
  byte j1PotX;
  byte j1PotY;
  byte j1Button;
  byte j2PotX;
  byte j2PotY;
  byte j2Button;
  byte pot1;
  byte pot2;
  byte tSwitch1;
  byte tSwitch2;
  byte button1;
  byte button2;
  byte button3;
  byte button4;
};

Data_Package data; //Create a variable with the above structure

void setup() {
  Serial.begin(9600);

  // Initialize interface to the MPU6050
  initialize_MPU6050();

  // Call this function if you need to get the IMU error values for your module
  //calculate_IMU_error();

  // Define the radio communication
  radio.begin();
  radio.openWritingPipe(address);
  radio.setAutoAck(false);
  radio.setDataRate(RF24_250KBPS);
  radio.setPALevel(RF24_PA_LOW);

  // Activate the Arduino internal pull-up resistors
  pinMode(jB1, INPUT_PULLUP);
  pinMode(jB2, INPUT_PULLUP);
  pinMode(t1, INPUT_PULLUP);
  pinMode(t2, INPUT_PULLUP);
  pinMode(b1, INPUT_PULLUP);
  pinMode(b2, INPUT_PULLUP);
  pinMode(b3, INPUT_PULLUP);
  pinMode(b4, INPUT_PULLUP);

  // Set initial default values
  data.j1PotX = 127; // Values from 0 to 255. When Joystick is in resting position, the value is in the middle, or 127. We actually map the pot value from 0 to 1023 to 0 to 255 because that's one BYTE value
  data.j1PotY = 127;
  data.j2PotX = 127;
  data.j2PotY = 127;
  data.j1Button = 1;
  data.j2Button = 1;
  data.pot1 = 1;
  data.pot2 = 1;
  data.tSwitch1 = 1;
  data.tSwitch2 = 1;
  data.button1 = 1;
  data.button2 = 1;
  data.button3 = 1;
  data.button4 = 1;
}
void loop() {
  // Read all analog inputs and map them to one Byte value
  data.j1PotX = map(analogRead(A1), 0, 1023, 0, 255); // Convert the analog read value from 0 to 1023 into a BYTE value from 0 to 255
  data.j1PotY = map(analogRead(A0), 0, 1023, 0, 255);
  data.j2PotX = map(analogRead(A2), 0, 1023, 0, 255);
  data.j2PotY = map(analogRead(A3), 0, 1023, 0, 255);
  data.pot1 = map(analogRead(A7), 0, 1023, 0, 255);
  data.pot2 = map(analogRead(A6), 0, 1023, 0, 255);
  // Read all digital inputs
  data.j1Button = digitalRead(jB1);
  data.j2Button = digitalRead(jB2);
  data.tSwitch2 = digitalRead(t2);
  data.button1 = digitalRead(b1);
  data.button2 = digitalRead(b2);
  data.button3 = digitalRead(b3);
  data.button4 = digitalRead(b4);
  // If toggle switch 1 is switched on
  if (digitalRead(t1) == 0) {
    read_IMU();    // Use MPU6050 instead of Joystick 1 for controling left, right, forward and backward movements
  }
  // Send the whole data from the structure to the receiver
  radio.write(&data, sizeof(Data_Package));
}

void initialize_MPU6050() {
  Wire.begin();                      // Initialize comunication
  Wire.beginTransmission(MPU);       // Start communication with MPU6050 // MPU=0x68
  Wire.write(0x6B);                  // Talk to the register 6B
  Wire.write(0x00);                  // Make reset - place a 0 into the 6B register
  Wire.endTransmission(true);        //end the transmission
  // Configure Accelerometer
  Wire.beginTransmission(MPU);
  Wire.write(0x1C);                  //Talk to the ACCEL_CONFIG register
  Wire.write(0x10);                  //Set the register bits as 00010000 (+/- 8g full scale range)
  Wire.endTransmission(true);
  // Configure Gyro
  Wire.beginTransmission(MPU);
  Wire.write(0x1B);                   // Talk to the GYRO_CONFIG register (1B hex)
  Wire.write(0x10);                   // Set the register bits as 00010000 (1000dps full scale)
  Wire.endTransmission(true);
}

void calculate_IMU_error() {
  // We can call this funtion in the setup section to calculate the accelerometer and gury data error. From here we will get the error values used in the above equations printed on the Serial Monitor.
  // Note that we should place the IMU flat in order to get the proper values, so that we then can the correct values
  // Read accelerometer values 200 times
  while (c < 200) {
    Wire.beginTransmission(MPU);
    Wire.write(0x3B);
    Wire.endTransmission(false);
    Wire.requestFrom(MPU, 6, true);
    AccX = (Wire.read() << 8 | Wire.read()) / 4096.0 ;
    AccY = (Wire.read() << 8 | Wire.read()) / 4096.0 ;
    AccZ = (Wire.read() << 8 | Wire.read()) / 4096.0 ;
    // Sum all readings
    AccErrorX = AccErrorX + ((atan((AccY) / sqrt(pow((AccX), 2) + pow((AccZ), 2))) * 180 / PI));
    AccErrorY = AccErrorY + ((atan(-1 * (AccX) / sqrt(pow((AccY), 2) + pow((AccZ), 2))) * 180 / PI));
    c++;
  }
  //Divide the sum by 200 to get the error value
  AccErrorX = AccErrorX / 200;
  AccErrorY = AccErrorY / 200;
  c = 0;
  // Read gyro values 200 times
  while (c < 200) {
    Wire.beginTransmission(MPU);
    Wire.write(0x43);
    Wire.endTransmission(false);
    Wire.requestFrom(MPU, 4, true);
    GyroX = Wire.read() << 8 | Wire.read();
    GyroY = Wire.read() << 8 | Wire.read();
    // Sum all readings
    GyroErrorX = GyroErrorX + (GyroX / 32.8);
    GyroErrorY = GyroErrorY + (GyroY / 32.8);
    c++;
  }
  //Divide the sum by 200 to get the error value
  GyroErrorX = GyroErrorX / 200;
  GyroErrorY = GyroErrorY / 200;
  // Print the error values on the Serial Monitor
  Serial.print("AccErrorX: ");
  Serial.println(AccErrorX);
  Serial.print("AccErrorY: ");
  Serial.println(AccErrorY);
  Serial.print("GyroErrorX: ");
  Serial.println(GyroErrorX);
  Serial.print("GyroErrorY: ");
  Serial.println(GyroErrorY);
}

void read_IMU() {
  // === Read acceleromter data === //
  Wire.beginTransmission(MPU);
  Wire.write(0x3B); // Start with register 0x3B (ACCEL_XOUT_H)
  Wire.endTransmission(false);
  Wire.requestFrom(MPU, 6, true); // Read 6 registers total, each axis value is stored in 2 registers
  //For a range of +-8g, we need to divide the raw values by 4096, according to the datasheet
  AccX = (Wire.read() << 8 | Wire.read()) / 4096.0; // X-axis value
  AccY = (Wire.read() << 8 | Wire.read()) / 4096.0; // Y-axis value
  AccZ = (Wire.read() << 8 | Wire.read()) / 4096.0; // Z-axis value

  // Calculating angle values using
  accAngleX = (atan(AccY / sqrt(pow(AccX, 2) + pow(AccZ, 2))) * 180 / PI) + 1.15; // AccErrorX ~(-1.15) See the calculate_IMU_error()custom function for more details
  accAngleY = (atan(-1 * AccX / sqrt(pow(AccY, 2) + pow(AccZ, 2))) * 180 / PI) - 0.52; // AccErrorX ~(0.5)

  // === Read gyro data === //
  previousTime = currentTime;        // Previous time is stored before the actual time read
  currentTime = millis();            // Current time actual time read
  elapsedTime = (currentTime - previousTime) / 1000;   // Divide by 1000 to get seconds
  Wire.beginTransmission(MPU);
  Wire.write(0x43); // Gyro data first register address 0x43
  Wire.endTransmission(false);
  Wire.requestFrom(MPU, 4, true); // Read 4 registers total, each axis value is stored in 2 registers
  GyroX = (Wire.read() << 8 | Wire.read()) / 32.8; // For a 1000dps range we have to divide first the raw value by 32.8, according to the datasheet
  GyroY = (Wire.read() << 8 | Wire.read()) / 32.8;
  GyroX = GyroX + 1.85; //// GyroErrorX ~(-1.85)
  GyroY = GyroY - 0.15; // GyroErrorY ~(0.15)
  // Currently the raw values are in degrees per seconds, deg/s, so we need to multiply by sendonds (s) to get the angle in degrees
  gyroAngleX = GyroX * elapsedTime;
  gyroAngleY = GyroY * elapsedTime;

  // Complementary filter - combine acceleromter and gyro angle values
  angleX = 0.98 * (angleX + gyroAngleX) + 0.02 * accAngleX;
  angleY = 0.98 * (angleY + gyroAngleY) + 0.02 * accAngleY;
  // Map the angle values from -90deg to +90 deg into values from 0 to 255, like the values we are getting from the Joystick
  data.j1PotX = map(angleX, -90, +90, 255, 0);
  data.j1PotY = map(angleY, -90, +90, 0, 255);
}
In the setup section we need to initialize the MPU6050 module and we can also calculate the IMU error which is a values that is later used when calculating the correct angles of the module. You can find more details about this on the website article, there is explanation for each line of the code as well as some dedicated tutorials. Then we need to initialize the radio communication, activate the Arduino internal pull-up resistors for all digital inputs and set the initial default values for all variables.
In the loop section start by reading the all analog inputs, map their values from 0 to 1023 into byte values from 0 to 255 because we already defined the variables in our structure as bytes. Each input is stored in the particular data variable from the structure. We should just note that because we use the pull-up resistors the digital pins readings are 0 when the buttons are pressed. So using the radio.write() function we simple send the values from all 14 channels to the receiver. In case the toggle switch 1 is switched on, then we use the accelerometer and gyro data instead for the control. Again you can find more how we read and calculate this data on the website. So instead of the joystick 1 X and Y values we are using the angle values we are getting from the IMU, which we previously convert them from values from -90 to +90 degrees into byte values from 0 to 255 appropriately. So that’s how the transmitter code, the most important things were defining the radio communication and sending the data to the receiver.
Receiver Code
Now let’s take a look at how we can receive this data. Here’s a simple receiver code where we will receive the data and simply print it on the serial monitor so that we know that the communication works properly. Again we need to include the RF24 library and define the objects and the structure the same way as in the transmitter code. In the setup section when defining the radio communication we need to use the same settings as the transmitter and set the module as receiver using the radio.startListening() function.
/*
    DIY Arduino based RC Transmitter Project
              == Receiver Code ==

  by Dejan Nedelkovski, www.HowToMechatronics.com
  Library: TMRh20/RF24, https://github.com/tmrh20/RF24/
*/
#include <SPI.h>
#include <nRF24L01.h>
#include <RF24.h>
RF24 radio(6, 7);   // nRF24L01 (CE, CSN)
const byte address[6] = "00001";

unsigned long lastReceiveTime = 0;
unsigned long currentTime = 0;

// Max size of this struct is 32 bytes - NRF24L01 buffer limit
struct Data_Package {
  byte j1PotX;
  byte j1PotY;
  byte j1Button;
  byte j2PotX;
  byte j2PotY;
  byte j2Button;
  byte pot1;
  byte pot2;
  byte tSwitch1;
  byte tSwitch2;
  byte button1;
  byte button2;
  byte button3;
  byte button4;
};

Data_Package data; //Create a variable with the above structure

void setup() {
  Serial.begin(9600);
  radio.begin();
  radio.openReadingPipe(0, address);
  radio.setAutoAck(false);
  radio.setDataRate(RF24_250KBPS);
  radio.setPALevel(RF24_PA_LOW);
  radio.startListening(); //  Set the module as receiver
  resetData();
}
void loop() {
  // Check whether there is data to be received
  if (radio.available()) {
    radio.read(&data, sizeof(Data_Package)); // Read the whole data and store it into the 'data' structure
    lastReceiveTime = millis(); // At this moment we have received the data
  }
  // Check whether we keep receving data, or we have a connection between the two modules
  currentTime = millis();
  if ( currentTime - lastReceiveTime > 1000 ) { // If current time is more then 1 second since we have recived the last data, that means we have lost connection
    resetData(); // If connection is lost, reset the data. It prevents unwanted behavior, for example if a drone has a throttle up and we lose connection, it can keep flying unless we reset the values
  }
  // Print the data in the Serial Monitor
  Serial.print("j1PotX: ");
  Serial.print(data.j1PotX);
  Serial.print("; j1PotY: ");
  Serial.print(data.j1PotY);
  Serial.print("; button1: ");
  Serial.print(data.button1);
  Serial.print("; j2PotX: ");
  Serial.println(data.j2PotX);
}

void resetData() {
  // Reset the values when there is no radio connection - Set initial default values
  data.j1PotX = 127;
  data.j1PotY = 127;
  data.j2PotX = 127;
  data.j2PotY = 127;
  data.j1Button = 1;
  data.j2Button = 1;
  data.pot1 = 1;
  data.pot2 = 1;
  data.tSwitch1 = 1;
  data.tSwitch2 = 1;
  data.button1 = 1;
  data.button2 = 1;
  data.button3 = 1;
  data.button4 = 1;
}
In the main loop using the available() function we check whether there is an incoming data. If true we simply read the data and store it into the variables of the structure. Now we can print the data on the serial monitor to check whether the transmission work properly. Also using the millis() function and an if statement we check whether we keep receiving data, or if we don’t receive data for a period longer than 1 second, then we reset variables to their default values. We use this to prevent unwanted behavior, for example if a drone has a throttle up and we lose connection it can keep flying away unless we reset the values.
So that’s it. Now we can implement this method of receiving the data for any Arduino project. For example here the code for controlling the Arduino robot car from one of my previous videos.
Arduino Robot Car Wireless Control using RC Transmitter
Here we need to define the libraries, the structure and the radio communication as explained earlier. Then in the main loop we just need read the incoming data and use any of it for whatever we want. In this case I use the joystick 1 values for driving the car.
Arduino Ant Robot / Hexapod control using Arduino RC Transmitter
In the exact same way I made the Arduino Ant Robot from my previous video to be wirelessly controlled using this RC Transmitter. We just need to read the data, and according to it execute the appropriate functions, like moving forward, left, right, bite, attack and so on.
ESC and Servo Control using RC Transmitter
Lastly, let’s take a look how can this transmitter be used for controlling commercial RC devices. Usually for these devices we need to control their servos or brushless motors. So after receiving the data from the transmitter, for controlling servo we simply use the Arduino Servo library and use values from 0 to 180 degrees. For controlling brushless motor using ESC, we can again use the servo library for generating the 50Hz PWM signal used for controlling the ESC. By varying the duty cycle from 1000 to 2000 microseconds we control the RPM of the motor from zero to maximum. However, more on controlling brushless motors using ESC in my next tutorial.
So that’s it. I hope you enjoyed this video and learned something new. Feel free to ask any question in the comments section below and check my Arduino Projects Collection.
The post DIY Arduino RC Transmitter appeared first on HowToMechatronics.
from HowToMechatronics http://bit.ly/2TP2Loi
Subscribe to:
Posts (Atom)