In this tutorial I will show you how I built an Arduino based 3D wire bending machine. This is actually a typical mechatronic system because it involves mechanical, electrical and computer engineering. So therefore I believe many engineering students or anyone who is new into mechatronics found this project interesting.
Here’s the working principle of this 3D wire bending machine. So first, the wire goes through a series rollers, or straighteners. Using a stepper motor the wire is precisely fed to the wire bending mechanism which also uses a stepper motor as well as a small servo for the bending process.
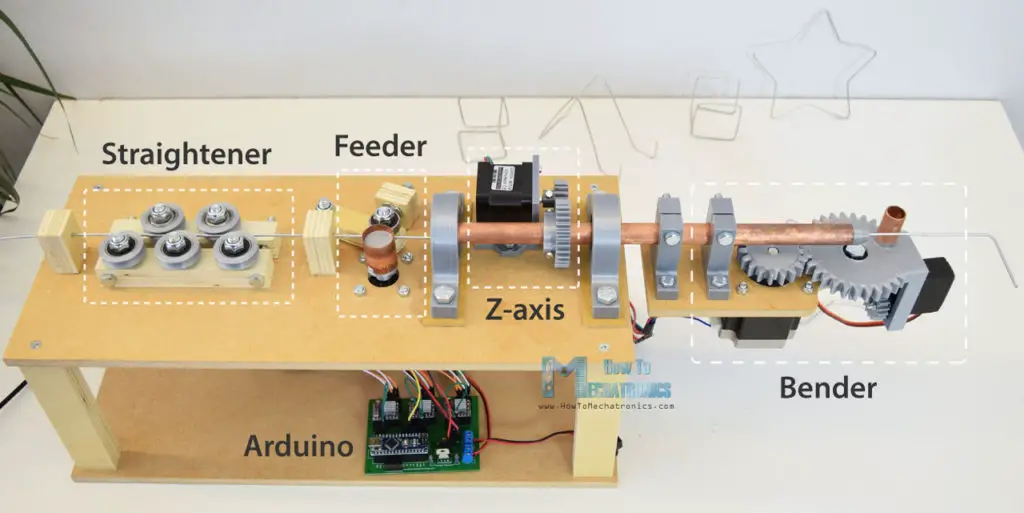 There’s also another stepper motor, called the Z-axis, which actually enables the machine to create three dimensional forms. Of course, the brain of the machine is an Arduino board which along with the other electronics components is attached on a custom designed PCB.
As for the program, I made few custom functions for making various shapes, like a star, a cube and a simple stand, as well as a manual mode where we can make the wire forms by entering commands through the serial monitor.
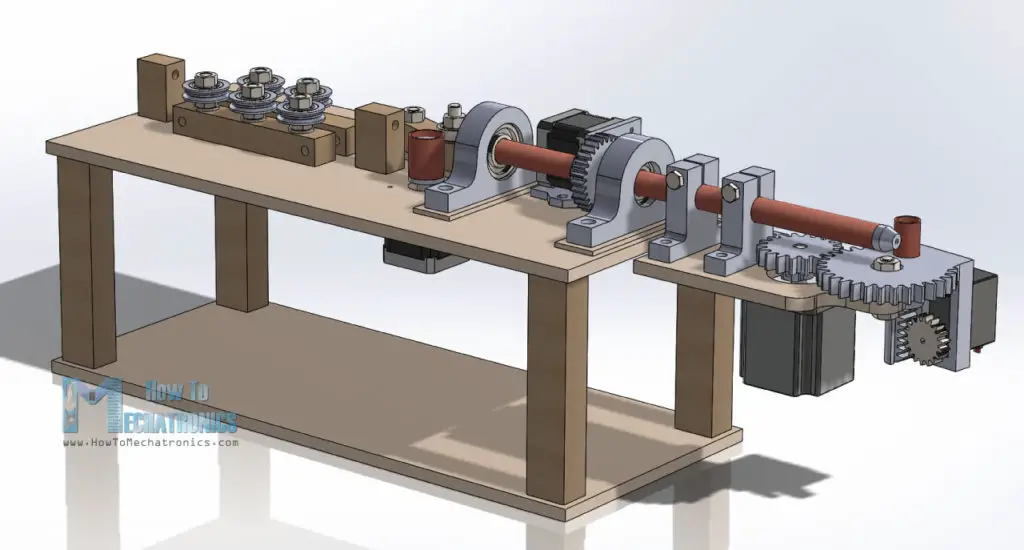
DIY 3D Wire Bending Machine 3D Model
As usual, I started by designing the project using a 3D modeling software. You can download and the 3D model below.
Solidworks:
STEP file:
STL files for 3D Printing:
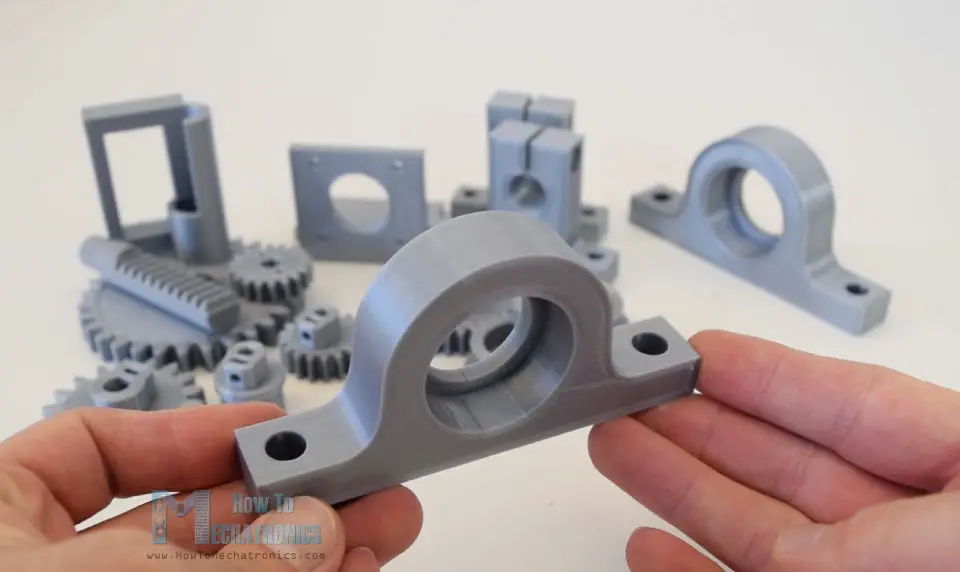
For some of the parts, like the gears, the bearing pillow blocks and some shaft couplers I used a 3D printer to make them. The STL files of these parts, which are used for 3D printing, can be downloaded from the files above.
My new 3D printer, Creality CR-10, did a great job and printed the parts with great quality. Here’s a link to this 3D printer in case you want to check it out.
Building the Wire Bending Machine
I continued with preparing the other parts, for which I used MDF and plywood. So once I took all dimensions from the 3D model, using a circular saw, I cut the pieces to size. I used 8 mm tick MDF and 18 mm tick plywood. Once I got them ready I started with the assembly. First I made the base out of two MDF plates and 4 plywood columns. For securing them I used a wood glue and some screws.
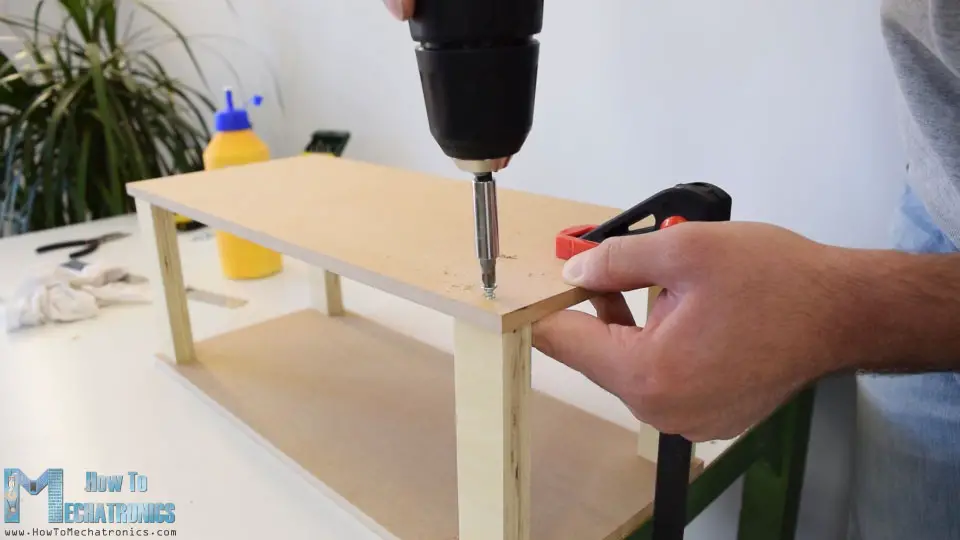
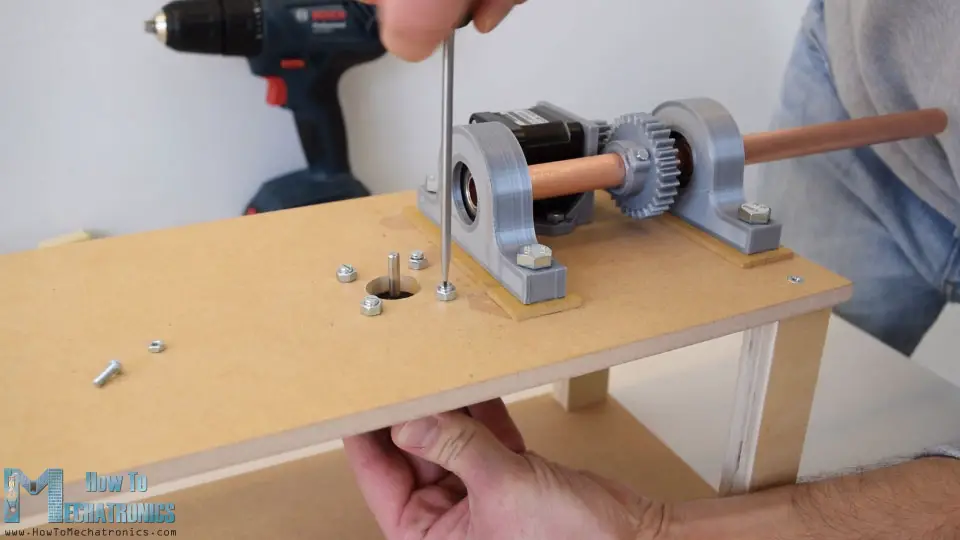
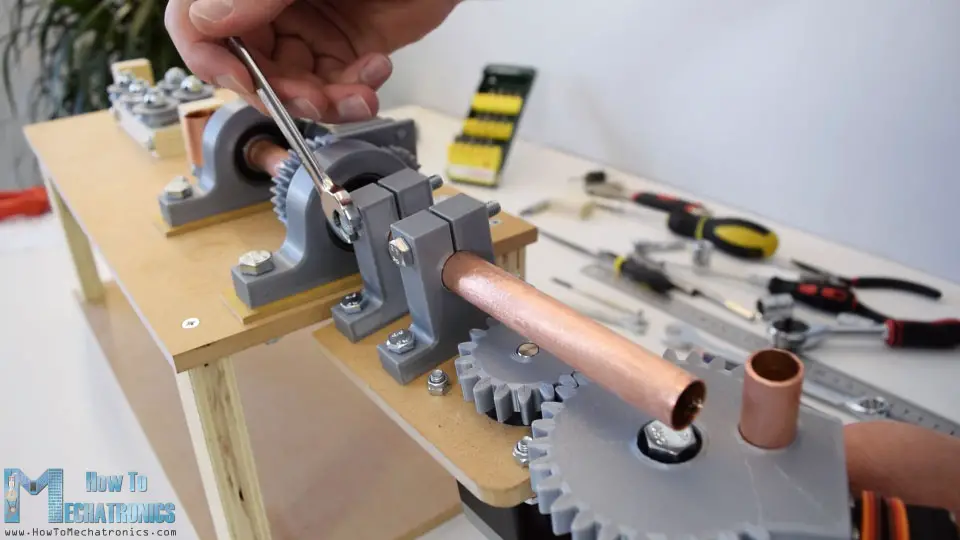
Next on the top panel I attached the 3D printed bearing pillow blocks using some 8 mm bolts and nuts. We can notice here that I added 3 mm tick MDF plates between the top and the pillow blocks so that I get the proper height. Now in these blocks we can fit the 6202 bearings.
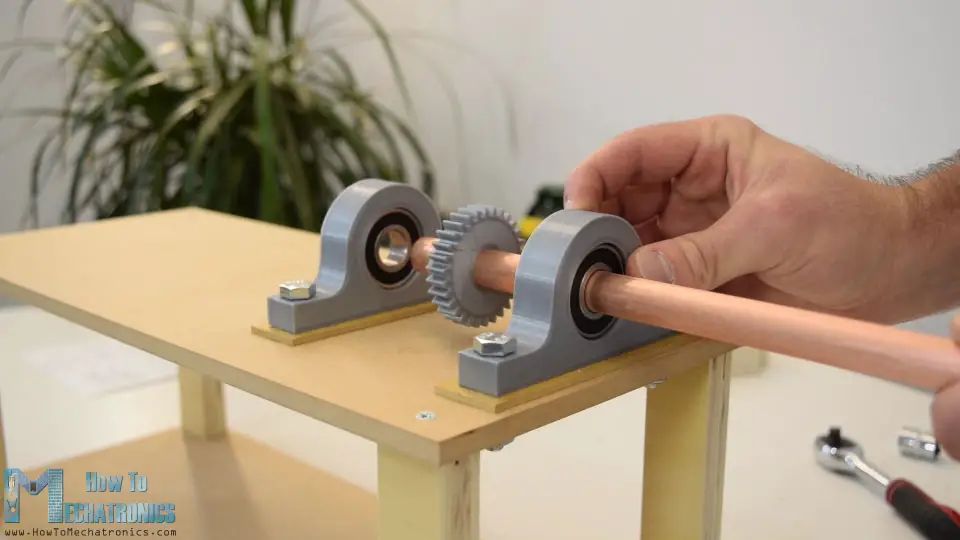
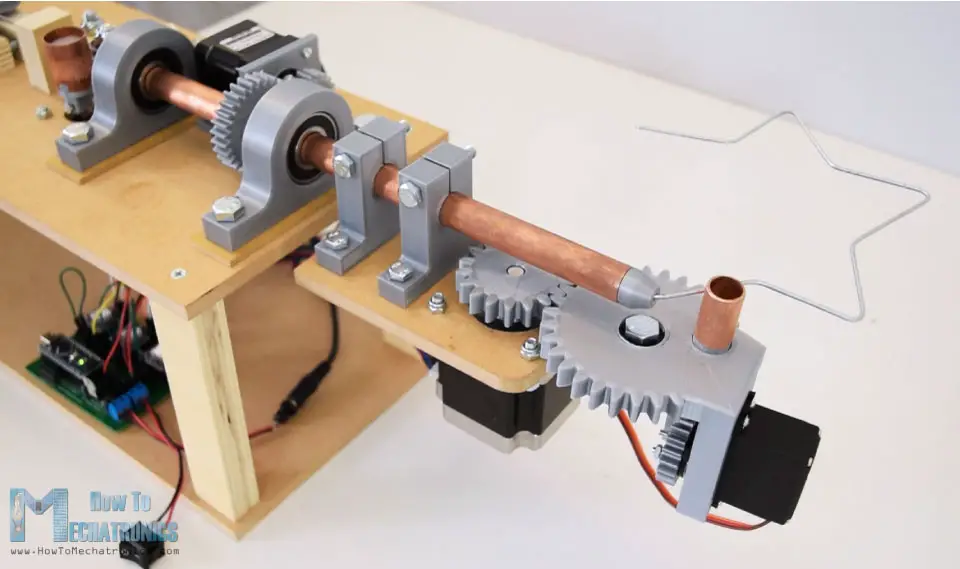
Their outer diameter is 35 mm and the inner diameter is 15 mm. So now, through these bearings, we need to insert a 15 mm hollow shaft so that the wire could pass through it. This shaft is actually the Z-axis, which enables to bending mechanism to rotate around the wire and in that way make three dimensional forms. I used a copper tube for that purpose and its length needs to be around 30 cm.
In between the two bearings I also inserted a 3D printed gear with module of 1.5 and 30 teeth. The gear has custom design slots where we can insert M3 nuts and then using M3 bolts we can tighten the gear to the shaft.
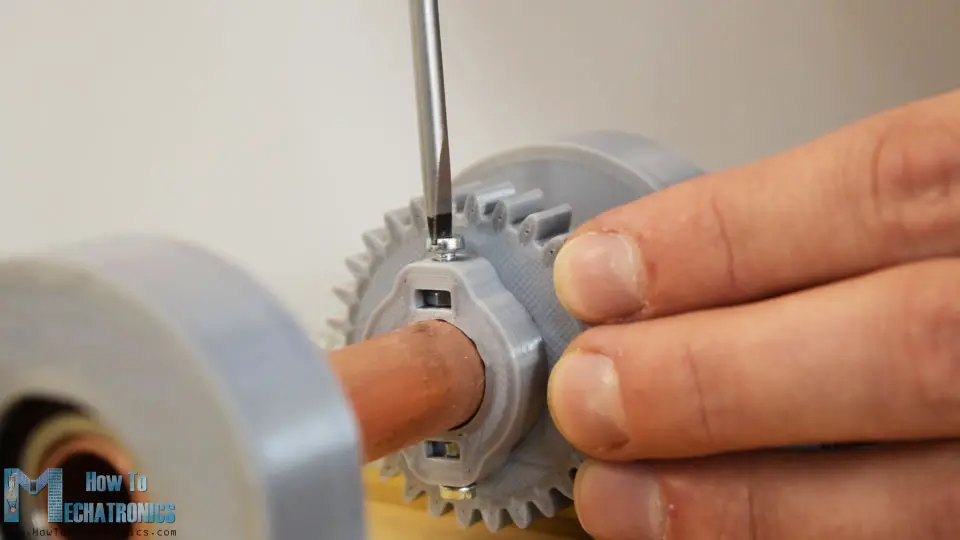
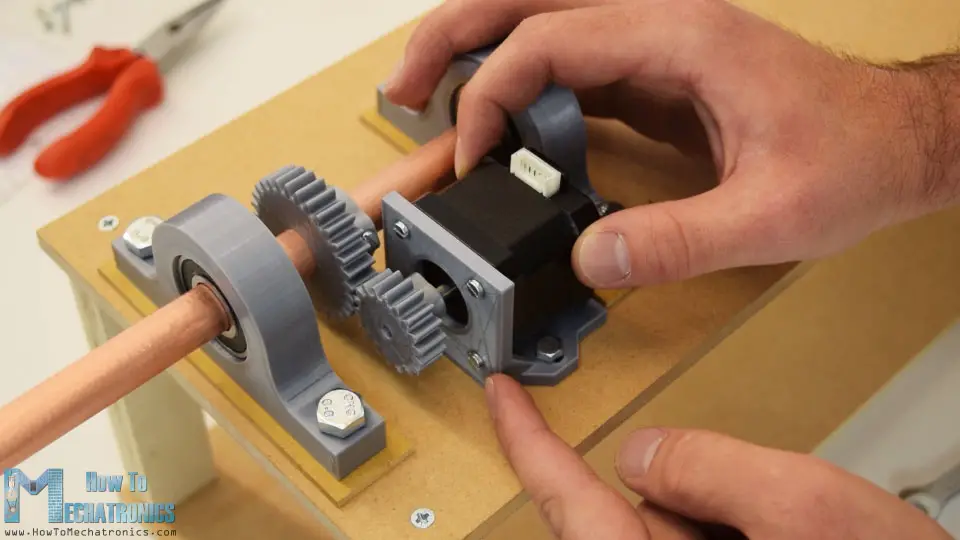
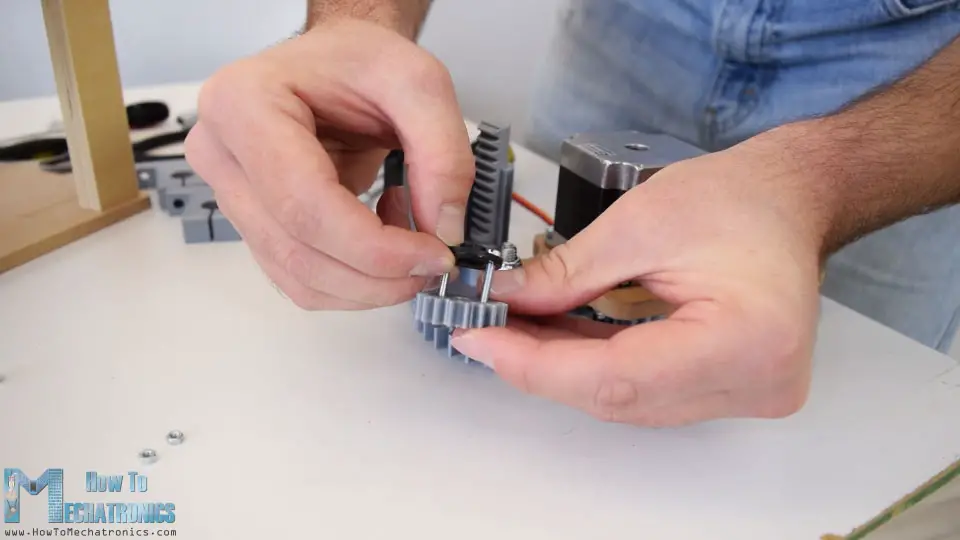
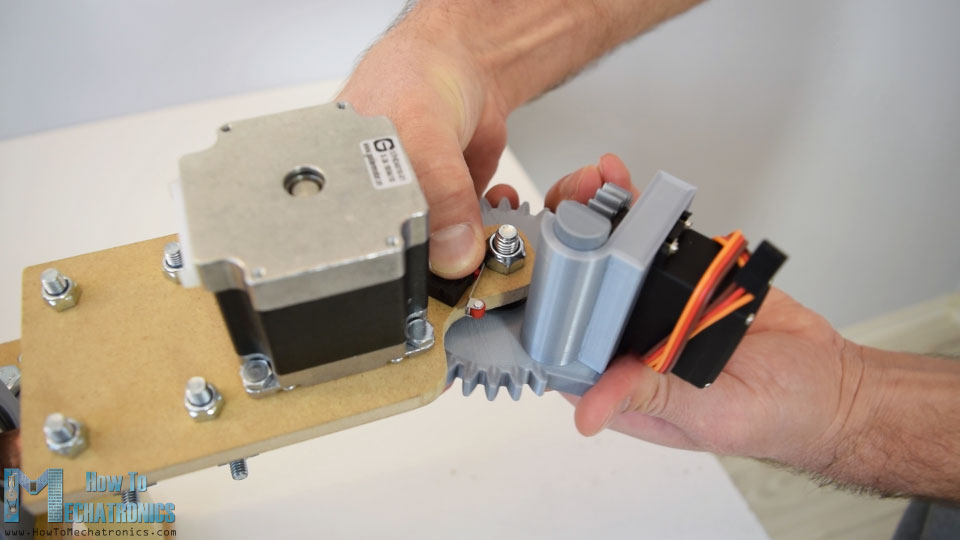
Next we need install the Z-axis stepper motor. For that purpose I 3D printed a custom mounting bracket. So I secured the stepper to the bracket using M3 bolts, and then inserted the 18 teeth gear on the motors shaft. I used the same method for securing the gear to the shaft as shown earlier.
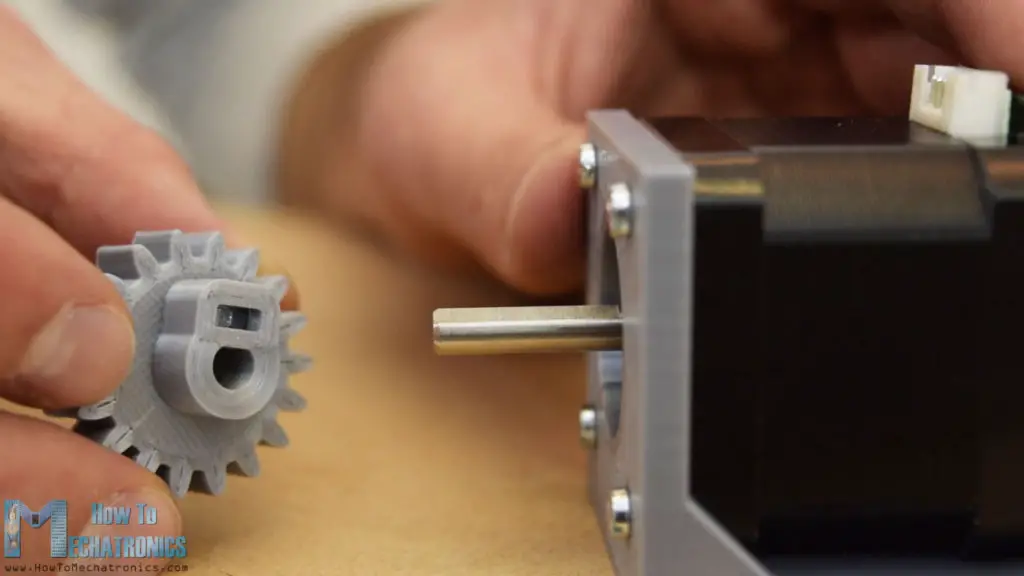
Then using a 6 mm drill I made two holes on the top on which the mounting bracket will be secured. We can notice that the bracket instead of holes, has slots which enables the two gears to be properly paired.
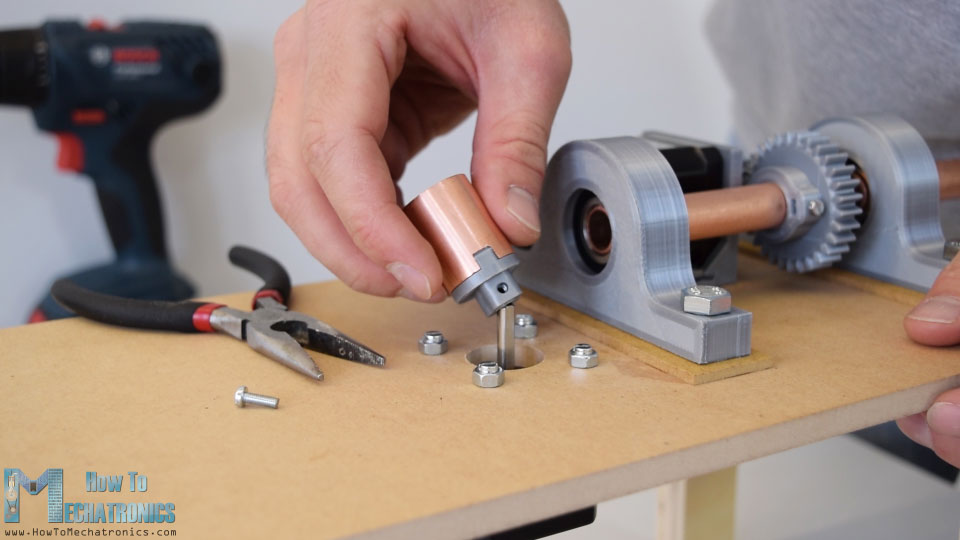
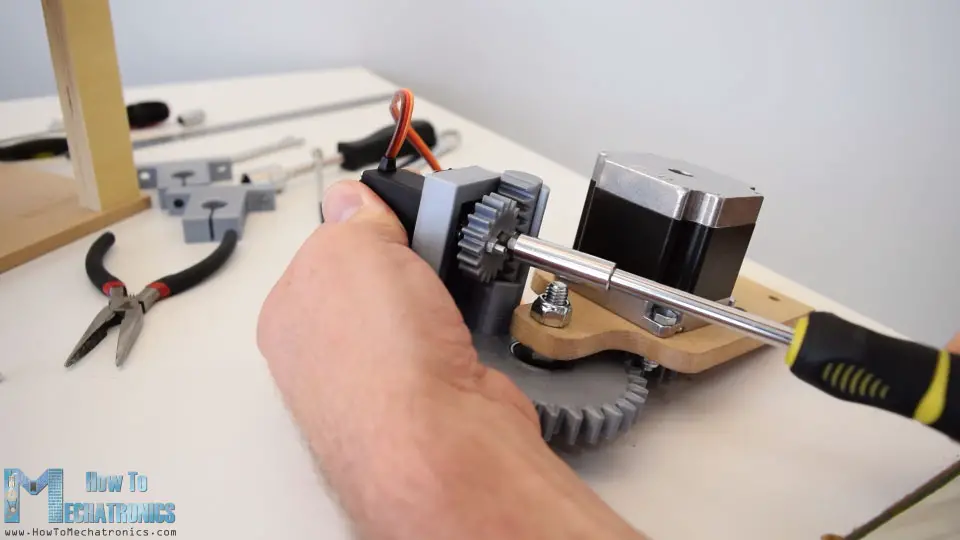
I moved on with installing the stepper motor for the feeder mechanism. This motor will be directly mounted on the top plate, so I drilled the appropriate holes on it. Then using four bolts I secured the stepper to the plate, and in case you wonder what those nuts do here, they actually act as distance nuts because the bolts I had were longer and couldn’t fit into the motors threads.
So now on the shaft of this stepper we need to insert the feeder. For that purpose I 3D printed a custom shaft coupler on which I inserted a copper tube which will actually be the contact surface of the feeder.
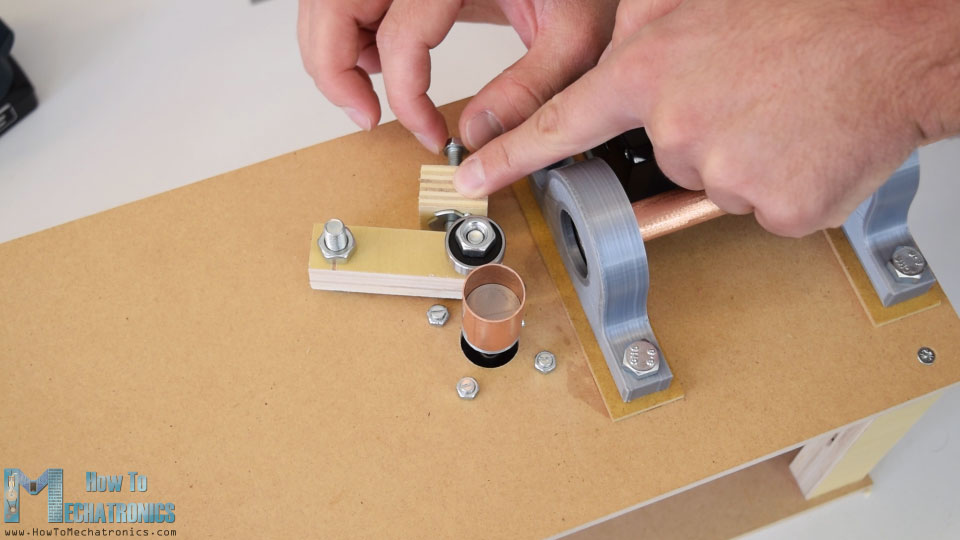
Then on the opposite side of the motor I inserted a lever, on which I attached a bearing which will press against the feeder. For getting enough grip so the feeder could move the wire, I will attach a piece of plywood with a T-nut on it, and then using a bolt we will be able control the grip of the feeder.
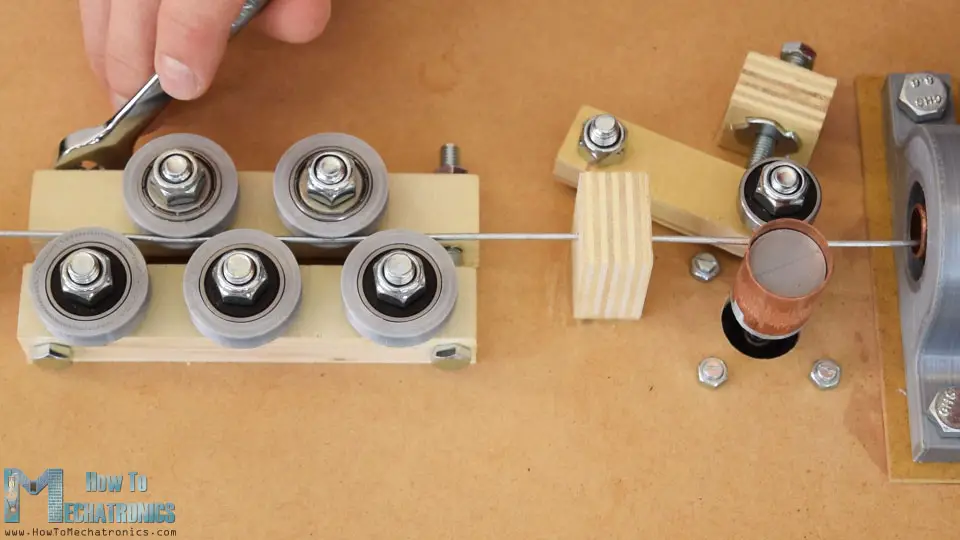
The next step is making the wire straightening system. Using three M8 bolts I secured a piece of plywood that I previously drilled according to the 3D model. Now on top of it I inserted the rollers. I made the rollers out of bearings and 3D printed grooved outer rings.
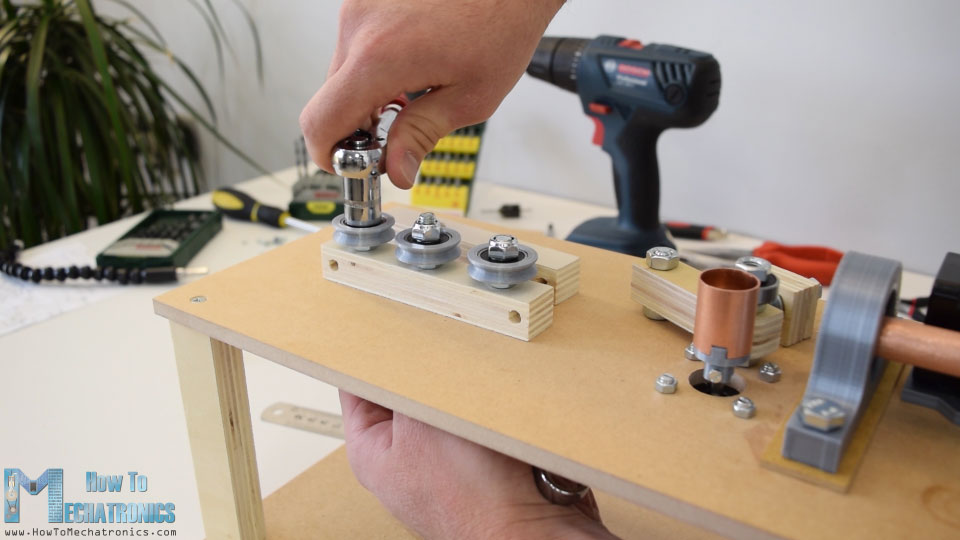
Three rollers go on this side, and two rollers on the other side. For the other side I made a slot in the plywood piece so that the bolts stay flush with the piece. Now using just two bolts we can pair the two side, and using the nuts we can tighten the straighteners appropriately.
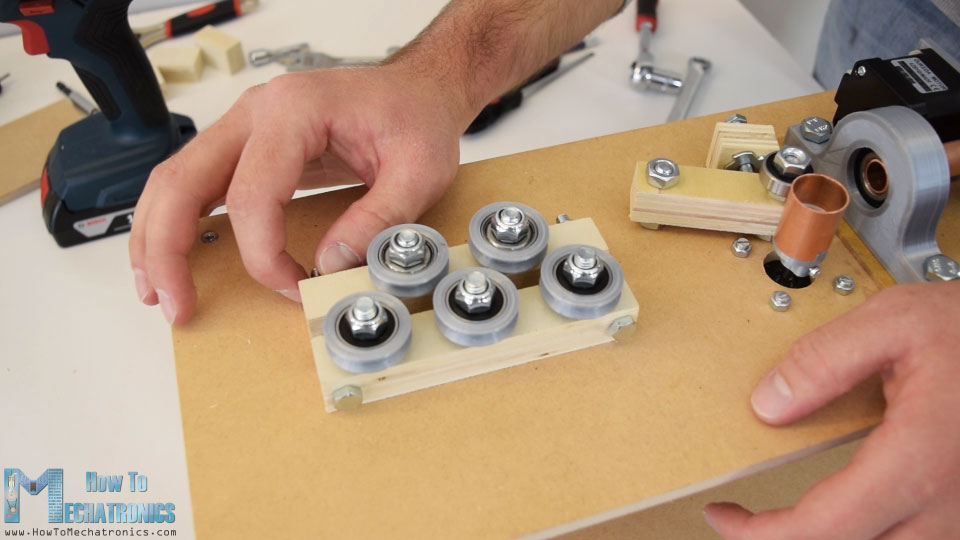
Once finished with this step, I added two more pieces of plywood in front and after the straighteners which will serve as wire guides.
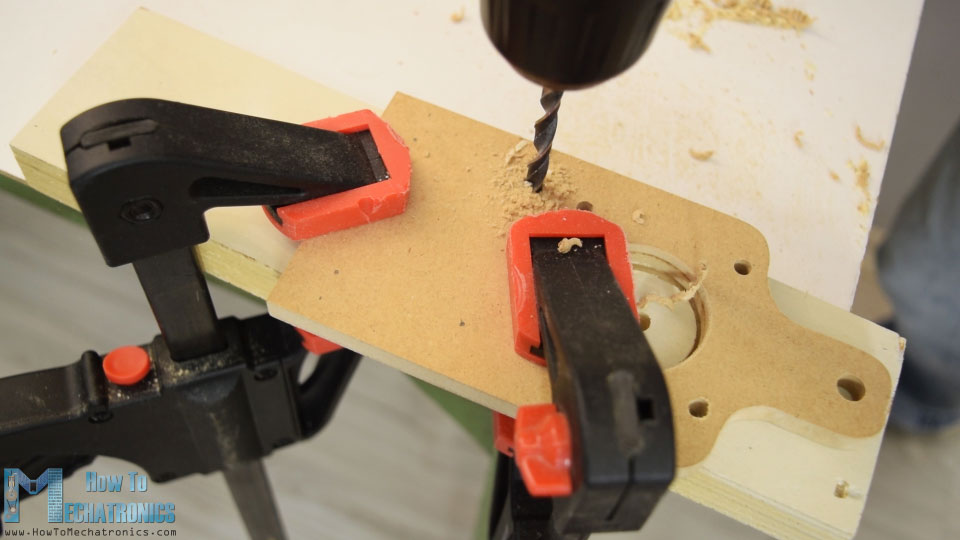
Ok, so now we can move on with making the wire bending mechanism. First on a piece of MDF we need to attach the bender motor. Before I did that, the MDF piece that I had needed some shaping, so using a handsaw, a coping saw and a rasp I easily got the desired shape. Then using a 38 mm hole saw I made an opening for the bigger stepper that we will use for the bending, a NEMA 23 stepper motor. Also I drilled some smaller holes needed for attaching the other parts.
I secured the NEMA 23 stepper using M4 bolts and nuts and on its output shaft I attached a gear with module of 2.5 and 18 teeth. This gear will be paired with bigger 30 teeth gear which is a custom designed gear with integrated plate for mounting a MG996R servo. This servo will move a rack and pinion mechanism, which is actually a pin which will pop out of the gear and it will serve for bending the wire. Using a 5 minutes epoxy I secured a bearing onto the gear and also added a piece of copper tube onto the rack which will be the contact surface when bending the wire.
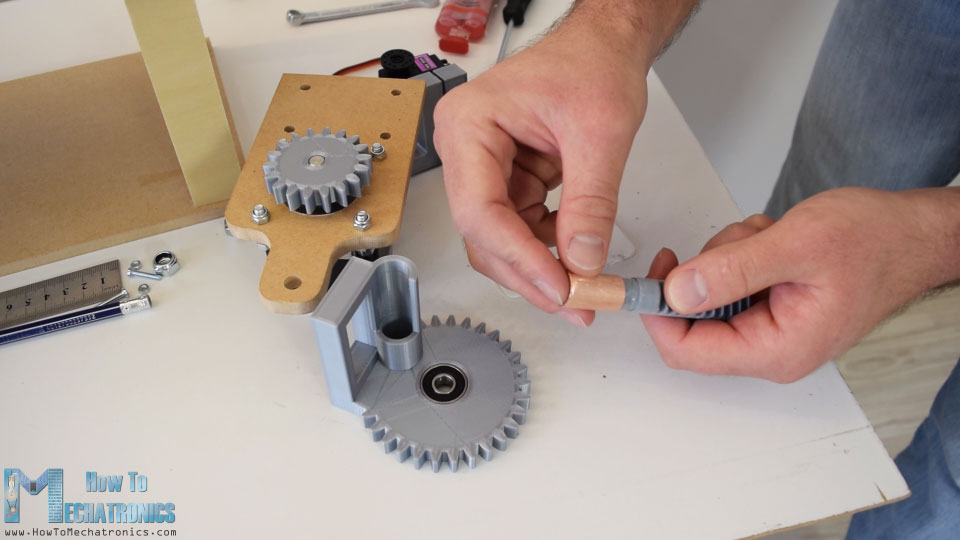
After the epoxy dried out, I paired the two gears by securing the bigger gear in place with a M8 bolt and a nuts. Then I inserted the rack and the servo in placed, and secured it using the screws provided in the servos package. Then I secured the pinion gear onto the round horn of the servo using two M3 bolts and nuts.
Finally I attached the horn to the servo and with this the bending mechanism was completed.
What’s left to do now is to attach the bender to the Z-axis. I did that using the two 3D printed shaft clamps. First I secured them to the bender plate using M6 bolts and nuts, and then inserted them into the Z-axis. I inserted the two nuts in place, and using the bolts I tightened the clamps to the shaft. So now all moving parts are working properly.
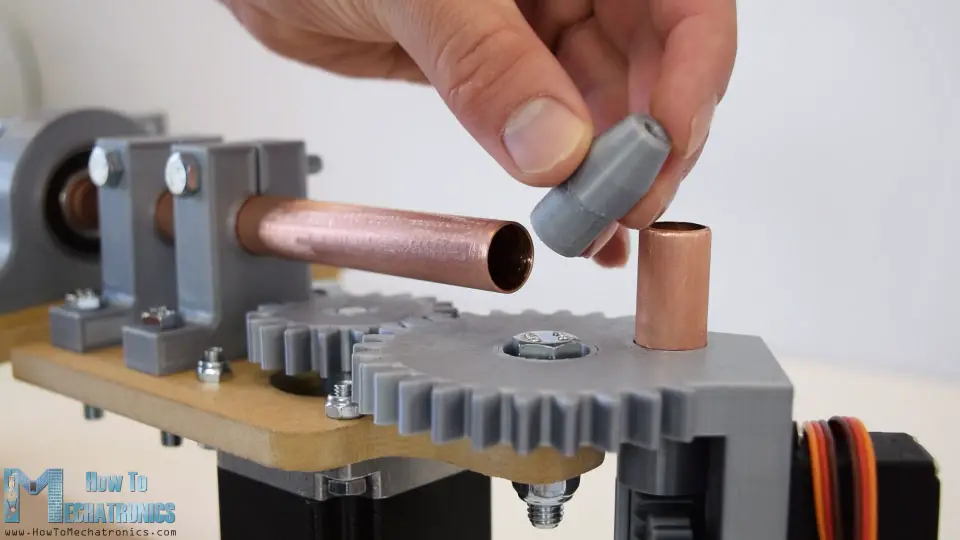
Actually there are two more small details to be added. That’s this 3 mm nozzle on the shaft where the wire comes out.
And at the bottom of bender I placed a micro limit switch which will be used for setting initial position of the bender.
And that’s it, our 3D wire bending machine is almost done. I say almost, because now we need to give live to this machine, or connect the electronics components and program it.
Circuit Diagram
Here’s the circuit diagram of this project.
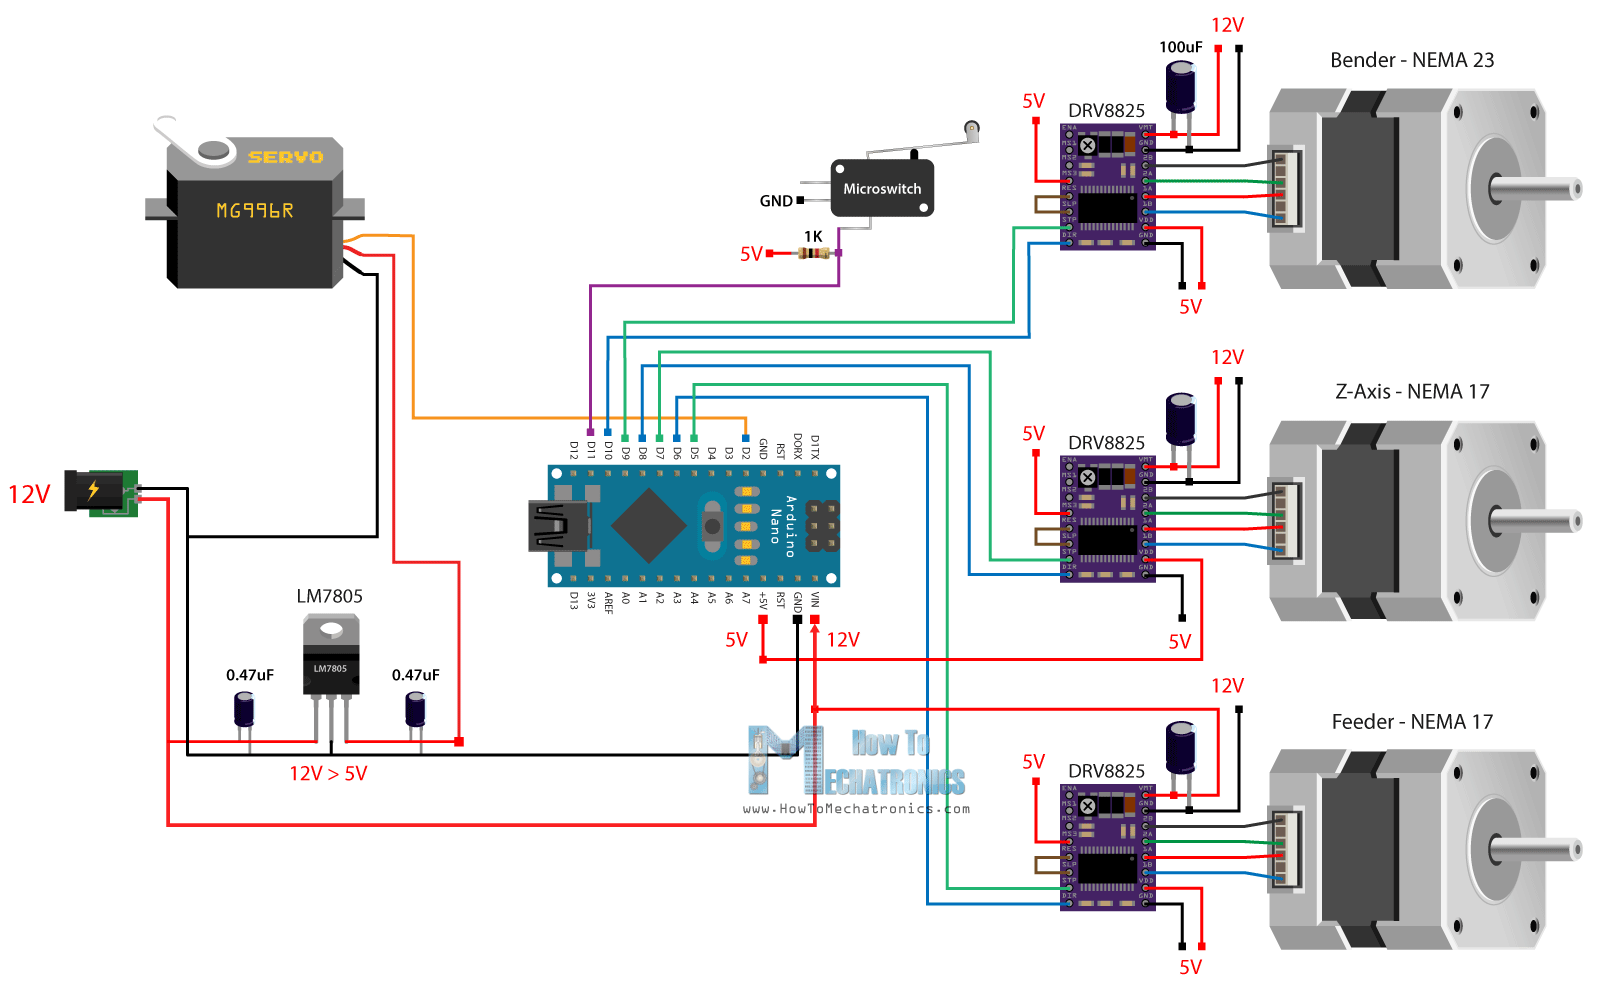
So the three stepper motors are controlled using the three DRV8825 stepper drivers. For powering the steppers and the whole project we will use 12V power supply with at least 3A of current rate.
For powering the servo, we could use the 5V coming from the Arduino, but the MG996R servo can be power hungry and the 5V voltage regulator of the Arduino might not be able to handle it. Therefore, I decided to use a separate 5V voltage regulator, the LM7805, which is good enough to power the servo for this project. There is also a limit switch for the bender which has a pull up resistor it’s connected to a digital pin of the Arduino board.
You can get the components needed for this project from the links below:
- Stepper Motor – NEMA 17……… Amazon / Banggood
- Stepper Motor – NEMA 23 …….. Amazon / Banggood
- DRV8825 Stepper Driver…….…. Amazon / Banggood
- 12V 2A Adapter…………………..…. Amazon / Banggood
- Power Jack…………….………….…… Amazon / Banggood
- Arduino Board ……………………… Amazon / Banggood
*Please note: These are affiliate links. I may make a commission if you buy the components through these links. I would appreciate your support in this way!
PCB Design
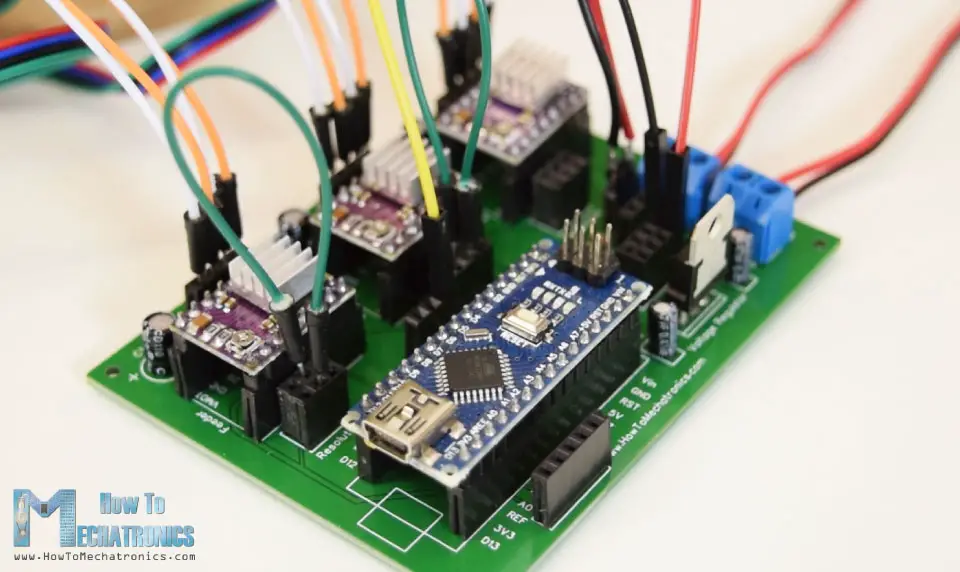
Next, in order to get rid of wiring mess and keep the electronics components organize I designed a custom PCB using the EasyEDA free online circuit design software. The circuit has many connection, so I used both the top and the bottom layers to organize them. I also added pins for selecting the steppers resolution, added one more limit switch connection and provided additional digital and analog pins coming from the Arduino in case we need them for something.
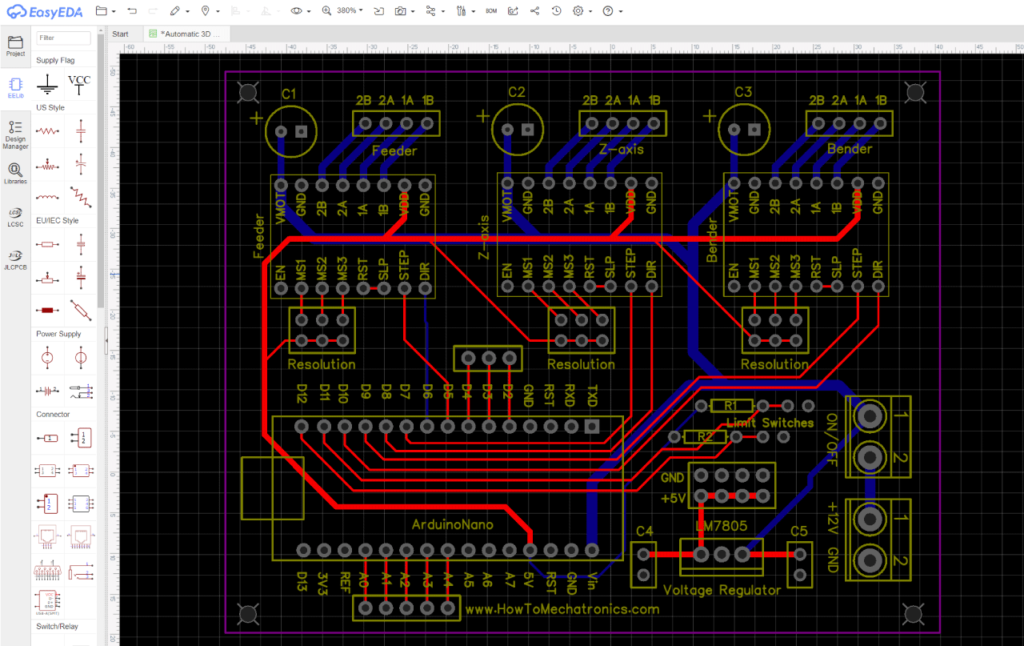
Here’s a link to the project files of this PCB design. So once finished with this design I generated the Gerber file needed for manufacturing the PCB. Then I ordered the PCB from JLCPCB, which is actually the sponsor of this project.

Here we can simply drag and drop the Gerber file and once uploaded, we can review our PCB in the Gerber viewer. If everything is all right then we can go on, select the properties that we want for our PCB, and then we can order our PCB at a reasonable price. Note that if it’s your first order from JLCPCB, you can get up to 10 PCBs for only $2.

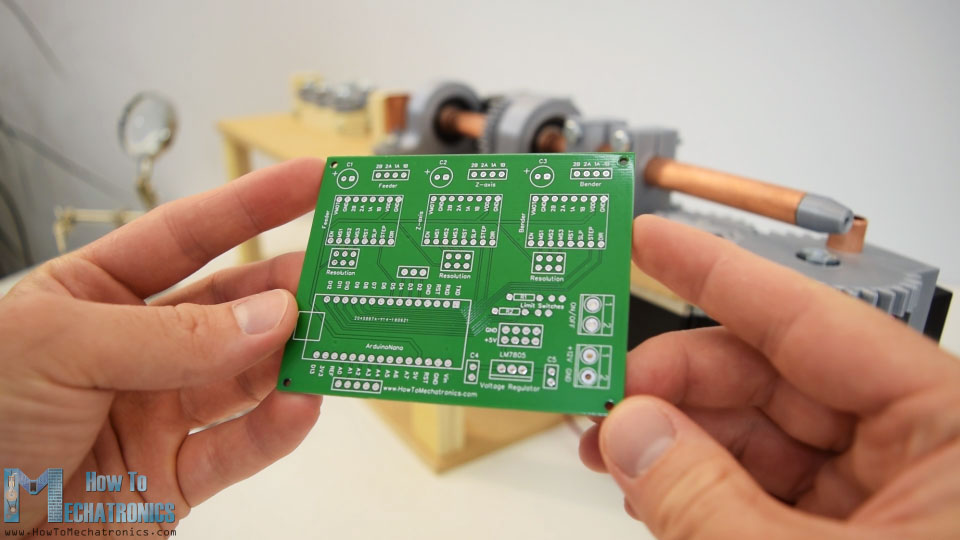
After several days the PCBs have arrived. The quality of the PCBs is great and everything is exactly the same as in the design.
So now we can move on and install the electronics components onto the PCB. I started by soldering pin headers to the PCB. This enables easier connecting and disconnecting of the components when needed. As for the smaller components, like the capacitors, the resistors, the voltage regulator and the terminal blocks I soldered them directly onto the PCB.
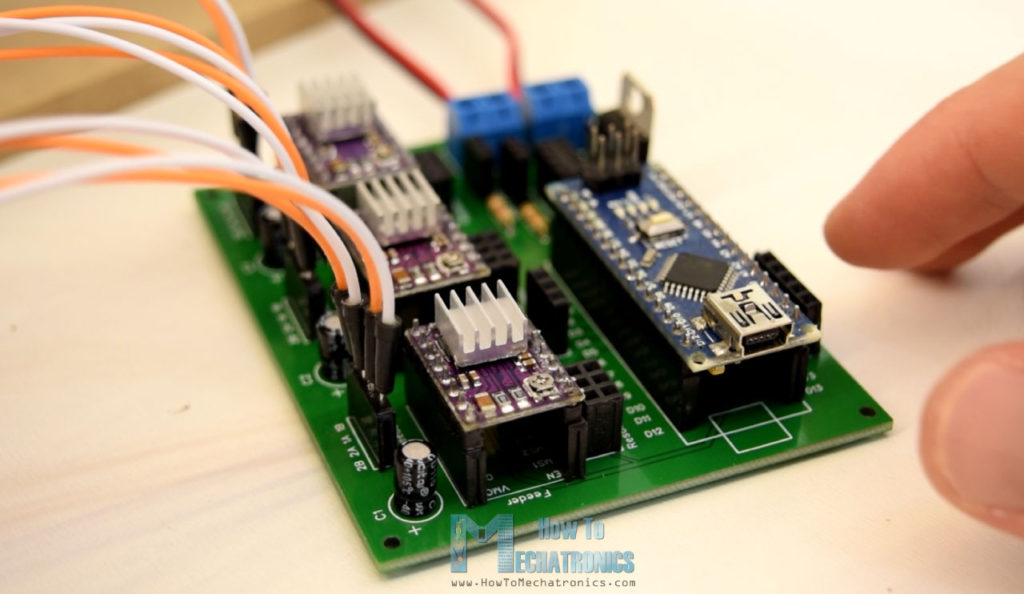
Once finished with this step, now we can insert the stepper drivers and the Arduino in place. Then we need connect the power plug and the power switch to the terminal blocks, connect the cables to the stepper motors on one side and connect them to the PCB on the other side. The servo is connected to digital pin number 2 and powered with the 5V coming from the LM7805 voltage regulator. Finally we can select stepper resolution by connecting the resolution pins below the drivers.
I decided to use 16th step resolution so we need to connect the right pins instead of the middle ones as seen on the photo above. So the electronic components are now ready and we can move on with programming the wire bending machine.
Arduino Code for 3D Wire Bending Machine Project
As the code is a bit longer, for better understanding, I will post the source code of the program in sections with description for each section. And at the end of this article I will post the complete source code.
For controlling the stepper motors I will use the AccelStepper library by Mike McCauley. So we need to include this library, as well as the servo library for controlling the servo motor. Then we need to define the pins to which the steppers are connected and some variables needed for the program below.
#include <AccelStepper.h>
#include <Servo.h>

#define limitSwitch 11

// Define the stepper motors and the pins the will use
AccelStepper feederStepper(1, 5, 6); // (Type:driver, STEP, DIR)
AccelStepper zAxisStepper(1, 7, 8);
AccelStepper benderStepper(1, 9, 10);

Servo servo01;
String dataIn = "";
String manualStatus = "";
int count = 0;
int dist;
In the setup section we set the initial position of the servo or the bending pin, and also set the initial position of the bender gear. This is done with the help of the limit switch. The stepper rotates toward the switch and once it’s pressed the motor starts counting the steps from zero and position itself to zero degrees, ready for bending.
void setup() {
  Serial.begin(9600);
  pinMode(limitSwitch, INPUT_PULLUP);
  servo01.attach(2);
  servo01.write(40); // Initial position, bending pin up
  // Stepper motors max speed
  feederStepper.setMaxSpeed(2000);
  zAxisStepper.setMaxSpeed(2000);
  benderStepper.setMaxSpeed(2000);
  // Homing
  while (digitalRead(limitSwitch) != 0) {
    benderStepper.setSpeed(1200);
    benderStepper.runSpeed();
    benderStepper.setCurrentPosition(0); // When limit switch pressed set position to 0 steps
  }
  delay(40);
  // Move 1400 steps from the limit switch to starting position
  while (benderStepper.currentPosition() != -1400) {
    benderStepper.setSpeed(-1200); // if negative rotates anti-clockwise
    benderStepper.run();
  }
  benderStepper.setCurrentPosition(0);
}
Now in the loop section, we wait for commands coming from the serial monitor. If we type manual, we will enter the manual bending mode or if we type for example star, the start() custom function will be executed and the machine will automatic make a star form for us.
void loop() {
  String mode = Serial.readString();
  if (mode.startsWith("manual")) {
    manual();
  }
  if (mode.startsWith("star")) {
    star();
  }
  if (mode.startsWith("cube")) {
    cube();
  }
  if (mode.startsWith("stand")) {
    stand();
  }
}
Let’s take a look at this custom function.
void star() {
  while (count != 5) {
    int feed = 38; //  mm
    int feedDistance = feed * 48; // 48- constats that map the mm value to number of steps the stepper show move
    while (feederStepper.currentPosition() != feedDistance) { // run until it reaches the distance value
      feederStepper.setSpeed(1200);
      feederStepper.run();
    }
    feederStepper.setCurrentPosition(0); // reset the current position to 0
    servo01.write(40); // Set the bender pin up
    delay(200);
    int angleConst = 18; // angle constant
    // Bend the wire 52 degrees
    while (benderStepper.currentPosition() != -52 * angleConst) {
      benderStepper.setSpeed(-700);
      benderStepper.run();
    }
    benderStepper.setCurrentPosition(0);
    delay(100);
    // Go back 52 degrees to initial position
    while (benderStepper.currentPosition() != 52 * angleConst) {
      benderStepper.setSpeed(1200);
      benderStepper.run();
    }
    benderStepper.setCurrentPosition(0);
    delay(100);
    // Feed the same distance again
    while (feederStepper.currentPosition() != feedDistance) {
      feederStepper.setSpeed(1200);
      feederStepper.run();
    }
    feederStepper.setCurrentPosition(0);
    delay(100);
    servo01.write(130); // Set the bender pin down
    delay(200);
    // Set bender to new initial position, for bending in the other direction
    while (benderStepper.currentPosition() != -42 * angleConst) {
      benderStepper.setSpeed(-1200);
      benderStepper.run();
    }
    benderStepper.setCurrentPosition(0);
    delay(200);
    servo01.write(40); // Bender pin up
    delay(200);
    while (benderStepper.currentPosition() != 105 * angleConst) {
      benderStepper.setSpeed(700);
      benderStepper.run();
    }
    benderStepper.setCurrentPosition(0);
    delay(50);
    while (benderStepper.currentPosition() != -63 * angleConst) {
      benderStepper.setSpeed(-1200);
      benderStepper.run();
    }
    delay(100);
    servo01.write(130);
    benderStepper.setCurrentPosition(0);
    count++;
  }
}
So here we enter a while loop which is executed 5 times, because obviously the star has 5 points. We start by setting the feed value, or that’s how much wire will be feed in millimeters. This value is then multiplied by 48 which translates feed value into appropriate steps for the stepper motor to move. Then using the run() function, we rotate the feeder motor with a speed set by the setSpeed() function. We stops when the above feedDistance value is reached, and right after that we set the current position value of the stepper zero.
int feed = 38; //  mm
    int feedDistance = feed * 48; // 48- constats that map the mm value to number of steps the stepper show move
    while (feederStepper.currentPosition() != feedDistance) { // run until it reaches the distance value
      feederStepper.setSpeed(1200);
      feederStepper.run();
    }
    feederStepper.setCurrentPosition(0); // reset the current position to 0
In the next step we bend the wire 52 degrees. This is done in similar way as explained above. Here we also have an angle constant which is multiplied with the desired angle. Once that value is reached by the motor, the motor stops, reset its current position to 0, and then runs the same number of steps in the opposite direction which actually returns the motor to its initial position.
// Bend the wire 52 degrees
    while (benderStepper.currentPosition() != -52 * angleConst) {
      benderStepper.setSpeed(-700);
      benderStepper.run();
    }
    benderStepper.setCurrentPosition(0);
    delay(100);
    // Go back 52 degrees to initial position
    while (benderStepper.currentPosition() != 52 * angleConst) {
      benderStepper.setSpeed(1200);
      benderStepper.run();
    }
    benderStepper.setCurrentPosition(0);
    delay(100);
Then again we feed the same length of wire and we set the pin down so that the bender can move to a new initial position which is used for bending in the other direction. The bender pin is then raised, and so we bend the wire 105 degrees in the opposite direction. The commands are repeated 5 times and that’s how we get the star form.
In similar way as explained above we make the cube shape or actually any other shape we can come up with. As for the manual mode, the working principle of the commands are the same, except that we have few more lines for reading the commands coming from the serial monitor. For example for feeding the wire, we need to type “f”, plus the distance in millimeters, for bending the wire, we need to type “b”, plus the angle in degrees, and for rotating the Z-axis, we need to type “z”, plus the angle in degrees.
if (dataIn.startsWith("f")) {
      dataInS = dataIn.substring(1, dataIn.length()); // reads the feed value
      dist = dataInS.toInt();
      Serial.print("Feed ");
      Serial.print(dist);
      Serial.println("mm wire.");
      dist = dist * 48;
      while (feederStepper.currentPosition() != dist) {
        feederStepper.setSpeed(1200);
        feederStepper.run();
      }
      feederStepper.setCurrentPosition(0);
      delay(100);
    }
So that’s how the program that I made works, but of course, there are many other ways this to be coded. Here’s the complete Arduino code for this 3D Wire Bending Machine:
/*
  Arduino 3D Wire Bending Machine
  by Dejan Nedelkovski
  www.HowToMechatronics.com
  Library - AccelStepper by Mike McCauley:
  http://www.airspayce.com/mikem/arduino/AccelStepper/index.html
*/

#include <AccelStepper.h>
#include <Servo.h>

#define limitSwitch 11

// Define the stepper motors and the pins the will use
AccelStepper feederStepper(1, 5, 6); // (Type:driver, STEP, DIR)
AccelStepper zAxisStepper(1, 7, 8);
AccelStepper benderStepper(1, 9, 10);

Servo servo01;
String dataIn = "";
String manualStatus = "";
int count = 0;
int dist;

void setup() {
  Serial.begin(9600);
  pinMode(limitSwitch, INPUT_PULLUP);
  servo01.attach(2);
  servo01.write(40); // Initial position, bending pin up
  // Stepper motors max speed
  feederStepper.setMaxSpeed(2000);
  zAxisStepper.setMaxSpeed(2000);
  benderStepper.setMaxSpeed(2000);
  // Homing
  while (digitalRead(limitSwitch) != 0) {
    benderStepper.setSpeed(1200);
    benderStepper.runSpeed();
    benderStepper.setCurrentPosition(0); // When limit switch pressed set position to 0 steps
  }
  delay(40);
  // Move 1400 steps from the limit switch to starting position
  while (benderStepper.currentPosition() != -1400) {
    benderStepper.setSpeed(-1200); // if negative rotates anti-clockwise
    benderStepper.run();
  }
  benderStepper.setCurrentPosition(0);
}

void loop() {
  String mode = Serial.readString();
  if (mode.startsWith("manual")) {
    manual();
  }
  if (mode.startsWith("star")) {
    star();
  }
  if (mode.startsWith("cube")) {
    cube();
  }
  if (mode.startsWith("stand")) {
    stand();
  }
}
void star() {
  while (count != 5) {
    int feed = 38; //  mm
    int feedDistance = feed * 48; // 48- constats that map the mm value to number of steps the stepper show move
    while (feederStepper.currentPosition() != feedDistance) { // run until it reaches the distance value
      feederStepper.setSpeed(1200);
      feederStepper.run();
    }
    feederStepper.setCurrentPosition(0); // reset the current position to 0
    servo01.write(40); // Set the bender pin up
    delay(200);
    int angleConst = 18; // angle constant
    // Bend the wire 52 degrees
    while (benderStepper.currentPosition() != -52 * angleConst) {
      benderStepper.setSpeed(-700);
      benderStepper.run();
    }
    benderStepper.setCurrentPosition(0);
    delay(100);
    // Go back 52 degrees to initial position
    while (benderStepper.currentPosition() != 52 * angleConst) {
      benderStepper.setSpeed(1200);
      benderStepper.run();
    }
    benderStepper.setCurrentPosition(0);
    delay(100);
    // Feed the same distance again
    while (feederStepper.currentPosition() != feedDistance) {
      feederStepper.setSpeed(1200);
      feederStepper.run();
    }
    feederStepper.setCurrentPosition(0);
    delay(100);
    servo01.write(130); // Set the bender pin down
    delay(200);
    // Set bender to new initial position, for bending in the other direction
    while (benderStepper.currentPosition() != -42 * angleConst) {
      benderStepper.setSpeed(-1200);
      benderStepper.run();
    }
    benderStepper.setCurrentPosition(0);
    delay(200);
    servo01.write(40); // Bender pin up
    delay(200);
    while (benderStepper.currentPosition() != 105 * angleConst) {
      benderStepper.setSpeed(700);
      benderStepper.run();
    }
    benderStepper.setCurrentPosition(0);
    delay(50);
    while (benderStepper.currentPosition() != -63 * angleConst) {
      benderStepper.setSpeed(-1200);
      benderStepper.run();
    }
    delay(100);
    servo01.write(130);
    benderStepper.setCurrentPosition(0);
    count++;
  }
}

void cube() {
  int feed = 40; //  mm
  int feedDistance = feed * 48;
  int angleConst = 16;
  // Step 1
  while (count != 3) {
    while (feederStepper.currentPosition() != feedDistance) {
      feederStepper.setSpeed(1200);
      feederStepper.run();
    }
    feederStepper.setCurrentPosition(0);
    delay(100);
    while (benderStepper.currentPosition() != -90 * angleConst) {
      benderStepper.setSpeed(-700);
      benderStepper.run();
    }
    benderStepper.setCurrentPosition(0);
    delay(100);
    while (benderStepper.currentPosition() != 90 * angleConst) {
      benderStepper.setSpeed(1200);
      benderStepper.run();
    }
    benderStepper.setCurrentPosition(0);
    delay(100);
    count++;
  }
  count = 0;
  // Step 2
  while (zAxisStepper.currentPosition() != 88 * angleConst) {
    zAxisStepper.setSpeed(500);
    zAxisStepper.run();
  }
  zAxisStepper.setCurrentPosition(0);
  delay(100);
  //Step 3
  while (count != 2) {
    while (feederStepper.currentPosition() != feedDistance) {
      feederStepper.setSpeed(1200);
      feederStepper.run();
    }
    feederStepper.setCurrentPosition(0);
    delay(100);
    while (benderStepper.currentPosition() != -90 * angleConst) {
      benderStepper.setSpeed(-700);
      benderStepper.run();
    }
    benderStepper.setCurrentPosition(0);
    delay(100);
    while (benderStepper.currentPosition() != 90 * angleConst) {
      benderStepper.setSpeed(1200);
      benderStepper.run();
    }
    benderStepper.setCurrentPosition(0);
    delay(100);
    count++;
  }
  count = 0;
  // Step 4
  while (zAxisStepper.currentPosition() != 85 * angleConst) {
    zAxisStepper.setSpeed(500);
    zAxisStepper.run();
  }
  zAxisStepper.setCurrentPosition(0);
  delay(100);
  // Step 5
  servo01.write(130);
  delay(200);
  while (benderStepper.currentPosition() != -42 * angleConst) {
    benderStepper.setSpeed(-1200);
    benderStepper.run();
  }
  benderStepper.setCurrentPosition(0);
  while (count != 3) {
    delay(100);
    servo01.write(40);
    delay(200);
    // Step 6
    while (feederStepper.currentPosition() != feedDistance) {
      feederStepper.setSpeed(1200);
      feederStepper.run();
    }
    feederStepper.setCurrentPosition(0);
    delay(100);
    while (benderStepper.currentPosition() != 90 * angleConst) {
      benderStepper.setSpeed(700);
      benderStepper.run();
    }
    benderStepper.setCurrentPosition(0);
    delay(100);
    while (benderStepper.currentPosition() != -90 * angleConst) {
      benderStepper.setSpeed(-1200);
      benderStepper.run();
    }
    benderStepper.setCurrentPosition(0);
    delay(100);
    count++;
  }
  count = 0;
}

void stand() {
  int feed = 20; // mm
  int feedDistance = feed * 48;
  int angleConst = 16;
  // Step 1
  while (feederStepper.currentPosition() != feedDistance) {
    feederStepper.setSpeed(1200);
    feederStepper.run();
  }
  feederStepper.setCurrentPosition(0);
  delay(100);
  while (benderStepper.currentPosition() != -90 * angleConst) {
    benderStepper.setSpeed(-700);
    benderStepper.run();
  }
  benderStepper.setCurrentPosition(0);
  delay(100);
  while (benderStepper.currentPosition() != 90 * angleConst) {
    benderStepper.setSpeed(1200);
    benderStepper.run();
  }
  benderStepper.setCurrentPosition(0);
  delay(100);

  // Step 2
  while (feederStepper.currentPosition() != feedDistance) {
    feederStepper.setSpeed(1200);
    feederStepper.run();
  }
  feederStepper.setCurrentPosition(0);
  delay(100);
  while (benderStepper.currentPosition() != -70 * angleConst) {
    benderStepper.setSpeed(-700);
    benderStepper.run();
  }
  benderStepper.setCurrentPosition(0);
  delay(100);
  while (benderStepper.currentPosition() != 70 * angleConst) {
    benderStepper.setSpeed(1200);
    benderStepper.run();
  }
  benderStepper.setCurrentPosition(0);
  delay(100);

  // Step 3
  feed = 80; // mm
  feedDistance = feed * 48;
  while (feederStepper.currentPosition() != feedDistance) {
    feederStepper.setSpeed(1200);
    feederStepper.run();
  }
  feederStepper.setCurrentPosition(0);
  delay(100);
  // Step 4
  servo01.write(130);
  delay(200);
  while (benderStepper.currentPosition() != -42 * angleConst) {
    benderStepper.setSpeed(-1200);
    benderStepper.run();
  }
  benderStepper.setCurrentPosition(0);
  delay(100);
  servo01.write(40);
  delay(200);
  while (benderStepper.currentPosition() != 108 * angleConst) {
    benderStepper.setSpeed(700);
    benderStepper.run();
  }
  benderStepper.setCurrentPosition(0);
  delay(100);
  while (benderStepper.currentPosition() != -66 * angleConst) {
    benderStepper.setSpeed(-1200);
    benderStepper.run();
  }
  benderStepper.setCurrentPosition(0);

  //Step 5
  servo01.write(130);
  delay(200);
  // Step 6
  feed = 80; // mm
  feedDistance = feed * 48;
  while (feederStepper.currentPosition() != feedDistance) {
    feederStepper.setSpeed(1200);
    feederStepper.run();
  }
  feederStepper.setCurrentPosition(0);
  servo01.write(40);
  delay(200);
  // Step 7
  while (zAxisStepper.currentPosition() != -90 * angleConst) {
    zAxisStepper.setSpeed(-500);
    zAxisStepper.run();
  }
  zAxisStepper.setCurrentPosition(0);
  delay(100);

  // Step 8
  while (benderStepper.currentPosition() != -90 * angleConst) {
    benderStepper.setSpeed(-700);
    benderStepper.run();
  }
  benderStepper.setCurrentPosition(0);
  delay(100);
  while (benderStepper.currentPosition() != 90 * angleConst) {
    benderStepper.setSpeed(1200);
    benderStepper.run();
  }
  benderStepper.setCurrentPosition(0);
  delay(100);
  // Step 6
  feed = 45; // mm
  feedDistance = feed * 48;
  while (feederStepper.currentPosition() != feedDistance) {
    feederStepper.setSpeed(1200);
    feederStepper.run();
  }
  feederStepper.setCurrentPosition(0);
  // Step 10
  while (benderStepper.currentPosition() != -90 * angleConst) {
    benderStepper.setSpeed(-700);
    benderStepper.run();
  }
  benderStepper.setCurrentPosition(0);
  delay(100);
  while (benderStepper.currentPosition() != 48 * angleConst) {
    benderStepper.setSpeed(1200);
    benderStepper.run();
  }
  benderStepper.setCurrentPosition(0);
  delay(100);

  // Step 11
  while (zAxisStepper.currentPosition() != 90 * angleConst) {
    zAxisStepper.setSpeed(500);
    zAxisStepper.run();
  }
  zAxisStepper.setCurrentPosition(0);
  delay(100);
  feed = 80; // mm
  feedDistance = feed * 48;
  while (feederStepper.currentPosition() != feedDistance) {
    feederStepper.setSpeed(1200);
    feederStepper.run();
  }
  feederStepper.setCurrentPosition(0);

  // Step 12
  while (benderStepper.currentPosition() != 110 * angleConst) {
    benderStepper.setSpeed(700);
    benderStepper.run();
  }
  benderStepper.setCurrentPosition(0);
  delay(100);
  while (benderStepper.currentPosition() != -68 * angleConst) {
    benderStepper.setSpeed(-1200);
    benderStepper.run();
  }
  benderStepper.setCurrentPosition(0);
  //Step 13
  servo01.write(130);
  delay(200);
  feed = 80; // mm
  feedDistance = feed * 48;
  while (feederStepper.currentPosition() != feedDistance) {
    feederStepper.setSpeed(1200);
    feederStepper.run();
  }
  feederStepper.setCurrentPosition(0);
  servo01.write(40);
  delay(200);

  // Step 14
  while (benderStepper.currentPosition() != -70 * angleConst) {
    benderStepper.setSpeed(-700);
    benderStepper.run();
  }
  benderStepper.setCurrentPosition(0);
  delay(100);
  while (benderStepper.currentPosition() != 70 * angleConst) {
    benderStepper.setSpeed(1200);
    benderStepper.run();
  }
  benderStepper.setCurrentPosition(0);
  delay(100);

  //Step 15
  feed = 25; // mm
  feedDistance = feed * 48;
  while (feederStepper.currentPosition() != feedDistance) {
    feederStepper.setSpeed(1200);
    feederStepper.run();
  }
  feederStepper.setCurrentPosition(0);
  delay(100);
  // Step 16
  while (benderStepper.currentPosition() != -90 * angleConst) {
    benderStepper.setSpeed(-700);
    benderStepper.run();
  }
  benderStepper.setCurrentPosition(0);
  delay(100);
  while (benderStepper.currentPosition() != 90 * angleConst) {
    benderStepper.setSpeed(1200);
    benderStepper.run();
  }
  benderStepper.setCurrentPosition(0);
  delay(100);

  // Step 17
  while (feederStepper.currentPosition() != feedDistance) {
    feederStepper.setSpeed(1200);
    feederStepper.run();
  }
  feederStepper.setCurrentPosition(0);
}

void manual() {
  int sign;
  String dataInS;
  int angle;
  int angleConst;
  Serial.println("  // MANUAL MODE //");
  while (!dataIn.startsWith("end")) {
    servo01.write(130);
    delay(200);
    dataIn = Serial.readString();
    if (dataIn.startsWith("f")) {
      dataInS = dataIn.substring(1, dataIn.length()); // reads the feed value
      dist = dataInS.toInt();
      Serial.print("Feed ");
      Serial.print(dist);
      Serial.println("mm wire.");
      dist = dist * 48;
      while (feederStepper.currentPosition() != dist) {
        feederStepper.setSpeed(1200);
        feederStepper.run();
      }
      feederStepper.setCurrentPosition(0);
      delay(100);
    }
    if (dataIn.startsWith("b")) {
      if (dataIn.charAt(1) == '-') {
        dataInS = dataIn.substring(2, dataIn.length()); ///reads the angle value
        angle = dataInS.toInt();
        Serial.print("Bend -");
        Serial.print(angle);
        Serial.println(" degrees.");
        angleConst = 16;
        // Set "negative" bending initial position
        while (benderStepper.currentPosition() != -43 * angleConst) {
          benderStepper.setSpeed(-1200);
          benderStepper.run();
        }
        benderStepper.setCurrentPosition(0);
        delay(100);
        servo01.write(40);
        delay(200);
        // Bend the wire
        while (benderStepper.currentPosition() != angle * angleConst) {
          benderStepper.setSpeed(700);
          benderStepper.run();
        }
        benderStepper.setCurrentPosition(0);
        delay(100);
        while (benderStepper.currentPosition() != (-1) * angle * angleConst) {
          benderStepper.setSpeed(-1200);
          benderStepper.run();
        }
        benderStepper.setCurrentPosition(0);
        delay(100);
        servo01.write(130);
        delay(200);
        // Get back to original "positive" bending initial poistion
        while (benderStepper.currentPosition() != 43 * angleConst) {
          benderStepper.setSpeed(1200);
          benderStepper.run();
        }
        benderStepper.setCurrentPosition(0);
        delay(100);
      }
      else {
        dataInS = dataIn.substring(1, dataIn.length());
        angle = dataInS.toInt();
        Serial.print("Bend ");
        Serial.print(angle);
        Serial.println(" degrees.");
        angleConst = 16;
        servo01.write(40);
        delay(200);
        while (benderStepper.currentPosition() != (-1) *angle * angleConst) {
          benderStepper.setSpeed(-700);
          benderStepper.run();
        }
        benderStepper.setCurrentPosition(0);
        delay(100);
        while (benderStepper.currentPosition() != angle * angleConst) {
          benderStepper.setSpeed(1200);
          benderStepper.run();
        }
        benderStepper.setCurrentPosition(0);
        delay(100);
      }
      dataInS = dataIn.substring(2, dataIn.length());
      angle = dataInS.toInt();
      angleConst = 16;
      while (benderStepper.currentPosition() != sign * angle * angleConst) {
        benderStepper.setSpeed(-700);
        benderStepper.run();
      }
      benderStepper.setCurrentPosition(0);
      delay(100);
      while (benderStepper.currentPosition() != sign * angle * angleConst) {
        benderStepper.setSpeed(1200);
        benderStepper.run();
      }
      benderStepper.setCurrentPosition(0);
      delay(100);
    }
    // Z-Axis Control
    if (dataIn.startsWith("z")) {
      if (dataIn.charAt(1) == '-') {
        dataInS = dataIn.substring(2, dataIn.length());
        angle = dataInS.toInt();
        Serial.print("Move Z-Axis -");
        Serial.print(angle);
        Serial.println(" degrees.");
        angleConst = 16;
        while (zAxisStepper.currentPosition() != angle * angleConst) {
          zAxisStepper.setSpeed(500);
          zAxisStepper.run();
        }
        zAxisStepper.setCurrentPosition(0);
        delay(100);
      }
      else {
        dataInS = dataIn.substring(1, dataIn.length());
        angle = dataInS.toInt();
        Serial.print("Move Z-Axis ");
        Serial.print(angle);
        Serial.println(" degrees.");
        angleConst = 16;
        while (zAxisStepper.currentPosition() != (-1) *angle * angleConst) {
          zAxisStepper.setSpeed(-500);
          zAxisStepper.run();
        }
        zAxisStepper.setCurrentPosition(0);
        delay(100);
      }
    }
    manualStatus = dataIn;
  }
}
At the end I would like to point out that the wire straightening system of the wire bending machine is actually not working like it should work, because if I tighten it more, the feeder loses grip and the wire doesn’t move.
For solving this issue you could try to use different, stronger material than the copper tube or make a different feeder system.
So that’s it. I hope you enjoyed this video and learned something new. Feel free to ask any question in the comments section below and check my Arduino Projects Collection.
The post Arduino 3D Wire Bending Machine appeared first on HowToMechatronics.
from HowToMechatronics https://ift.tt/2IUbBNk
No comments:
Post a Comment