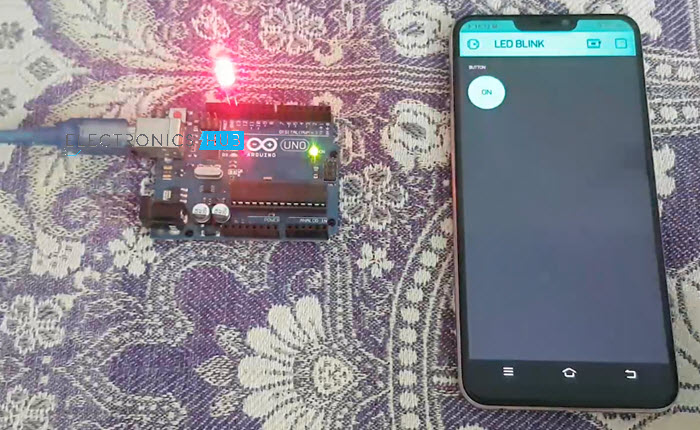
In this project, I will show you How to Remotely Control Arduino using Blynk App on a smartphone. Using this implementation, you can control an Arduino board from anywhere in the World.
Introduction
Previously, I have shown you how to remotely control the Digital IO pins of an Arduino board using Bluetooth, Wi-Fi, Internet etc. In all those project, I was using Arduino with additional components like a Bluetooth Module or a Wi-Fi module (ESP8266) or I was using the ESP8266 Wi-Fi module alone.
But what if you want to control Arduino from anywhere but without adding additional connectivity peripherals? The solution to this is the Blynk Platform. Using Blynk, you can various hardware like Arduino, ESP8266, Raspberry Pi, etc. over a variety of communication protocols.
What is Blynk?
Before getting started with controlling Arduino using Blynk App, I think having a basic understanding of what Blynk is and how it works is a good idea.
Blynk is an IoT (Internet of Things) platform using which you can easily and remotely control hardware. Additionally, you can also view sensor data, store the data, visualize the data etc. all over the internet.
Speaking of hardware, the Blynk platform supports a wide range of boards and MCUs like:
- Arduino UNO, Nano, Mini, Mega, etc. Basically all Arduino boards
- Arduino-like boards like ESP8266 and its variants, Blue Pill (STM32F103C), etc.
- Texas Instruments’ Tiva Boards, MSP432 Launchpad series, etc.
- Raspberry Pi, BeagleBone Black, normal PC (Windows, Linux or Mac), etc.
How Blynk Works?
To understand how the Blynk platform works, you need to know the components of platform. There are three major components in the Blynk Platform. They are:
- Blynk App
- Blynk Server
- Blynk Libraries
The Blynk App, which is available for both Android and iOS, allows the user to create intuitive interfaces for their projects. The Blynk Server is responsible for the communication between your hardware like Arduino and your application on the smartphone.
Finally, the Blynk Libraries allows the hardware to communicate with the server and process all the incoming and outgoing commands.
So, first, your hardware is made ready with the help of the necessary libraries. When a command is given through the Blynk App on your smartphone, like Toggle an LED, it reaches the Blynk Server and gets redirected to your hardware and based on the command received from the server, the hardware responds accordingly.
Different ways to Control Arduino using Blynk
Since Arduino is the hardware of choice in this project, let us see all the different types of connections you can use with Arduino boards that can support Blynk protocol.
Ethernet
You need Ethernet Shields for Arduino like the Arduino Ethernet Shield (W5100) or the SeeedStudio Ethernet Shield V2.0 (W5200).
Bluetooth
HC-05, HC-06 etc. for Bluetooth 2.0 Serial Profile or HC-08, DFRobot BLE-Link module, etc. for BLE profile.
Wi-Fi
Arduino Wi-Fi Shield, ESP8266 as Wi-Fi Modem, Adafruit CC3000 WiFi Breakout board etc. for Wi-Fi based communication.
GSM / 3G / LTE
GSM Modems like SIM800A, SIM900A, Adafruit FONA GSM breakout board etc. for cellular based communication.
USB
If you don’t have any of the above mentioned communication systems, you can still use the Blynk Protocol with Arduino using an USB (Serial Communication) connection with a Laptop / PC.
How to Remotely Control Arduino using Blynk App?
Now that I have given a brief introduction about Blynk in general, let us proceed with understanding how to control Arduino with Blynk App.
Getting Started with Blynk App
The first step is install the Blynk App on your smartphone. You might have to register with a valid e-mail ID to completely utilize the Blynk services.
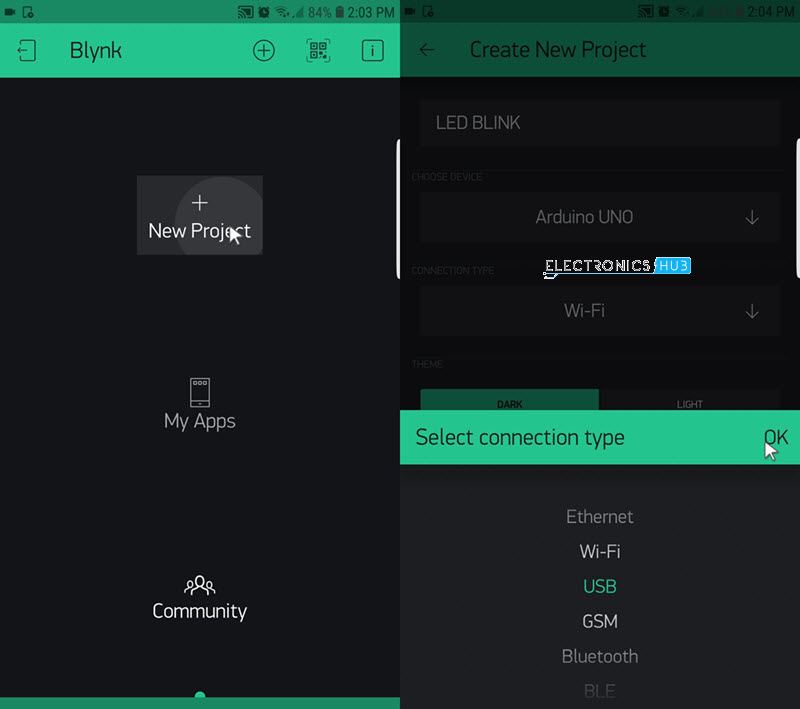
Install the Blynk app from App Store or Google Play Store depending on your device. Open the app and enter your credentials, if required. Then select “New Project”. Provide an appropriate name to your project and also select the hardware i.e. Arduino UNO in this case.
Additionally, you have to select the type of connection you are going to use. So, select “USB”. Then click on “Create” option. Your Blynk project will be created and an Authentication Token will be sent to the registered e-mail address. Make a note of this Auth Token.
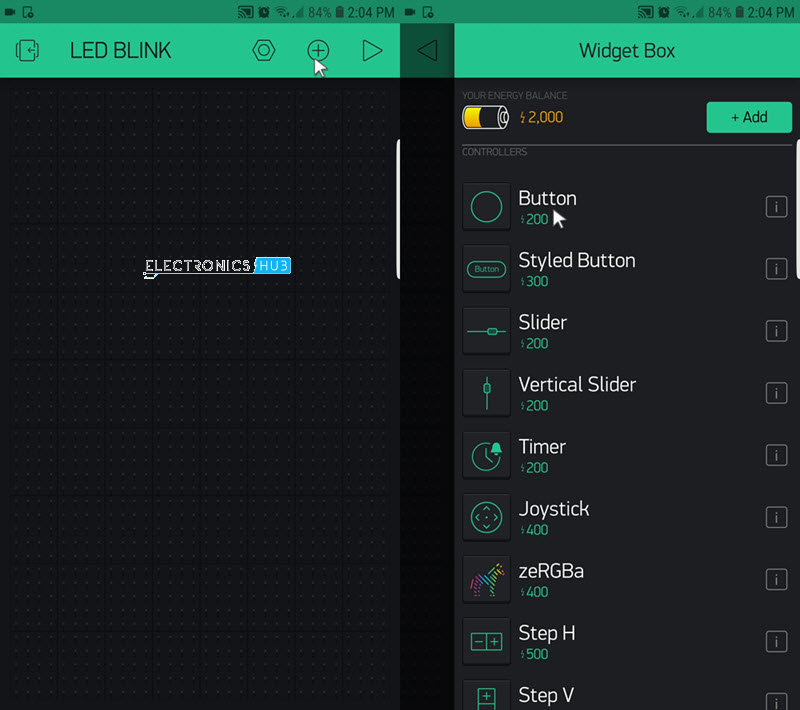
In the project space, select the “+” symbol to add a widget to your project. Since I will toggling an LED connected to one of the Digital IO pins of Arduino, I will select a “Button”.
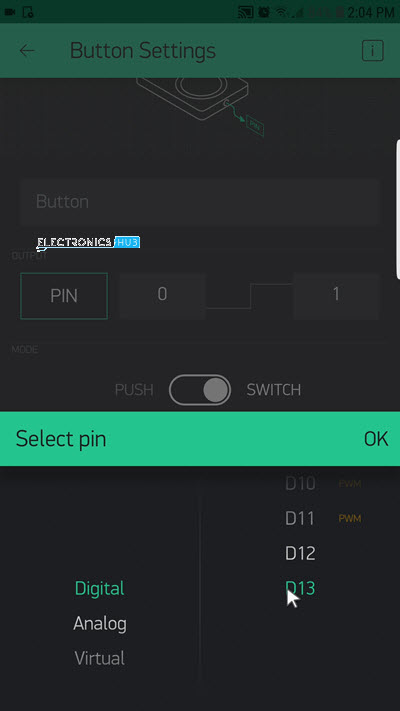
Select the Button to change its settings. First, select the LED Pin of Arduino. I have used the onboard LED of Arduino UNO. So, select “PIN” and set “Digital” and “D13”.
Also, the mode of the button can set as “Switch”, for toggle action.
That is it. The Blynk App is set. Now let us proceed with installing the libraries.
Installing Blynk Libraries
Go to the official GitHub page of Blynk or follow this link and download the latest release. At the time of writing, the latest release is Blynk_Release_v0.6.1. Download the zip file. Extract the contents of the zip file and copy the contents of the “libraries” folder and paste them into the libraries folder of Arduino. In my case this is “C:\Program Files (x86)\Arduino\libraries”.
Uploading the Code to Arduino
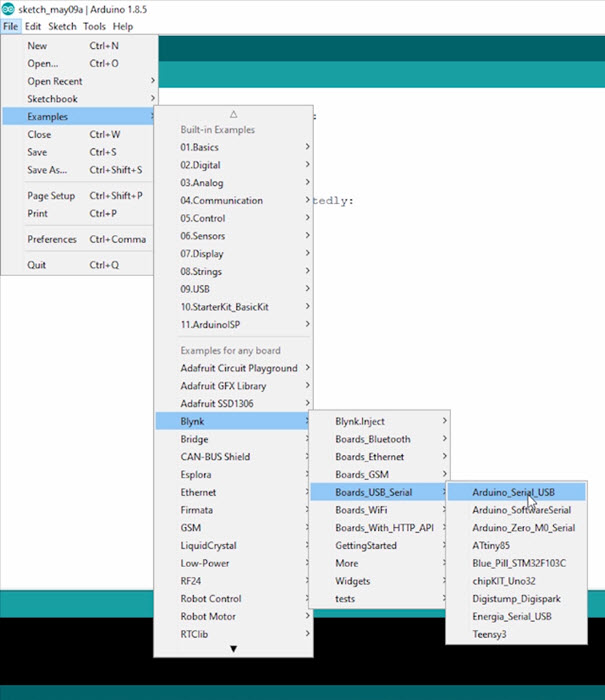
Open Arduino IDE and select File –> Examples –> Blynk –> Boards_USB_Serial –> Arduino_Serial_USB sketch.
Scroll down to the line that says ‘char auth[]=”YourAuthToken”;’, and add the Auth Token you received in mail in place of YourAuthToken. Select the correct COM Port (COM5 in my case) and upload the sketch to Arduino.
Controlling Arduino using Blynk through USB (Serial)
You are almost ready to control your Arduino Board. The final step is run a small script in your laptop / PC. Open Command Prompt with Administrator Privileges and change the working directory to “C:\Program Files (x86)\Arduino\libraries\Blynk\scripts” using the cd command.
If you open this folder in the explorer, you can view some script files written in Python, Shell, Batch, etc. Since I am on a Windows machine, I will be using the .bat file. In the command prompt (with the working directory set as mentioned above), enter the following and hit enter.
blynk-ser.bat –c COM5
Here, COM5 is the COM Port to with Arduino UNO is connected to in my case. Make sure to check your COM Port and make necessary changes in the above line. What this does is that it allows the Blynk Server to communicate with the device connected to COM5 of this PC. Since Arduino is connected in our case, Blynk will be able to control Arduino Board.
Now, open the Blynk App on your Phone and press of the button to see the LED ON and OFF according to the status of the Button.
Once you are done, you have to stop the script and release the COM Port. To do this, enter “ctlr+c” in the command prompt and select Y to terminate the job.
The post How to Remotely Control Arduino using Blynk App? appeared first on Electronics Hub.
from Electronics Hub http://bit.ly/2vR65W0
No comments:
Post a Comment