In this tutorial, I will talk about the millis function in Arduino, how it works, what are its benefits and finally, how can we use Arduino Millis function efficiently to introduce the concept of Multitasking in Arduino.
Traditional Programming
Before I begin the Arduino Millis Tutorial, let me show a simple example circuit and code that you might be following till now.
Assume, Arduino UNO board and in that board, a user LED is connected to Digital IO pin 13. The following code is a simple Blink Code that Blinks the LED connected to Pin 13 of Arduino UNO.
In this code, the Arduino UNO is configured to make the Digital IO pin 13 HIGH for a second and LOW for a second and this process repeats in a loop.
Delay is the culprit
You might be familiar with the delay() function in the Arduino environment. From the day go with Arduino, delay is one of the first function you come across. It is a simple function that is associated with timing.
Using the delay function is simple and straightforward: mention the amount of time in milliseconds in the delay function and your microcontroller holds its operations for that period of time.
There seems no problem with this approach but if you observe or understand closely how delay works internally, you will get to know the disadvantage of delay.
When the delay function with a value is called, Arduino enters into a busy state and suspends all activity until that time is finished. During this state i.e. during the execution of the delay function, Arduino cannot perform any other tasks, like reading a button for example.
The following is a possible code for delay that keeps the processor busy.
NOTE: This is in fact the main delay code I use in my 8051 Microcontroller projects. The combination of 250 and 248 in the for loops take approximately 1millisecond of the controller’s execution time. If I run this loop for 1000 times, I get a delay of approximately 1000ms or 1 second.
How Arduino benefits by avoiding Delay?
Arduino is a microcontroller based system that performs simple tasks based on a single program. There is no operating system involved with Arduino and hence you cannot run multiple programs on Arduino.
Does this mean we are struck with just one program that runs over and over? The simple answer is yes. But this doesn’t mean that we cannot program Arduino to handle multiple tasks.
In order to program Arduino to manage many tasks (many tasks in a single program), functions like delay, which engage the processor is a busy state, must be avoided. So, get ready to ditch the delay.
Meet Millis the Delay Killer
Now that we have understood that using delay function in our Arduino programs must be avoided, how can we achieve the same functionality without actually using the delay?
In order to achieve the functionality of timing, the simple process is to keep track of a clock at regular intervals. If you regularly check a clock, you can easily know when is the time to act on something.
This is possible in Arduino with the help of millis function.
Before actually talking about the mechanism responsible for this, let me show you the code for blinking an LED without using the delay function.
Blinking an LED without using Delay
The following is a simple for blinking an LED connected to Pin 13 of Arduino to blink without using the delay function.
Arduino Millis Tutorial
If you try the above mentioned code for blinking the LED, it will work flawlessly. But in order to understand more, you need to get to know the Arduino Millis function.
According to the literature provided by Arduino, millis is an Arduino function that returns the present time in milliseconds from the moment the Arduino board is powered on or reset.
The return value of millis is number of milliseconds through an unsigned long variable since the program in Arduino started. The reason I mentioned the return type as unsigned long is because if you use this return types, you can keep track of the time for almost 50 days, after which the value resets to 0.
If you try to use any other return type like int or signed long, you may get logical errors or less duration.
Arduino Millis Example
The following code shows the usage of millis function in Arduino.
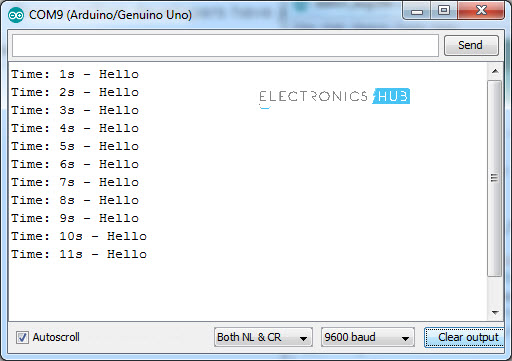
This code prints the text “Hello” on the Serial Monitor for each second. The following image shows the output on the Serial Monitor.
Arduino Millis Applications
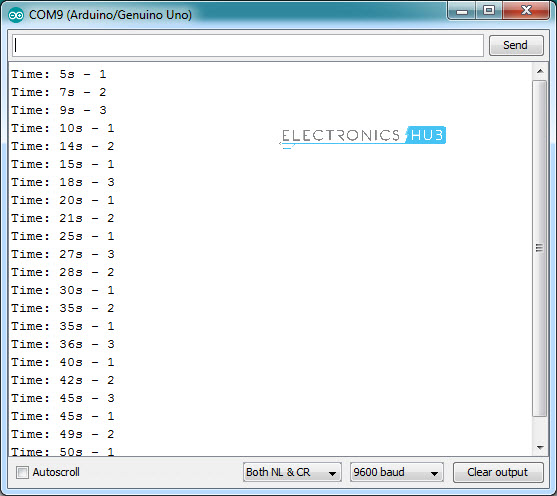
Using millis in Arduino allows you to be more creative than before. Consider an application where you want to print MESSAGE1 for every 5 seconds, MESSAGE2 for every 7 seconds and a MESSAGE3 for every 9 seconds.
You can implement this type of functionality in Arduino with the help of millis function but it is not possible delay.
Here is a screen shot of the output of the above code for the first 50 seconds.
Future implementations of millis
In the beginning of this tutorial, I have talked about multitasking in Arduino. In the next tutorial, I will talk about that and how can we achieve multitasking in Arduino using millis.
The post Arduino Millis Tutorial – Millis() the Delay Killer appeared first on Electronics Hub.
from Electronics Hub https://ift.tt/2MwJTdB
No comments:
Post a Comment