In this project, we will learn about 128×64 Graphics Display, how to interface a 128×64 OLED Graphic Display with Arduino and finally I will display few graphical images and text on this display using Arduino UNO. So, let’s get started.
The main limitation of 16×2 LCD displays is that you are constrained to displaying just numbers and alphabets and if you want to display small graphical images, then the struggle begins.
Here comes the 128×64 Graphics OLED Display to the rescue. It is a tiny little display module that can be used to display small graphical images easily using Arduino (or any other microcontroller).
This is a monochrome OLED Display with while light and since it is an OLED display, there is no concept of backlight as individual pixel is self-illuminating. This 128×64 Pixel OLED Display measures about 0.96” diagonally. So, you can understand by this dimension that it is a fairly small display module.
NOTE: I am not sure whether there is any voltage regulator on the board so I have connected it to 3.3V supply (as the OLED Driver/Controller IC is rated for 3.3V). Some boards include a voltage regulator.
Any display module must have an appropriate Driver/Controller Module associated with it. In case of our traditional 16×2 LCD Displays, it is HD44780 IC. Coming to the 128×64 OLED Display module, the Driver module is SSD1306 from Solomon Systech.
This particular driver IC is suitable for driving OLEDs and PLEDs of a resolution of 128×64 Pixels.
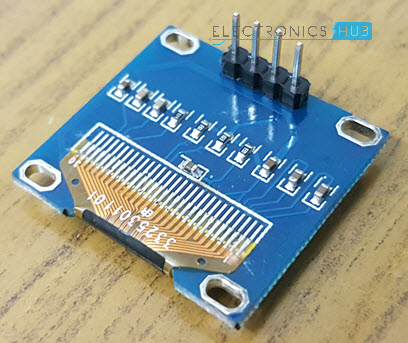
The SSD1306 OLED Driver IC supports various interfaces like Parallel, 4-wire SPI, 3-wire SPI and I2C. This particular OLED Graphic Display which I am using has pins for I2C Communication and interfacing with Microcontrollers.
First thing is the power supply. Find out the power supply requirements of your board and connected to appropriate power supply pin i.e. 5V or 3.3V.
The next important thing is the communication interface. Some modules come with both SPI and I2C Interface pins on board. Check out the pins on your board and proceed with the interface of your choice.
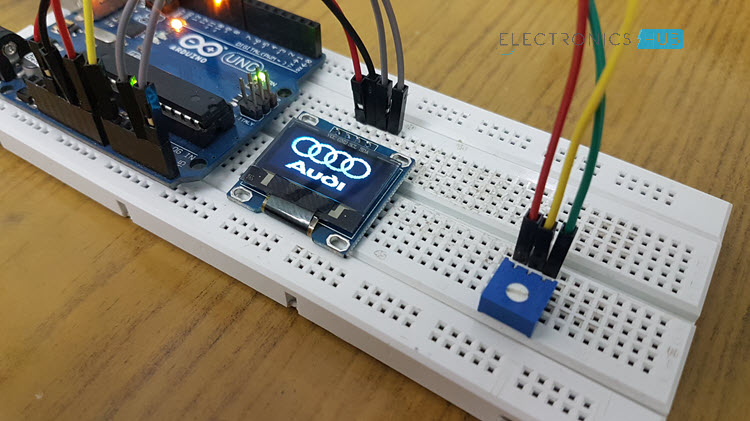
In my case, I have connected the OLED Display Module to 3.3V Supply and as my board has only I2C Communication i.e. SDA and SCL Pins, I have used the same.
Finally, using appropriate libraries with your Arduino IDE. I will talk about the libraries and special tools in the Code section.
Optional Connection: Just to demonstrate the output, I have connected a 10KΩ POT to A0 of Arduino (with its other terminals being connected to 5V and GND).
These libraries are developed by Adafruit and are called Adafruit_SSD1306 and Adafruit_GFX. You can download these libraries from the following links: Adafruit_SSD1306 and Adafruit-GFX-Library.
Download the zip files, extract the contents and place them in libraries folder of Arduino.
The second important thing is that if you want to display any small graphical images, you need to convert them to byte arrays. There are many tools but I have used this online tool.
First, convert your image to a bitmap image (.bmp) file using photoshop or paint. It is important that your image is of the same resolution as you OLED Display i.e. 128×64 in my case.
IMPORTANT NOTE: Before uploading the code, you need to set the resolution of your OLED Display i.e. whether 128×64 or 128×32 by commenting/uncommenting the appropriate value in the Adafruit_SSD1306.h file in the libraries. Do not forget this step.
The post Interfacing 128×64 OLED Graphic Display with Arduino – Hook-up Guide & Tutorial appeared first on Electronics Hub.
from Electronics Hub https://ift.tt/2MHyNDp
Introduction
In almost all the projects that I have implemented so far, I have used the traditional 16×2 Alphanumeric LCD Display to display any vital information from Arduino. It is a great display option if your requirement is to display number and alphabets (and a few special characters as well) in your project.The main limitation of 16×2 LCD displays is that you are constrained to displaying just numbers and alphabets and if you want to display small graphical images, then the struggle begins.
Here comes the 128×64 Graphics OLED Display to the rescue. It is a tiny little display module that can be used to display small graphical images easily using Arduino (or any other microcontroller).
A Brief Note on 0.96 inch 128×64 OLED Graphic Display
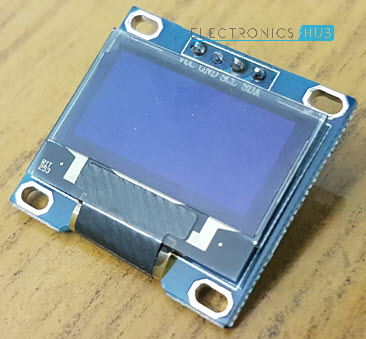
Before discussing about the 128×64 Graphical OLED Display Module and interfacing it with Arduino, let me show you the module used in this project. The following image shows a typical 0.96” OLED Graphic Display Module with a resolution of 128×64 Pixels.This is a monochrome OLED Display with while light and since it is an OLED display, there is no concept of backlight as individual pixel is self-illuminating. This 128×64 Pixel OLED Display measures about 0.96” diagonally. So, you can understand by this dimension that it is a fairly small display module.
NOTE: I am not sure whether there is any voltage regulator on the board so I have connected it to 3.3V supply (as the OLED Driver/Controller IC is rated for 3.3V). Some boards include a voltage regulator.
Any display module must have an appropriate Driver/Controller Module associated with it. In case of our traditional 16×2 LCD Displays, it is HD44780 IC. Coming to the 128×64 OLED Display module, the Driver module is SSD1306 from Solomon Systech.
This particular driver IC is suitable for driving OLEDs and PLEDs of a resolution of 128×64 Pixels.
The SSD1306 OLED Driver IC supports various interfaces like Parallel, 4-wire SPI, 3-wire SPI and I2C. This particular OLED Graphic Display which I am using has pins for I2C Communication and interfacing with Microcontrollers.
Interfacing 128×64 OLED Graphic Display with Arduino
Now that we have seen a little bit about the 0.96” OLED Display, let us now proceed with interfacing a 0.96” 128×64 OLED Graphic Display with Arduino. There are two important things to remember before proceeding with the interface.First thing is the power supply. Find out the power supply requirements of your board and connected to appropriate power supply pin i.e. 5V or 3.3V.
The next important thing is the communication interface. Some modules come with both SPI and I2C Interface pins on board. Check out the pins on your board and proceed with the interface of your choice.
In my case, I have connected the OLED Display Module to 3.3V Supply and as my board has only I2C Communication i.e. SDA and SCL Pins, I have used the same.
Finally, using appropriate libraries with your Arduino IDE. I will talk about the libraries and special tools in the Code section.
Circuit Diagram
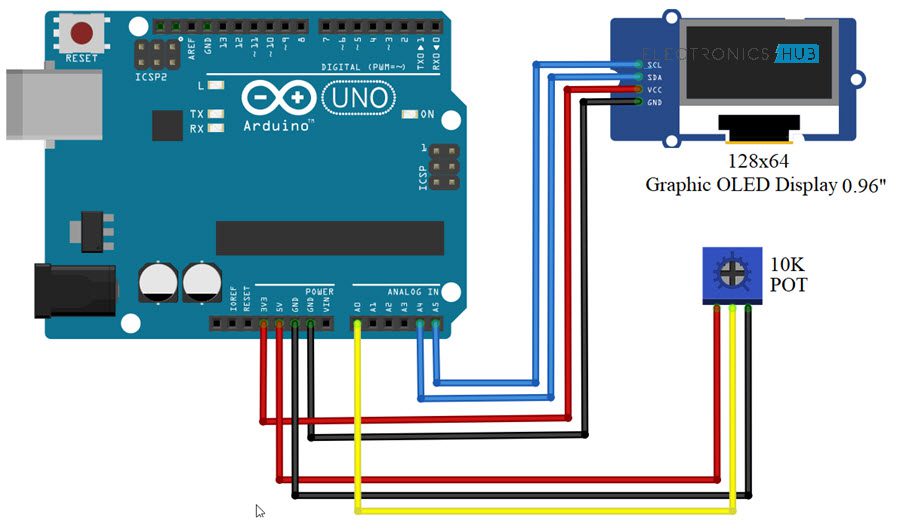
The circuit diagram for interfacing 128×64 OLED Graphic Display with Arduino UNO is shown in the following image.Components Required
- Arduino UNO
- Monochrome 0.96” 128×64 OLED Graphic Display
- Breadboard
- Connecting Wires
- 10KΩ Potentiometer (optional)
Circuit Design
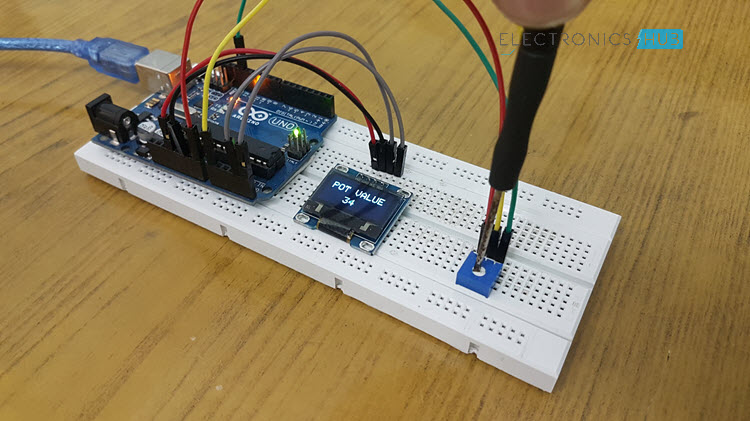
Connect the VCC and GND of the OLED display to 3.3V and GND of Arduino. Then the connect the SDA and SCL pin of the display module to A4 and A5 (Analog Inputs) of Arduino UNO.Optional Connection: Just to demonstrate the output, I have connected a 10KΩ POT to A0 of Arduino (with its other terminals being connected to 5V and GND).
Download Necessary Libraries
Before looking at the code, you need to gather a few things. First thing is the libraries used to drive the OLED Display. You need to download two special libraries: one is for the SSD1306 OLED Driver and the other is for all the Graphics related functions like drawing lines, pixels, circles etc.These libraries are developed by Adafruit and are called Adafruit_SSD1306 and Adafruit_GFX. You can download these libraries from the following links: Adafruit_SSD1306 and Adafruit-GFX-Library.
Download the zip files, extract the contents and place them in libraries folder of Arduino.
The second important thing is that if you want to display any small graphical images, you need to convert them to byte arrays. There are many tools but I have used this online tool.
First, convert your image to a bitmap image (.bmp) file using photoshop or paint. It is important that your image is of the same resolution as you OLED Display i.e. 128×64 in my case.
Code
I have used two codes in the project. One code is just for displaying few random graphical images of different logos and the other code is to display the value read from the Potentiometer connected to Arduino. I have included both the codes.IMPORTANT NOTE: Before uploading the code, you need to set the resolution of your OLED Display i.e. whether 128×64 or 128×32 by commenting/uncommenting the appropriate value in the Adafruit_SSD1306.h file in the libraries. Do not forget this step.
Code for Logo
Code for POT Value
The post Interfacing 128×64 OLED Graphic Display with Arduino – Hook-up Guide & Tutorial appeared first on Electronics Hub.
from Electronics Hub https://ift.tt/2MHyNDp
No comments:
Post a Comment