In this project, I will show you how to Send an Email using ESP8266. For this project, I will be using the DFRobot FireBeetle ESP8266 IoT Board. Sending an e-mail with the help of the ESP8266 Module will be a step forward in the IoT Implementation.
Introduction
With Internet of Things (IoT) expanding, the scope of the IoT applications is growing from controlling appliances to monitoring devices (like sensors) and sending e-mails.
By sending e-mails from you ESP8266 Module, you can know the status of any sensor you are monitoring or you can receive an emergency e-mail in case of burglary or an intruder alert.
So, without further delay, let me show you all the steps required to Send an Email using ESP8266 WiFi Module.
ESP8266 Board
As said earlier, I will be using the DFRobot FireBeetle ESP8266 board in this project to send e-mails. You can use any ESP8266 Module and I have tested this procedure with my ESP-01 ESP8266 Board and it worked just fine.
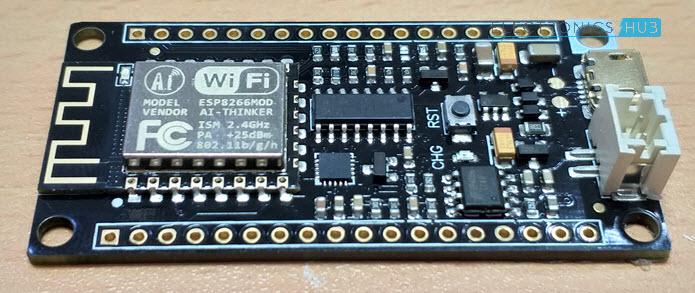
Since the DFRobot FireBeetle ESP8266 board has all the required components like the MicroUSB Port, 3.3V Regulator, etc. I don’t need to make any extra connections with respect to the board.
All I need to do is to plug-in a MicroUSB cable in the port and connect it to a computer (with the drivers being already installed and Arduino IDE is already setup).
This is one of the main reasons for choosing the DFRobot FireBeetle ESP8266 board over my regular ESP-01 Module.
So, I suggest you to go through the hook-up guide of the DFRobot FireBeetle ESP8266 board as described in the following project: DFROBOT FIREBEETLE ESP8266 REVIEW AND HOOK-UP GUIDE.
SMTP Server Setup
In order to send e-mails from ESP8266 Module, you need to follow the SMTP protocol. Hence, an SMTP Server is required to send the e-mails and the ESP8266 will act as an SMTP Client.
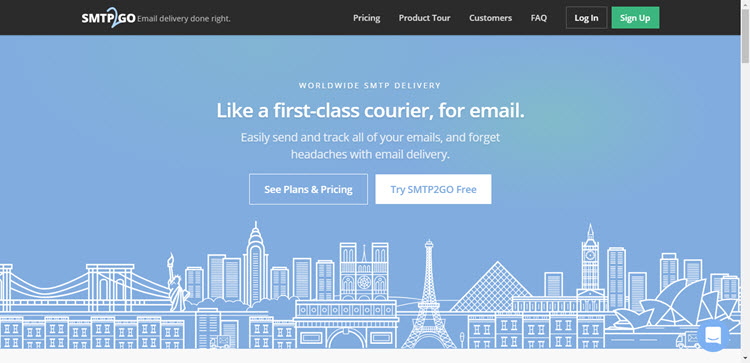
I have tried the Gmail’s SMTP Settings several times to send email using ESP8266 but it was not fruitful. So, I have decided to use a third-party SMTP Server and I found “SMTP2GO” as a reliable choice.
So, go to the SMTP2GO website and register with a free account. After creating an account, the first step is to create the SMTP Username and SMTP Password. In fact, the moment you confirm your e-mail address and first login to SMTP2GO, this is the information that you’ll get.
Leave the username as it is i.e. the e-mail address and change the SMTP Password with your own choice. Note that this is SMTP Password and is different from the SMTP2GO Login Password.
Make a note of the two i.e. SMTP Username and SMTP Password.
Now, enter the dashboard of the SMTP2GO app and on the left access bar, click on “Settings” and then on “Users”.
In that, you can see the information regarding the SMTP Server and PORT number. It is usually as follows:
- SMTP Server: mail.smtp2go.com
- SMTP PORT: 2525
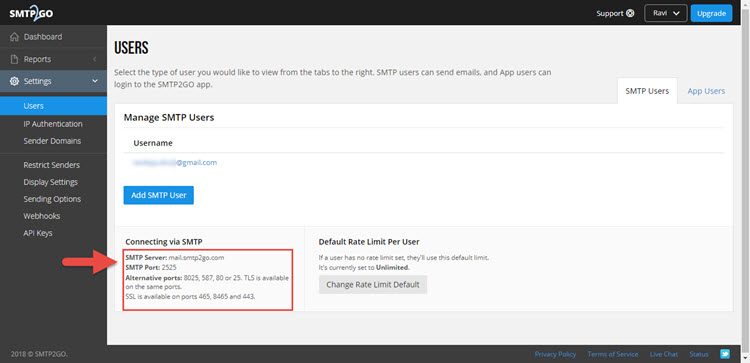
Note down this information as you need to use this data in the code.
Encoding Username and Password
You need to encode your SMTP Username and SMTP Password to Base64 format with ASCII Character Set. For this, you can either use an Arduino Library or a website called BASE64ENCODE.
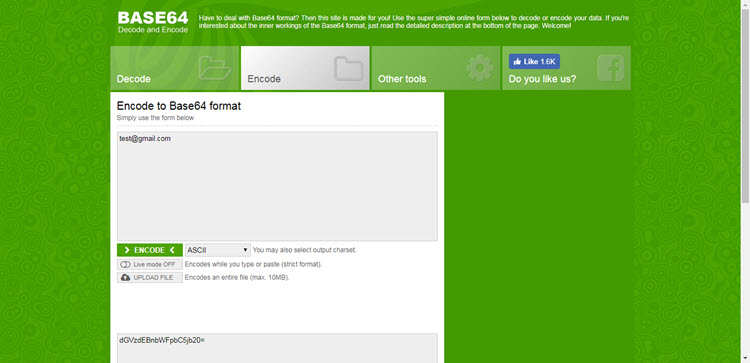
Enter your SMTP Username and Password separately and note the encoded content. For example, if your email address is test@gmail.com, it would be encoded as dGVzdEBnbWFpbC5jb20=.
And if your password is “testpassword” (excluding the quotes), it would be encoded as dGVzdHBhc3N3b3Jk.
Code
Now, let me show you the necessary code in order to Send an Email using ESP8266.
In the code, make necessary changes like SSID, Password of your WiFi Connection, Sender and Receiver E-Mail Address, Base64 Encoded SMTP Username and SMTP Password.
Explanation of the Code
The initial section of the code is simple used to connect the ESP8266 WiFi Module to the Internet. If the connection is successful, you will get an IP Address.
Next is the actual code for sending the e-mail. The code can be divided into 8 stages.
Stage 1: In stage 1, you will be connecting to the SMTP Server on a PORT. This is done using the command client.connect(SMTP_SERVER, SMTP_PORT). In response, you will get a 220 code.
Stage 2: Greet the SMTP Server with EHLO Command (Previously HELO Command). The command is client.println(“EHLO www.example.com”);
If the connection is successful, you will get a 250 Response Code.
Stage 3: Stage 3 is to authorize the user with AUTH LOGIN Command. The command is client.println(“AUTH LOGIN”);. You will get a Response 334 for success.
Stage 4: Send the encoded SMTP Username and Password one after the other. The commands are client.println(“Base64, ASCII encoded username”); and client.println(“Base64, ASCII encoded password”);.
If the authentication is success, you will get a 235 Response.
Stage 5: Now its time to send the mail from string where you have to enter the sender’s email address using the format MAIL FROM:<”+String(from)+’>’;.
The command is client.println(“MAIL From: sender@gmail.com”);
Stage 6: Then send the rcpt to string using the format RCPT TO:<”+String(to)+’>’;. The command is client.println(“RCPT To: receiver@gmail.com”);.
Stage 7: Send the “DATA” followed by the Message body of the e-mail. The commands are
client.println(“DATA”);
client.println(“To: receiver@gmail.com”);
client.println(“From: sender@gmail.com”);
client.println(“Subject: ESP8266 test e-mail\r\n”);
client.println(“This is is a test e-mail sent from ESP8266.\n”);
client.println(“Second line of the test e-mail.”);
stage 8: Finally, terminate the mail with “.” and send the quit command.
client.println(“.”);
client.println(“QUIT”);
All these commands and responses will be shown in the serial monitor of the Arduino IDE.
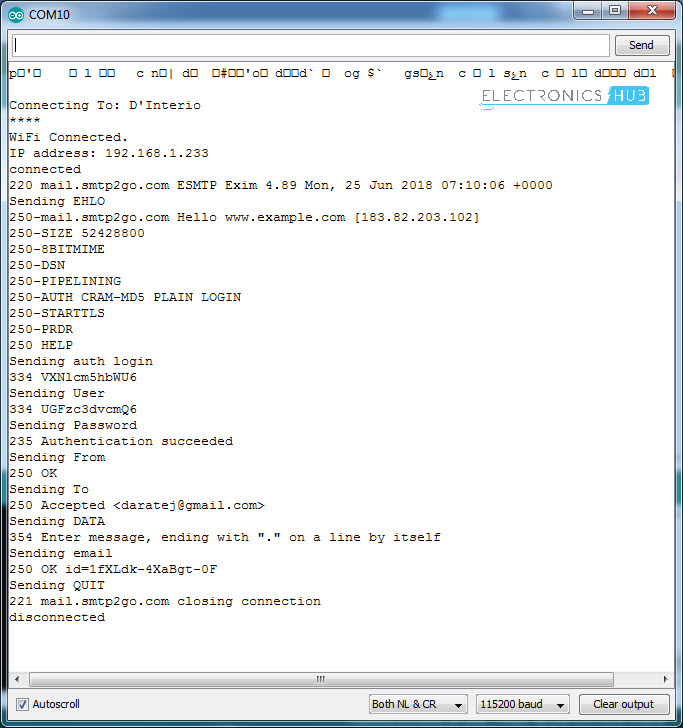
If you follow all the mentioned steps, you will be able send an email using ESP8266 successfully.
The post How to Send an Email using ESP8266 WiFi Module? appeared first on Electronics Hub.
from Electronics Hub https://ift.tt/2MnjviK
Excellent article, to send an email using an ESP8266 Wifi module. Especially thanks for using the images, snippets, and base64 encoding. And at the end, explaining the code, for better understanding.
ReplyDelete