This example shows how to use the tone() command to play different notes on multiple outputs.
The tone() command works by taking over one of the Atmega's internal timers, setting it to the frequency you want, and using the timer to pulse an output pin. Since it's only using one timer, you can only play one note at a time. You can, however, play notes on different pins, sequentially. To do this, you need to turn the timer off for one pin before moving on to the next.
Thanks to Greg Borenstein for clarifying this.
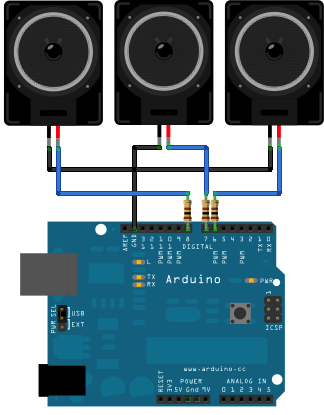 image developed using Fritzing. For more circuit examples, see the Fritzing project page
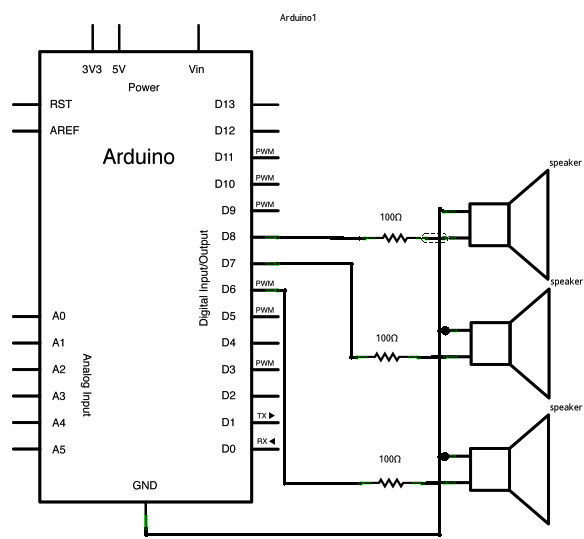
Here's the main sketch:
The tone() command works by taking over one of the Atmega's internal timers, setting it to the frequency you want, and using the timer to pulse an output pin. Since it's only using one timer, you can only play one note at a time. You can, however, play notes on different pins, sequentially. To do this, you need to turn the timer off for one pin before moving on to the next.
Thanks to Greg Borenstein for clarifying this.
Hardware Required
- Arduino or Genuino Board
- 3 8 ohm speakers
- 3 100 ohm resistor
- hook-up wires
- breadboard
Circuit
Schematic
click the image to enlargeCode
The sketch below plays a tone on each of the speakers in sequence, turning off the previous speaker first. Note that the duration of each tone is the same as the delay that follows it.Here's the main sketch:
/*
Multiple tone player
Plays multiple tones on multiple pins in sequence
circuit:
- three 8 ohm speakers on digital pins 6, 7, and 8
created 8 Mar 2010
by Tom Igoe
based on a snippet from Greg Borenstein
This example code is in the public domain.
http://www.arduino.cc/en/Tutorial/Tone4
*/
void setup() {
}
void loop() {
// turn off tone function for pin 8:
noTone(8);
// play a note on pin 6 for 200 ms:
tone(6, 440, 200);
delay(200);
// turn off tone function for pin 6:
noTone(6);
// play a note on pin 7 for 500 ms:
tone(7, 494, 500);
delay(500);
// turn off tone function for pin 7:
noTone(7);
// play a note on pin 8 for 300 ms:
tone(8, 523, 300);
delay(300);
}
No comments:
Post a Comment